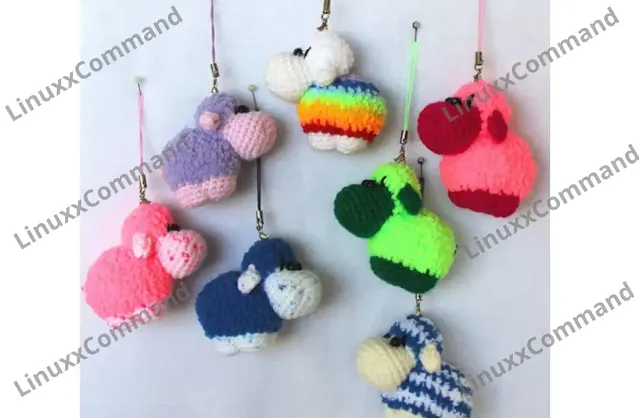
Hello amigurumi lovers and beautiful visitors
I wanted to share the free amigurumi patterns for you here. In my article, I will share 1 pattern and how to make it for you. At the end of my article, I will share amigurumi patterns that can generate ideas for you.
Materials and Tools
- Yarn Nako Bambino (muzzle and paws)
- Yarn Alize Softy (head and body)
- Thread for embroidery muzzle
- Hook 1.75 mm
- Eyes for toys
- Filler for toys
- Bubenchik
- Keychain accessories
- Needle for sewing details
- Scissors
Conventions
- KA – amigurumi ring
- vp – air loop
- sc – single crochet
- ssn – double crochet
- pr – increase
- ub – beauty
- (…) xn – repeat n times
Head
We start knitting with smooth threads.
- 1st row: 4 ch, 2 sbn in the second loop from the hook, 1 sbn, 3 sbn in the last loop. Next, we knit on the other side of the chain: 1 sc, 1 sc in the first loop of the chain (8)
- 2nd row: (inc) x 2 times, 1 sc, (inc) x 3 times, 1 sc, inc (14)
- 3rd row: (1 sc, inc) x 2 times, 1 sc, (1 sc, inc) x 3 times, 2 sc, inc (20)
- 4th row: (3 sc, inc, 5 sc, inc) x 2 times (24)
- 5-7 rows: 24 sc
- 8th row: (2 sc, dec) x 6 times (18)
- 9th row: 18 sc
- 10th row: (2 sc, inc) x 6 times (24) Cut a smooth thread, tie a fluffy one.
- 11-12 rows: 24 sc
- 13th row: (2 sc, dec) x 6 times (18)
- 14th row: (1 sc, dec) x 6 times (12)
Now you need to fill your head with holofiber. Straighten the filler inside, soften the part and form a beautiful muzzle.
- 15th row: decrease until the hole is closed
Break the thread, hide the tail.
Legs + Torso
We knit first with smooth, then fluffy threads:
- 1st row: 6 sc in KA or in VP
- 2nd row: (pr) x 6 times (12)
- 3rd row: 1 sc, inc, (2 sc, inc) x 3 times, sc (16)
- 4th row: 1 sc, inc x 2 times, (2 sc, inc x 2 times) x 3 times, sc (24)
Due to the additions in the corners, the part should tend to a square shape. You can even pull on the corners to make it look more like a square.
- 5th row: 24 sbn for the back half-loop of the previous row
- 6-7 rows: 24 sbn. Cut the smooth thread, tie the fluffy one.
- 8th row: (3 sc, inc) x 6 times (30)
- 9th row: (4 sc, inc) x 6 times (36)
- 10th row: 36 sc
- 11th row: (4 sc, dec) x 6 times (30)
- 12th row: (3 sc, dec) x 6 times (24)
- 13th row: (2 sc, dec) x 6 times (18)
- 14th row: (1 sc, dec) x 6 times (12), fill the part with holofiber.
- 15th row: decrease until the hole is closed
Fasten the thread, cut, hide the tail.
Ears (2 parts)
We knit with smooth threads.
- 1st row: 4 sbn in the KA or in the air loop
- The part is not closed in a circle! Turn knitting.
- 2nd row: inc, (2 dc in the next loop) x 2 times, inc
Cut the thread, fold the edge of the eyelet in half, sew.
Assembling and Decorating Toys
In the narrowest place of the muzzle, we make a small tightening of the place of the eyes (with one stitch, capturing 2-3 sc). We bring the thread to the base of the head.
With the same thread we form the nostrils (symmetrically, approximately in the 4th row from the beginning of knitting) and the mouth. Then it will be possible to slightly tint them with pastels, shadows, or a pencil. You can not pull the nose, but embroider with contrasting threads in the shape of the letter Y.
In the place of tightening with a black thread, we sew beads-eyes. We embroider eyebrows with it.
Approximately at eye level, we sew the ears to the fluffy part of the head so that they “look” to the sides or down.
Forming the Legs of the Lamb
We bring the thread out of the ringlet of the first row, insert it at the border of smooth and fluffy yarn and again we bring it out in the ringlet, making a tightening with one stitch. We repeat three more times. The tie-downs lie down in a cross and should pass in the middle of each side of the square that we formed at the beginning of knitting the torso.
The thread needs to be fixed and brought out to where the lamb will have a butt. There we knit 5-6 air loops with the same thread and sew the chain with a loop.
We sew the head firmly to the body at the angle that you like best.
Feel free to tag me (@freeamigurumii) in your photos on Instagram or Facebook if you’d like!
All Finished.


0 Comments:
Post a Comment