Top Ad 728x90

Search results for Amigurumi Llama Free Crochet Pattern

by


Hello dear friends,

One of the free amigurumi crochet patterns we will share today is the Llama, whose photos and design belong to Svetlana Mametova (VK). You can learn how to crochet this adorable llama using the free amigurumi pattern below. A big thank you to Svetlana Mametova for this cute Llama design!

Designer: Svetlana Mametova

Instagram: @mametova.svetlana

Amigurumi cats, amigurumi dolls, amigurumi dogs, amigurumi unicorns, amigurumi lambs, amigurumi dinosaurs, amigurumi foxes, amigurumi bears, amigurumi giraffes, amigurumi pigs, amigurumi birds, amigurumi penguins, amigurumi panda, amigurumi llama, amigurumi bunny, amigurumi clowns, amigurumi elephants, amigurumi hippos, amigurumi monkeys will not be difficult for you if you follow these patterns. Enjoy crocheting!

Materials:

  • Yarn: YarnArt Dolce and YarnArt Jeans
  • Hook size: 2.5-3.5 mm for plush yarn, 2.0-2.5 mm for cotton yarn
  • Black safety eyes or beads
  • Black cotton yarn or embroidery floss for nose and mouth
  • Tapestry needle and scissors
  • Stitch marker
  • Fiberfill

Abbreviations:

  • R = row
  • mc = magic circle
  • ch = chain
  • sc = single crochet
  • inc = 2 sc in the next stitch
  • dec = single crochet 2 stitches together
  • (12) = number of stitches you should have at the end of the round/row
  • (…) * 6 = repeat whatever is between the brackets the number of times stated
  • F.o. = finish off

AMIGURUMI LLAMA FREE PATTERN

Ears (make 2)

With semi-cotton yarn and 2.0 mm crochet hook:

  • R 1: 6 sc in mc (6)
  • R 2: 6 sc
  • R 3: (2 sc, inc) * 2 (8)
  • R 4: (1 sc, inc) * 4 (12)
  • R 5-10: 12 sc (6 rows)

Don’t stuff with fiberfill. F.o. and leave a long tail for sewing.

Muzzle

With semi-cotton yarn and 2.0 mm crochet hook:

  • R 1: 6 sc in mc (6)
  • R 2: (inc) * 6 (12)
  • R 3: (1 sc, inc) * 6 (18)
  • R 4: (2 sc, inc) * 6 (24)
  • R 5-6: 24 sc (2 rows)

F.o. and leave a long tail for sewing.

Arms (make 2)

Start crocheting with semi-cotton yarn and 2.0 mm crochet hook:

  • R 1: 6 sc in mc (6)
  • R 2: (1 sc, inc) * 3 (9)
  • R 3-14: 9 sc (12 rows)

Change to plush yarn and 2.5 mm crochet hook:

  • R 15: 9 sc
  • R 16: (2 sc, inc) * 3 (12)
  • R 17-19: 12 sc (3 rows)
  • R 20: (2 sc, dec) * 3 (9)

F.o.

Legs, Body, and Head (One Piece)

Legs (make 2)

Start crocheting with semi-cotton yarn and 2.0 mm crochet hook:

  • R 1: 5 sc in mc (5)
  • R 2: (inc) * 5 (10)
  • R 3-15: 10 sc (13 rows)

Change to plush yarn and 2.5 mm crochet hook:

  • R 16: 10 sc
  • R 17: (2 sc, inc) * 3, 1 sc (13)
  • R 18-21: 13 sc (4 rows)

F.o.

Don’t cut the yarn when you finish the second leg! From the second leg: 1 ch and join it with the first leg. Continue crocheting the body in the round:

  • R 1: on the 1st leg: inc, 11 sc, inc, 1 sc in 1 ch, on the 2nd leg: inc, 11 sc, inc, 1 sc in 1 ch (opposite side) (32)
  • R 23-25: 32 sc (3 rows)
  • R 26: (3 sc, dec) * 6, 2 sc (26)
  • R 27: 26 sc
  • R 28: (2 sc, dec) * 6, 2 sc (20)
  • R 29: dec, 18 sc (19)
  • R 30: dec, 17 sc (18)
  • R 31: 18 sc

Stuff with fiberfill the body and legs (only the plush part).

  • R 32-33: Attach arms on the sides of the body (crochet sc of the body together with sc of the arm). Don’t stuff the arms with fiberfill (18)
  • R 34: (1 sc, dec) * 6 (12)
  • R 35-39: 12 sc (5 rows) – it’s the neck
  • R 40: (1 sc, inc) * 6 (18)
  • R 41: (2 sc, inc) * 6 (24)
  • R 42: (4 sc, dec) * 4 (20)
  • R 43-46: 20 sc (4 rows)

Insert safety eyes between R 45 and R 46 at the distance of 3 sc from each other.

  • R 47: (2 sc, dec) * 5 (15)
  • Finish stuffing.
  • R 48: (1 sc, dec) * 5 (10)
  • R 49: (dec) * 5 (5)

F.o.

Assembly

  • Sew the muzzle to the head between R 40 and R 44. Put some stuffing inside the muzzle before you finish.
  • Sew on the ears that are folded together on the bottom.
  • Embroider the nose and mouth with black yarn or floss as shown in the pictures.

Enjoy crocheting your Llama! 😊

Amigurumi Chihuahua Dog Crochet Pattern

by


Hello amigurumi lovers and beautiful visitors! I wanted to share the free amigurumi patterns for you here. In this article, I will share one pattern and how to make it. At the end of the article, I’ll also include other amigurumi patterns that can inspire you!

Supplies

  • 4mm crochet hook
  • 4/Medium weight yarn in any desired colors for body & collar
  • 8mm safety eyes
  • Safety nose
  • Black embroidery thread
  • Tapestry needle
  • Scissors
  • Stuffing

Additional Information

Difficulty: Easy

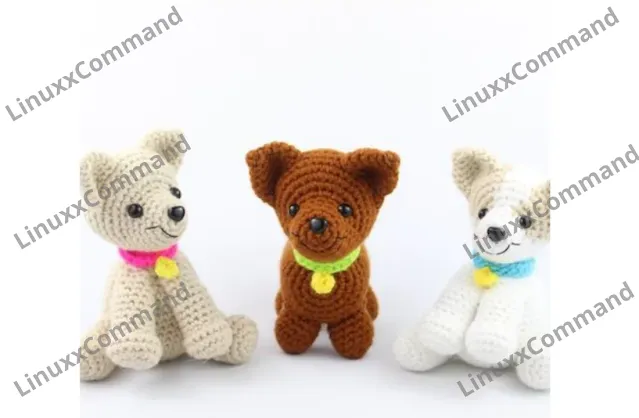
This pattern is for a cute chihuahua! There are two types of bodies you can make: a "sitting" body and a "standing" body. The legs you make will depend on the body you decide to make. Please see the photos in the pattern to decide which body you want to make.

For colors, “Main Color” refers to the color you want the chihuahua to be. You can incorporate color changes if you desire, but this pattern is to make one full-colored chihuahua with no color changes.

We start by making the nose, which leads into the head. Then, we make the ears and assemble the face. Next, we create the body, arms, legs, and tail. After we assemble the body and sew the head on, we create the collar. Then we are done!

Head

In Main Color

  1. Round 1: 6 Sc in Magic Ring (6)
  2. Round 2: *Inc* all around (12)
  3. Round 3: *Inc, Sc in next 3 St* 3 times (15)
  4. Round 4: *Sc* all around (15)
  5. Round 5: *Inc, Sc in next 4 St* 3 times (18)
  6. Round 6: Sc in next 6 St, Sc in next St, add different St marker to Sc just made. Sc in next 4 St, Sc in next St and add different colored St marker to Sc just made, Sc in next 6 St (18)
  7. Round 7: Sc in next 6 St, *Inc* in the next 6 St, Sc in last 6 St (24)
  8. Round 8: Sc in next 6 St, *Inc, Sc in next St* 6 times, Sc in last 6 St (30)
  9. Round 9: *Inc, Sc in next 4 St* 6 times (36)
  10. Round 10-14: *Sc* all around (36)
  11. Round 15: *Dec, Sc 4* all around (30)
  12. Round 16: *Dec, Sc 3* all around (24)
  13. Round 17: *Dec, Sc 2* all around (18)
  14. Stuff here. Add in Safety Eyes & Place Safety Nose.
  15. Round 18: *Dec, Sc* all around (12)
  16. Round 19: *Dec* all around (6)
  17. Add any additional stuffing and finish off. Sew closed.

Ears: (Make 2)

In Main Color

  1. Round 1: 4 Sc in Magic Ring (4)
  2. Round 2: *Sc* all around (4)
  3. Round 3: *Inc* all around (8)
  4. Round 4: *Inc, Sc* all around (12)
  5. Round 5: *Inc, 2 Sc* all around (16)
  6. Round 6-7: *Sc* all around (16)
  7. Finish off and pin to the head. Make sure to have ears bend inside in the middle for definition.

Smile Assembly: With Black Embroidery Thread

Insert needle adjacent to safety nose, about 4 stitches away. Pull needle out about 2 stitches away. Reinsert needle back through first insertion. Now pull needle through to other side of mouth, and repeat as steps 1-2. Now insert needle in the middle of the mouth, directly underneath the nose. Pull needle to left smile crease. Finally, insert needle to the other half of the smile. Pull through and sew in loose ends.

Chihuahua Bodies

There are 2 types of bodies: the “sitting” body and the “standing” body. The limbs you make will depend on the type of body you make. Below are the instructions for both types.

Sitting Body

In Main Color

  1. Round 1: 6 Sc in Magic Ring (6)
  2. Round 2: *Inc* all around (12)
  3. Round 3: *Inc, Sc* all around (18)
  4. Round 4: *Inc, 2 Sc* all around (24)
  5. Round 5: *Inc, 3 Sc* all around (30)
  6. Round 6: *Inc, 4 Sc* all around (36)
  7. Round 7: *Inc, 5 Sc* all around (42)
  8. Round 8: *Inc, 6 Sc* all around (48)
  9. Round 9-11: *Sc* all around (48)
  10. Round 12: *Dec, Sc 6* all around (42)
  11. Round 13-15: *Sc* all around (42)
  12. Round 16: *Dec, Sc 5* all around (36)
  13. Round 17-18: *Sc* all around (36)
  14. Round 19: *Dec, Sc 4* all around (30)
  15. Round 20: *Sc* all around (30)
  16. Round 21: *Dec, Sc 3* all around (24)
  17. Round 22: *Dec, Sc 2* all around (18)
  18. Stuff here
  19. Round 23: *Dec, Sc* all around (12)
  20. Round 24: *Dec* all around (6)
  21. Finish off and add any additional stuffing. Sew closed.

Legs: (Make 2)

Make these legs for the sitting body. In Main Color

  1. Round 1: 6 Sc in Magic Ring (6)
  2. Round 2: *Inc* all around (12)
  3. Round 3: *Inc, Sc* all around (18)
  4. Round 4: *Sc* all around (18)
  5. Round 5: Sc in next 3 st, Dec 1 time, Sc in next 13 st (17)
  6. Round 6: Sc 1, *Dec* 3 times, Sc in next 10 st (14)
  7. Round 7: Sc 2, *Dec* 1 time, Sc in next 10 st (13)
  8. Round 8-12: *Sc* all around (13)
  9. Finish off and stuff. Pin to the bottom part of the body.

Arms: (Make 2)

Make these Arms for the sitting body. In Main Color

  1. Round 1: 6 Sc in Magic Ring (6)
  2. Round 2: *Inc* all around (12)
  3. Round 3: *Inc, Sc* all around (18)
  4. Round 4-5: *Sc* all around (18)
  5. Round 6: Sc in next 3 st, Dec 6 times, Sc in next 3 st (12)
  6. Round 7-11: *Sc* all around (12)
  7. Round 12: Sc in next 3 St, *Dec* 1 time, Sc in nest 4 St, *Dec* 1 time, Sc in last St (10)
  8. Round 13-15: *Sc* all around (9)
  9. Finish off and stuff. Pin to the top inner part of the body.

Tail

In Main Color

  1. Round 1: 4 Sc in Magic Ring (4)
  2. Round 2: *Sc* all around (4)
  3. Round 3: *Inc* all around (8)
  4. Round 4-6: *Sc* all around (8)
  5. Finish off. Pin to the back of the body.

Assembly

Reassemble any parts to your liking. Start by sewing on the legs, then the arms, then the tail. Last, sew on the head.

Standing Body:

In Main Color

  1. Round 1: 6 Sc in Magic Ring (6)
  2. Round 2: *Inc* all around (12)
  3. Round 3: *Inc, Sc* all around (18)
  4. Round 4: *Inc, 2 Sc* all around (24)
  5. Round 5: *Inc, 3 Sc* all around (30)
  6. Round 6-21: *Sc* all around (30)
  7. Round 22: *Dec, Sc 3* all around (24)
  8. Round 23: *Dec, Sc 2* all around (18)
  9. Stuff here
  10. Round 24: *Dec, Sc* all around (12)
  11. Round 25: *Dec* all around (6)
  12. Finish off and add any additional stuffing. Sew closed.

Legs: (Make 4)

Make these legs for standing body. In Main Color

  1. Round 1: 6 Sc in Magic Ring (6)
  2. Round 2: *Inc* all around (12)
  3. Round 3-7: *Sc* all around (12)
  4. Finish off and stuff. Pin to the bottom part of the body.

Collar

In any desired color

  1. Round 1: Ch 22
  2. Round 2: Turn, Hdc in 2nd Ch from hook, Hdc in next 20 St (21)
  3. Finish off.

Collar Tag:

In Yellow

  1. Round 1: 6 Sc in Magic Ring (6)
  2. Round 2: Slst to next St. Finish off

Assembly

Insert collar tag in the middle of the collar. Pull yarn through, reinsert into the tag, then reinsert into collar.

Feel free to tag me (@freeamigurumii) in your photos on Instagram or Facebook if you'd like!

All Finished. Enjoy your adorable chihuahua!

MARSHMALLOW UNICORN AMIGURUMI FREE PATTERN

by

Designer: Yelena Kuznetsova

Hello amigurumi lovers…

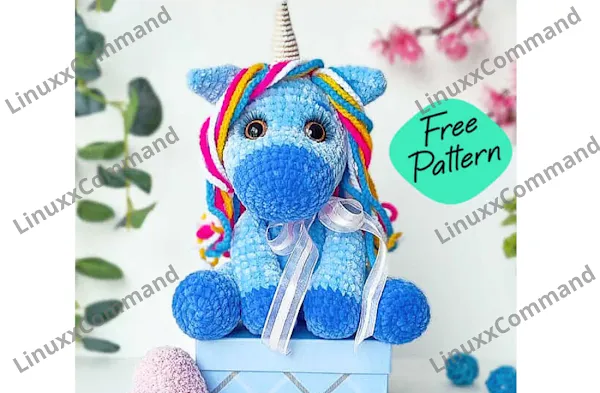
One of the free amigurumi crochet patterns we will share today is the amigurumi unicorn, whose photos and design belong to Yelena Kuznetsova. You can learn how to crochet this unicorn using the free amigurumi pattern. Thanks to Yelena Kuznetsova for this cute unicorn.

Below you will find some information about this pattern. Remember, if you have any problems, you can write to us and ask for help. You can follow our Pinterest account for free amigurumi patterns and great amigurumi ideas. Have fun!

Amigurumi cats, amigurumi dolls, amigurumi dogs, amigurumi unicorns, amigurumi lambs, amigurumi dinosaurs, amigurumi foxes, amigurumi bears, amigurumi giraffes, amigurumi pigs, amigurumi birds, amigurumi penguins, amigurumi panda, amigurumi llama, amigurumi bunny, amigurumi clowns, amigurumi elephants, amigurumi hippos, amigurumi monkeys…

All the amigurumi toys pattern recipes and ideas you are looking for are here…

Materials

  • Yarn Himalaya Dolphin Baby (Himalaya Dolphin Baby) 100g / 120m 1 skein of the main color and a little contrast on the nose and hooves
  • 18mm eyes
  • Synthetic winterizer
  • Glue moment crystal
  • Needle
  • Hook 4 and number 3 for the mane
  • Innovative children’s yarn for mane braiding in various colors
  • White denim yarn a little for the horn
  • Thick cardboard for insoles (optional)

Abbreviations

  • MR: Magic ring
  • ch: Chain
  • sc: Single crochet
  • inc: Increase
  • dec: Decrease
  • hdc: Half double crochet

AMIGURUMI UNICORN FREE CROCHET PATTERN

Legs

Thread of nail color:

  1. 1. 6 sc in MR
  2. 2. (inc)*6=12
  3. 4. (1 sc, inc)*6=18
  4. 5. (2 sc, inc)*6=24
  5. 6-7. 24 sc

Change the line color. An insole can be inserted into the hooves.

  1. 8-9. 24 sc
  2. 10. (2 sc, dec)*6=18
  3. 11-17. 18 sc
  4. 18. (dec, 7 sc)*2=16
  5. 19. 16 sc
  6. 20. (dec, 6 sc)*6=14
  7. 21. 14 sc
  8. 22. Stuff the hulls well. The rest of the leg is loose.
  9. 23. Fold and crochet both sides together 7 sc.

Arms

Thread of nail color:

  1. 1. In MR 6 sc
  2. 2. (inc)*6=12
  3. 3. (1 sc, inc)*6=18
  4. 4. (8 sc, inc)*2=20
  5. 5-6. 20 sc

Changing the yarn.

  1. 7-8. 20 sc
  2. 9. (3 sc, dec)*4=16
  3. 10-14. 16 sc
  4. 15. (6 sc, dec)*2=14
  5. 16-18. 14 sc
  6. 19. (5 sc, dec)*2=12
  7. 20. 12 sc
  8. 21. Fold in half and crochet both sides together 6 sc.

Ears

  1. 1. In MR 6 sc
  2. 2. 6 sc
  3. 3. (1 sc, inc)*3=9
  4. 4. 9 sc
  5. 5. (2 sc, inc)*3=12
  6. 6-7. 12 sc
  7. 8. (dec)*6=6
  8. 9. Fold both sides together, crochet 3 sc.

Horn

White color:

  1. 1. In MR 6 sc
  2. 2. 6 sc
  3. 3. (2 sc, inc)*2=8
  4. 4. 8 sc
  5. 5. (3 sc, inc)*2=10
  6. 6. (4 sc, inc)*2=12
  7. 7. (5 sc, inc)*2=14
  8. 8. (6 sc, inc)*2=16
  9. 9. (7 sc, inc)*2=18
  10. 10. 18 sc
  11. 11. (8 sc, inc)*2=20
  12. 12-16. 20 sc — wrap the horn with a contrasting thread.

Body

  1. 1. In MR 6 sc
  2. 2. (inc)*6=12
  3. 3. (inc)*12=24
  4. 4. (3 sc, inc)*6=30
  5. 5. (4 sc, inc)*6=36
  6. 6-11. 36 sc
  7. 12. 1 sc, dec, 30 sc, dec, 1 sc = 34
  8. 13. 1 sc, dec, 28 sc, dec, 1 sc = 32
  9. 14. 13 sc, (dec)*3, 13 sc = 29
  10. 15. 13 sc, dec, 14 sc = 28
  11. 16. 28 sc
  12. 17. 1 sc, dec, 22 sc, dec, 1 sc = 26
  13. 18. 5 sc, dec, 12 sc, dec, 5 sc = 24
  14. 19. 5 sc, dec, 10 sc, dec, 5 sc = 22
  15. 20. 22 sc
  16. 21-23. 6 hdc, 10 sc, 6 hdc = 22

Head

Nose and fingernail color:

  1. 1. In MR 6 sc
  2. 2. (inc)*6 = 12
  3. 3. (inc)*12 = 24
  4. 4. (3 sc, inc)*6 = 30
  5. 5-7. 30 sc

Change the line to the body color.

  1. 8. 30 sc
  2. 9. (4 sc, inc)*6 = 36
  3. 10-15. 36 sc
  4. 16. 14 sc, (inc, 1 sc)*4, 14 = 40
  5. 17-21. 40 sc
  6. 22. (8 sc, dec)*4 = 36
  7. 23. (4 sc, dec)*6 = 30
  8. 24. (3 sc, dec)*6 = 24
  9. 25. (2 sc, dec)*6 = 18
  10. 26. (1 sc, inc)*6 = 12
  11. 27. (inc)*6 = 6 — Finish and close

Assembly

I crochet a children’s novelty in 2 rows, I crochet chain chains number 3 to the length you want, so that the chain can be folded in half and sewn to the head in the center. The same with the tail.

Sew the ears to the head. Sew the head to the body. The front legs are sewn in the top 4-5 rows. Sew the hind legs to the height you like, try it on so that the unicorn can walk, leaning on them.

Sew the mane starting with 3-4 chains (the more chains you sew, the more magnificent the mane and tail will be).

The beautiful unicorn is complete, congratulations!

Amigurumi Smurf Free Pattern

by

Hello amigurumi lovers and beautiful visitors, I wanted to share the free amigurumi patterns for you here. In my article, I will share one pattern and how to make it for you. At the end of my article, I will share amigurumi patterns that can generate ideas for you.

Materials and Tools

  • Yarn: Blue, White
  • Thread for embroidery of eyebrows and mouth
  • Hook
  • Eyes for toys
  • Filler for toys
  • Needle for sewing details
  • Scissors

Conventions

  • KA: Amigurumi ring
  • vp: Air loop
  • sc: Single crochet
  • pr: Increase
  • ub: Beauty
  • (...) x n: Repeat n times

AMIGURUMI PATTERN

Ears (Make 2 Parts)

In blue yarn:

  1. 1: 6 sc in KA
  2. 2: (sc, inc) x 3 (9)
  3. 3-9: sc
  4. 4: (sc, dec) x 3 (9)

Eyes (Make 2 Parts)

In white yarn:

  1. In KA, make 8 sb, leave a long tail. Use 8 mm eyes.

Head

In blue yarn:

  1. 1: 6 sc in KA
  2. 2: 6 sc (12)
  3. 3: (sc, inc) x 6 (18)
  4. 4: (2 sc, inc) x 6 (24)
  5. 5: (3 sc, inc) x 6 (30)
  6. 6: (4 sc, inc) x 6 (36)
  7. 7-14: 36 sc
  8. 15: (4 sc, dec) x 6 (30)
  9. 16: (3 sc, dec) x 6 (24)
  10. 17: (2 sc, dec) x 6 (18) — Close

Nose

In blue yarn:

  1. 1: 5 sb in KA
  2. 2: 5 sb (10)
  3. 3: 10 sb
  4. 4: 5 dec (5) — Leave a long tail

Body

In white yarn:

  1. 1: 6 sc in KA
  2. 2: 6 sc (12)
  3. 3: (sc, inc) x 6 (18)
  4. 4: (2 sc, inc) x 6 (24)
  5. 5: (3 sc, inc) x 6 (30)
  6. 6-9: 30 sc — Change yarn to blue
  7. 10: Behind the back walls of the loops, 30 sc
  8. 11: 30 sc
  9. 12: (8 sc, dec) x 3 (27)
  10. 13: 27 sc
  11. 14: (7 sc, dec) x 3 (24)
  12. 15: (6 sc, dec) x 3 (21)
  13. 16: (5 sc, dec) x 3 (18) — Leave a long tail

Tail

In white yarn:

  1. 1: 6 sb in KA
  2. 2: 6 sb (12)
  3. 3: 12 sb
  4. 4: 6 dec (6) — Leave a long tail

Handles (Make 2 Parts)

In blue yarn:

  1. 1: 6 sc in KA
  2. 2: (sc, inc) x 3 (9)
  3. 3-9: 9 sc
  4. 10: dec, 7 sc (8)
  5. 11: dec, 6 sc (7) — Leave a long tail

Legs (Make 2 Parts)

In white yarn. Start with 4 ch, from the second loop from the hook:

  1. 1: inc, sc, 3 sc in 1st, on the other side, inc (8)
  2. 2: 2 inc, sc, 3 inc, sc, inc (14)
  3. 3: 2 inc, sc, inc, sc, 2 inc, sc, inc, sc (22)
  4. 4-5: 22 sc
  5. 6: 3 sc, 4 sc, 3 together, dec, 3 together, 4 sc (14)
  6. 7: 7 sc, dec, 4 sc (12)
  7. 8-12: 12 sc
  8. 13: 6 dec (6) — Leave a long tail

Cap

In white yarn:

  1. 1: 6 sc in KA
  2. 2: 6 sc (12)
  3. 3: (sc, inc) x 6 (18)
  4. 4-9: 8 sc
  5. 10: (2 sc, inc) x 6 (24)
  6. 11-12: 24 sc
  7. 13: (3 sc, inc) x 6 (30)
  8. 14: 23 sc, 7 sc together with 9 next
  9. 15-17: 30 sc
  10. 18: (4 sc, inc) x 6 (36)
  11. 19: 36 sc
  12. 20: (5 sc, inc) x 6 (42)
  13. 21: 33 sc, 9 sc together with B36
  14. 22: 42 sc
  15. 23: (6 sc, inc) x 6 (48)
  16. 24-25: 48 sc
  17. 26: 17 sc close

Assembling the Toy

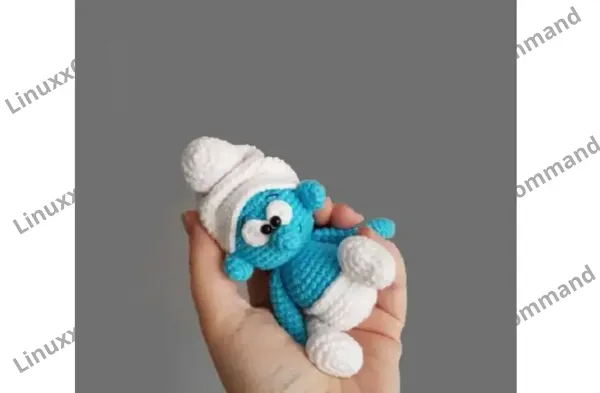
Focusing on the photo, sew all the details, for convenience, fastening them with pins.

Feel free to tag me (@freeamigurumii) in your photos on Instagram or Facebook if you’d like!

All finished.

AMIGURUMI TURTLE FREE PATTERN

by


Designer: Vivir Vintage
Instagram: @vivir_vintage

Hello everyone…
One of the free amigurumi crochet patterns we will share today is the amigurumi turtle, whose photos and design belong to Vivir Vintage. You can learn how to crochet this turtle using the free amigurumi pattern. Thanks to Vivir Vintage (YouTube) for this cute turtle.

Below you will find some information about this pattern. Remember, if you have any problems, you can write to us and ask for help. You can follow our Pinterest account for free amigurumi patterns and great amigurumi ideas. Have fun…

Amigurumi cats, amigurumi dolls, amigurumi dogs, amigurumi unicorns, amigurumi lambs, amigurumi dinosaurs, amigurumi foxes, amigurumi bears, amigurumi giraffes, amigurumi pigs, amigurumi birds, amigurumi penguins, amigurumi panda, amigurumi llama, amigurumi bunny, amigurumi clowns, amigurumi elephants, amigurumi hippos, amigurumi monkeys… All the amigurumi toys pattern recipes and ideas you are looking for are here…

Materials

  • 3.5 gauge light green cotton yarn
  • 3.5 gauge coral cotton yarn
  • 3.5 gauge light yellow cotton yarn
  • 3.5 gauge acqua cotton yarn
  • 3.5 gauge light pink cotton yarn
  • Fiberfill stuffing
  • Scissors
  • 3.5 mm crochet hook
  • Tapestry needle
  • Embroidery needle
  • 8 mm safety eyes

Abbreviations

  • MR: Magic ring
  • Sc: Single crochet
  • Inc: Increase
  • Dec: Decrease
  • Ch: Chain
  • Slst: Slip stitch
  • Dc: Double crochet
  • Hdc: Half double crochet

AMIGURUMI TURTLE CROCHET FREE PATTERN

Head

Light green cotton yarn.

  1. Rnd 1: 6 sc in MR (6)
  2. Rnd 2: 6 inc (12)
  3. Rnd 3: (sc, inc) *6 (18)
  4. Rnd 4: 3 sc, (sc, inc) *3, 3 sc (sc, inc) *3 (24)
  5. Rnd 5: 3 sc, (2 sc, inc) *3, 3 sc (2 sc, inc) *3 (30)
  6. Rnd 6-10: sc in all 30 stitches (30)
  7. Rnd 11: 9 sc (sc, inc) *6, 9 sc (36)
  8. Rnd 12-15: sc in all 36 stitches (36)

Place 2 pins: one in the first inc of rnd 11 and another in the last inc of rnd 11. We are going to use these pins to center the safety eyes on the turtle’s trunk.

Place safety eyes between rounds 10 and 11, leaving 6 stitches apart.

  1. Rnd 16: dec, repeat 18 times (18)
  2. Stuff with fiberfill.
  3. Rnd 17: (sc, dec) *6 (12)
  4. Rnd 18-24: sc in all 12 stitches (12)

Fasten off and leave tail for sewing. Stuff only the head with fiberfill.

Tail

Light green cotton yarn.

  1. Rnd 1: 5 sc in MR (5)
  2. Rnd 2: inc, 4 sc (6)

Fasten off and leave tail for sewing.

Upper Shell

Coral cotton yarn.

  1. Rnd 1: 6 sc in MR (6)
  2. Rnd 2: 6 inc (12)
  3. Rnd 3: (1 sc, inc) *6 (18)
  4. Rnd 4: (2 sc, inc) *6 (24)
  5. Rnd 5: sc in all 24 stitches (24)
  6. Rnd 6: 6 sc, (sc, inc) *3, 6 sc (sc, inc) *3 (30)
  7. Rnd 7: sc in all 30 stitches (30)
  8. Rnd 8: 6 sc, (2 sc, inc) *3, 6 sc (2 sc, inc) *3 (36)
  9. Rnd 9: sc in all 36 stitches (36)
  10. Rnd 10: 6 sc, (3 sc, inc) *3, 6 sc (3 sc, inc) *3 (42)
  11. Rnd 11-13: sc in all 42 stitches (42)
  12. Change color to light yellow.

Lower Shell

  1. Rnd 14: BLO, 6 sc (3 sc, dec) *3, 6 sc (3 sc, dec) *3 (36)
  2. Rnd 15: BLO, 6 sc (2 sc, dec) *3, 6 sc (2 sc, dec) *3 (30)
  3. Rnd 16: BLO, 6 sc (sc, dec) *3, 6 sc (sc, dec) *3 (24)
  4. Rnd 17: (2 sc, dec) *6 (18)
  5. Rnd 18: (sc, dec) *6 (12)
  6. Stuff shell with fiberfill.
  7. Rnd 19: 6 dec (6)

Fasten off and hide thread.

Legs (Make 4)

Light yellow cotton yarn.

  1. Rnd 1: 8 sc in MR (8)
  2. Rnd 2: sc in all 8 stitches (8)
  3. Change color to light green.
  4. Rnd 3: BLO, sc in all 8 stitches (8)
  5. Rnd 4: dec, 6 sc (7)
  6. Rnd 5: sc in all 7 stitches (7)

Fasten off and leave thread for sewing. Stuff leg with a little bit of fiberfill.

Leaf (Make 2)

Light green cotton yarn.

In a MR: sc, sc, hdc, dc, hdc, sc, sc. Fasten off and leave thread for sewing.

Flower (Make 3)

Light pink, acqua, and light yellow cotton yarn.

Chain 10, from 3rd chain from hook crochet: sc, sc, sc, hdc, hdc, hdc, dc, dc, dc, slst. Fasten off and leave thread for sewing.

Roll the chain from the sc to the dc and shape the flower. With tapestry needle, sew the flower so it will not open.

Shell Border

Light yellow cotton yarn.

FLO of rnd 13 crochet: 3 sc in first stitch, slst in second stitch, slst in third stitch. Repeat the sequence all around. Fasten off and hide thread.

Assembly

  • Sew legs at the bottom of the shell.
  • Sew flowers and leaves on the lower side of the shell.
  • Sew the neck part of the head to the shell.
  • With white cotton yarn, embroider the eye light.
  • With light green cotton yarn, embroider eyelids.
  • With 3 strands of black thread, make the eyebrows.

Your adorable amigurumi turtle is complete! We hope you enjoy making this cute little creature. Happy crocheting!

Crochet Hedgehog Amigurumi Free Pattern

by

Designer: Anna Skorohodova
Instagram: @mirrabio

Hello…
One of the free amigurumi crochet patterns we will share today is the amigurumi hedgehog, whose photos and design belong to Anna Skorohodova. You can learn how to crochet this hedgehog using the free amigurumi pattern. Thanks to Anna Skorohodova for this cute hedgehog.

Materials:

  • Yarn for muzzle: YarnArt Jeans, 3.0 mm crochet hook
  • Yarn for head and body: Himalaya Dolphin Baby, 4.0 mm crochet hook
  • Embroidering floss for mouth, brows, and nose
  • 5 mm safety eyes
  • Yarn needle
  • Fiberfill

Abbreviations:

  • R – row
  • ch – chain
  • st – stitch
  • sc – single crochet
  • inc – increase (2 sc in one stitch)
  • dec – decrease (2 sc together)
  • […] – number of stitches you should have at the end of the row
  • (…) – repeat whatever is between the brackets the given number of times

AMIGURUMI HEDGEHOG FREE CROCHET PATTERN

Muzzle

With YarnArt Jeans, 3.0 mm crochet hook:

  1. R 1: 6 sc in magic ring [6]
  2. R 2: 6 sc
  3. R 3: 5 sc, inc [7]
  4. R 4: 6 sc, inc [8]
  5. R 5: 7 sc, inc [9]
  6. R 6: 9 sc
  7. R 7: 3 sc, 3 inc [12]
  8. R 8: 3 sc, (1 sc, inc) repeat 3 times, 3 sc [15]
  9. R 9: 15 sc
  10. R 10: 3 sc, (2 sc, inc) repeat 3 times, 3 sc [18]
  11. R 11: 3 sc, (1 sc, inc) repeat 6 times, 3 sc [24]
  12. R 12: 24 sc
  13. R 13: (3 sc, inc) repeat 6 times [30]
  14. R 14: 30 sc
  15. R 15: only 3 sc

Create the indents for the eyes on R 10 (view video at 06:48). Insert eyes and secure backings.

Head and Body

Switch to Himalaya Dolphin Baby, 3.0 mm crochet hook:

  1. R 16: 30 sc

With 4.00 mm crochet hook:

  1. R 17-21: 30 sc (5 rows)
  2. R 22: (3 sc, dec) repeat 6 times [24]
  3. R 23: 24 sc
  4. R 24: (2 sc, dec) repeat 6 times [18]
  5. R 25: 18 sc
  6. Stuff.
  7. R 26: (1 sc, dec) repeat 6 times [12]
  8. R 27: 6 dec [6]
  9. Stuff.

Dec to the end to close the hole. Fasten off.

Embroidering Details:

Embroider a mouth, a nose, and brows.

Now your adorable hedgehog is complete! We hope you enjoyed crocheting this cute little animal. Happy crocheting!

Top Ad 728x90