Top Ad 728x90

AMIGURUMI CUTE BEE CROCHET FREE PATTERN

by

Designer: Olga Tubanova
Instagram: @ollya.toys

Hello everyone…
One of the free amigurumi crochet patterns we will share today is the amigurumi bee, whose photos and design belong to Olga Tubanova. You can learn how to crochet this bee using the free amigurumi pattern. Thanks to dear Olga Tubanova for this cute bee.

Below you will find some information about this pattern. Remember, if you have any problems, you can write to us and ask for help. You can follow our YouTube account for free amigurumi patterns and great amigurumi ideas. Have fun…

Materials

  • YarnArt Jeans yarn (55% cotton, 45% acrylic, 50 g/160 m), colors:
    • #35 – yellow
    • #53 – black
    • #62 – white
  • 2.0 mm crochet hook
  • 10 mm safety eyes
  • Black embroidery floss
  • Thin white yarn for eye whites
  • Soft pink pastel crayon
  • Tapestry needle
  • Scissors
  • Stitch marker
  • Fiberfill

Abbreviations

  • R = row
  • mc = magic circle
  • ch = chain
  • sc = single crochet
  • hdc = half double crochet
  • inc = increase (2 sc in the next stitch)
  • dec = decrease (single crochet 2 stitches together)
  • (12) = number of stitches you should have at the end of the round/row
  • (…)*6 = repeat whatever is between the brackets the number of times stated
  • F.o. = finish off

Finished size: About 19 cm (7.4") without antennae.

Cute Honey Bee with Chamomile Crochet Free Pattern

Head

With yellow yarn:

  • R 1: 6 sc in mc (6)
  • R 2: (inc)*6 (12)
  • R 3: (1 sc, inc)*6 (18)
  • R 4: 1 sc, inc, (2 sc, inc)*5, 1 sc (24)
  • R 5: (3 sc, inc)*6 (30)
  • R 6: 2 sc, inc, (4 sc, inc)*5, 2 sc (36)
  • R 7: 36 sc
  • R 8: (5 sc, inc)*6 (42)
  • R 9: 42 sc
  • R 10: 3 sc, inc, (6 sc, inc)*5, 3 sc (48)
  • R 11: 48 sc
  • R 12: (7 sc, inc)*6 (54)
  • R 13-16: 54 sc (4 rows)
  • R 17: 18 sc, (1 sc, inc)*3, 6 sc, (inc, 1 sc)*3, 18 sc (60)
  • R 18-20: 60 sc (3 rows)
  • R 21: (3 sc, dec)*12 (48)
  • R 22: 3 sc, dec, (3 sc, dec)*5, 3 sc (42)
  • R 23: (5 sc, dec)*6 (36)
  • Insert safety eyes between R 15 and R 16 at the distance of 6 st from each other.
  • R 24: 2 sc, dec, (4 sc, dec)*5, 2 sc (30)
  • R 25: (3 sc, dec)*6 (24)
  • R 26: 1 sc, dec, (2 sc, dec)*5, 1 sc (18)
  • Stuff with fiberfill, paying special attention to the cheeks.
  • F.o.

Body

With black yarn:

  • R 1: 6 sc in mc (6)
  • R 2: (inc)*6 (12)
  • R 3: (1 sc, inc)*6 (18)
  • R 4: 1 sc, inc, (2 sc, inc)*5, 1 sc (24)
  • R 5: (3 sc, inc)*6 (30)
  • R 6: 2 sc, inc, (4 sc, inc)*5, 2 sc (36)
  • R 7: (5 sc, inc)*6 (42)
  • R 8: 3 sc, inc, (6 sc, inc)*5, 3 sc (48)
  • R 9: (7 sc, inc)*6 (54)
  • R 10: 54 sc
  • Change to yellow yarn:
  • R 11-13: 54 sc (3 rows)
  • Change to black yarn:
  • R 14-15: 54 sc (2 rows)
  • R 16: (7 sc, dec)*6 (48)
  • Change to yellow yarn:
  • R 17: 48 sc
  • R 18: 3 sc, dec, (6 sc, dec)*5, 3 sc (42)
  • R 19: 42 sc
  • Change to black yarn:
  • R 20: 42 sc
  • R 21: (5 sc, dec)*6 (36)
  • R 22: 36 sc
  • Change to yellow yarn:
  • R 23: 36 sc
  • R 24: 2 sc, dec, (4 sc, dec)*5, 2 sc (30)
  • R 25-26: 20 sc (2 rows)
  • R 27: (3 sc, dec)*6 (24)
  • R 28: 24 sc
  • R 29: 1 sc, dec, (2 sc, dec)*6, 1 sc (18)
  • R 30: 18 sc
  • Stuff with fiberfill.
  • F.o. and leave a long tail for sewing.
  • Sew the head to the body. Stuff the neck well.

Make eye tightening. Embroider eye whites with white yarn, eyelashes with black floss. Embroider a nose between R 17 and R 18 with black yarn (3 sc wide). Embroider eyebrows between R 9 and R 10 (in 2-3 sc). Embroider a smile between R 19 and R 20 (6 sc wide), fix the smile in the center between R 20 and R 21 with some stitches. Tint the cheeks with pink pastel crayon.

Antennae (make 2)

With black yarn:

  • R 1: 6 sc in mc (6)
  • R 2: (inc)*6 (12)
  • R 3-4: 12 sc (2 rows)
  • R 5: (dec)*6 (6)
  • Stuff with fiberfill.
  • R 6-9: 6 sc (4 rows)
  • F.o. and leave a long tail for sewing.
  • Sew the antennae on the head between R 4 and R 5.

Arms (make 2)

With yellow yarn:

  • R 1: 6 sc in mc (6)
  • R 2: (inc)*6 (12)
  • R 3-4: 12 sc (2 rows)
  • R 5: 3 hdc in one st, 11 sc (12)
  • R 6: 12 sc
  • R 7: (1 sc, dec)*4 (8)
  • Stuff gently the bottom part of the arm.
  • R 8-19: 8 sc (12 rows)
  • Stuff the arm till R 11. Fold top of arm flat and 4 sc through both sides across.
  • F.o. and leave a long tail for sewing.
  • Sew the arms to the body between R 29 and R 30.

Legs (make 2)

With black yarn:

  • R 1: 6 sc in mc (6)
  • R 2: (inc)*6 (12)
  • R 3: (1 sc, inc)*6 (18)
  • R 4: 18 sc
  • R 5: 5 sc, 4 dec, 5 sc (14)
  • R 6: 5 sc, 2 dec, 5 sc (12)
  • R 7: 5 sc, dec, 5 sc (10)
  • R 8-16: 10 sc (9 rows)
  • Stuff the leg till R 10. Crochet additional 2 sc.
  • Fold top of leg flat and 5 sc through both sides across.
  • F.o. and leave a long tail for sewing.
  • Sew the legs to the body between R 10 and R 11.

Wings (make 2)

With white yarn:

  • R 1: 6 sc in mc (6)
  • R 2: (inc)*6 (12)
  • R 3: (1 sc, inc)*6 (18)
  • R 4: 1 sc, inc, (2 sc, inc)*5, 1 sc (24)
  • R 5: (3 sc, inc)*6 (30)
  • R 6-8: 30 sc (3 rows)
  • R 9: (3 sc, dec)*6 (24)
  • R 10-12: 24 sc (3 rows)
  • R 13: 1 sc, dec, (2 sc, dec)*5, 1 sc (18)
  • R 14-16: 18 sc (3 rows)
  • R 17: (1 sc, dec)*6 (12)
  • R 18-19: 12 sc (2 rows)
  • Don’t stuff. Fold top of wing flat and 6 sc through both sides across. F.o. and leave a long tail for sewing.
  • Sew the wings to the body between R 29 and R 30: two stitches of the wing are above the two stitches of the sewn arms. To make the wings more flat, fix them with some stitches to the center of the body from the inner part of the wings.

Daisy

Materials:
YarnArt Jeans yarn (160 m/50 g)
No 35 yellow, No 69 green, No 01 white
2 mm crochet hook (Clover)

  • Start in yellow color.
  • 1rnd: 6 sc in MR
  • 2rnd: 6 inc (12)
  • 3rnd: 12 sc
  • Change to white.
  • 4rnd: BLO 12 SC
  • Change to green.
  • 5rnd: 6 dec
  • 6-22rnds: 6 sc (17 rounds)
  • Fasten and trim the thread, hide the end.
  • Attach the white thread for the remaining loops of the 3rd round and crochet the petals:
    • (7 ch, with the 3rd st from the hook, 2 dc in 1 st, dc, 3 hdc, slst into the same loop we started, slst in next loop)*12
  • Fasten and trim the thread, hide the end.

Simple Crochet Kangaroo Free Pattern

by


Designer: ansy_toys

I am excited to share this wonderful crochet kangaroo free pattern with you on a beautiful autumn day. I have never shared a crochet kangaroo amigurumi like this before. I think it is the first. I think I can say that it is a simple crochet kangaroo that everyone can do. You can learn how to make a crochet kangaroo step by step right away. Here is a great opportunity for you.

Tools

  • 2mm Clover hook
  • 12mm eyes
  • Synthetic fluff filler (Hollowfiber)
  • Doll needle
  • Yarn: Any semi-cotton. I used YarnArt Baby Cotton (Color: 403) and Alize Cotton Gold Hobby (White color)

Abbreviations

  • Sc: Single crochet
  • Slst: Slip stitch
  • Hdc: Half double crochet
  • MR: Magic ring
  • Inc: Increase
  • Dec: Decrease

Let’s start from the head first to make the kangaroo. I wish you success!

Head

We start with white yarn. Fill the part quite tightly as you crochet.

  • 1. 6 sc in MR (6)
  • 2. 6 inc in sc (12)
  • 3. (1 sc, inc) x 6 (18)
  • 4. (2 sc, inc) x 6 (24)
  • 5. 24 sc (24)
  • 6. (3 sc, inc) x 6 (30)
  • 7-9. 30 sc (30)

We continue with beige color yarn.

  • 10. (4 sc, inc) x 6 (36)
  • 11. (5 sc, inc) x 6 (42)
  • 12. 12 sc, (2 sc, inc) x 6, 12 sc (48)
  • 13. 15 sc, (2 sc, inc) x 6, 15 sc (54)
  • 14. (8 sc, inc) x 6 (60)
  • 15-24. 60 sc (60)

Insert the eyes between rows 12 and 13 at a distance of 15 sc from each other. The approximate size of the eyes is 12-15 mm. The larger the eyes, the cuter the muzzle turns out.

  • 25. (8 sc, dec) x 6 (54)
  • 26. 54 sc (54)
  • 27. (7 sc, dec) x 6 (48)
  • 28. 48 sc (48)
  • 29. (6 sc, dec) x 6 (42)
  • 30. 42 sc (42)
  • 31. (5 sc, dec) x 6 (36)
  • 32. (4 sc, dec) x 6 (30)
  • 33. (3 sc, dec) x 6 (24)
  • 34. (2 sc, dec) x 6 (18)
  • 35. (1 sc, dec) x 6 (12)
  • 36. 6 dec (6)

Tighten the hole with a needle, secure the thread, and hide it inside the fabric. Make a tightening for the eyes. Embroider the whites, nose, mouth, and eyebrows.

Ears (2 pcs)

Use beige color yarn. Do not fill in the details.

  • 1. 6 sc in MR (6)
  • 2. 6 inc in sc (12)
  • 3. 12 sc (12)
  • 4. (3 sc, inc) x 3 (15)
  • 5. 15 sc (15)
  • 6. (4 sc, inc) x 3 (18)
  • 7. (5 sc, inc) x 3 (21)
  • 8-10. 21 sc (21)
  • 11. (5 sc, dec) x 3 (18)
  • 12. (4 sc, dec) x 3 (15)
  • 13. (3 sc, dec) x 3 (12)
  • 14. 12 sc (12)

Crochet 6 sc at both ends. Fold in half and crochet 3 sc at both ends, or you can sew with a needle. Sew the ears to the head as desired.

Tail

Use beige yarn. Fill the piece loosely as you crochet.

  • 1. 6 sc in MR (6)
  • 2. 6 sc (6)
  • 3. (1 sc, inc) x 3 (9)
  • 4. 9 sc (9)
  • 5. (2 sc, inc) x 3 (12)
  • 6. 12 sc (12)
  • 7. (3 sc, inc) x 3 (15)
  • 8. 15 sc (15)
  • 9. (4 sc, inc) x 3 (18)
  • 10. 18 sc (18)
  • 11. (5 sc, inc) x 3 (21)
  • 12. 21 sc (21)
  • 13. (6 sc, inc) x 3 (24)
  • 14. 24 sc (24)
  • 15. (7 sc, inc) x 3 (27)
  • 16. 27 sc (27)
  • 17. (8 sc, inc) x 3 (30)
  • 18. 30 sc (30)
  • 19. (9 sc, inc) x 3 (33)
  • 20. 33 sc (33)
  • 21. (10 sc, inc) x 3 (36)
  • 22-24. 36 sc (36)

Leave a long tail of thread for sewing. Sew the tail between about rows 9-20 of the body. Try it on, the toy should be able to sit, leaning on the tail.

Body

  • 1. 6 sc in MR (6)
  • 2. 6 inc in sc (12)
  • 3. (1 sc, inc) x 6 (18)
  • 4. (2 sc, inc) x 6 (24)
  • 5. (3 sc, inc) x 6 (30)
  • 6. (4 sc, inc) x 6 (36)
  • 7. (5 sc, inc) x 6 (42)
  • 8. (6 sc, inc) x 6 (48)
  • 9. (7 sc, inc) x 6 (54)
  • 10. (8 sc, inc) x 6 (60)
  • 11. (9 sc, inc) x 6 (66)
  • 12. (10 sc, inc) x 6 (72)
  • 13-20. 72 sc (72)

Continue with decreasing stitches:

  • 21. (22 sc, dec) x 3 (69)
  • 22. 69 sc (69)
  • 23. (21 sc, dec) x 3 (66)
  • 24. 66 sc (66)
  • 25. (20 sc, dec) x 3 (63)
  • 26. 63 sc (63)
  • 27. (19 sc, dec) x 3 (60)
  • 28. 60 sc (60)
  • 29. (8 sc, dec) x 6 (54)
  • 30. 54 sc (54)
  • 31. (7 sc, dec) x 6 (48)
  • 32. 48 sc (48)
  • 33. (6 sc, dec) x 6 (42)
  • 34. 42 sc (42)
  • 35. (5 sc, dec) x 6 (36)
  • 36. 36 sc (36)
  • 37. (4 sc, dec) x 6 (30)
  • 38. 30 sc (30)
  • 39. (3 sc, dec) x 6 (24)
  • 40-42. 24 sc (24)

Upper Paws (2 pcs)

Fill the parts loosely, about 2/3 full.

  • 1. 6 sc in MR (6)
  • 2. 6 inc in sc (12)
  • 3. (3 sc, inc) x 3 (15)
  • 4. (4 sc, inc) x 3 (18)
  • 5-7. 18 sc (18)
  • 8. (4 sc, dec) x 3 (15)
  • 9. 15 sc (15)
  • 10. (3 sc, dec) x 3 (12)
  • 11-25. 12 sc (12)

Crochet 6 sc at both edges. Leave a thread for sewing. Sew the paws slightly diagonally between rows 32-36.

Lower Paws (2 pcs)

Fill the pieces quite tightly as you crochet. Start with white:

  • 1. 6 sc in MR (6)
  • 2. 6 inc in sc (12)
  • 3. (3 sc, inc) x 3 (15)
  • 4. (4 sc, inc) x 3 (18)
  • 5-7. 18 sc (18)

Continue with beige yarn:

  • 8. 18 sc (18)
  • 9. (4 sc, dec) x 3 (15)
  • 10. 15 sc (15)
  • 11. (3 sc, dec) x 3 (12)
  • 12-14. 12 sc (12)
  • 15. 5 hdc, 7 slst (12)

Continue with the rest of the paws:

  • 16. 12 sc (12)
  • 17. (3 sc, inc) x 3 (15)
  • 18. (4 sc, inc) x 3 (18)
  • 19. (5 sc, inc) x 3 (21)
  • 20. 21 sc (21)
  • 21. (6 sc, inc) x 3 (24)
  • 22. 24 sc (24)
  • 23. (7 sc, inc) x 3 (27)
  • 24-28. 27 sc (27)
  • 29. (7 sc, dec) x 3 (24)
  • 30. (6 sc, dec) x 3 (21)
  • 31. (5 sc, dec) x 3 (18)
  • 32. (4 sc, dec) x 3 (15)
  • 33. (3 sc, dec) x 3 (12)
  • 34. 6 dec (6)

Pull the hole together with a needle, secure the thread, and hide it inside the fabric. Sew to the body with a thread fastener using a long doll needle.

Chest

Crochet in white, in turning rows:

  • 1. 9 ch, from 2 loops from hook 8 sc (8)
  • 2. inc, 6 sc, inc (10)
  • 3. 10 sc (10)
  • 4. inc, 8 sc, inc (12)
  • 5. 12 sc (12)
  • 6. inc, 10 sc, inc (14)
  • 7. 14 sc (14)
  • 8. inc, 12 sc, inc (16)
  • 9. 16 sc (16)
  • 10. inc, 14 sc, inc (18)
  • 11. 18 sc (18)
  • 12. inc, 16 sc, inc (20)
  • 13-17. 20 sc (20)
  • 18. dec, 16 sc, dec (18)
  • 19. 18 sc (18)
  • 20. dec, 14 sc, dec (16)
  • 21. 16 sc (16)
  • 22. dec, 12 sc, 12 (14)
  • 23. 14 sc (14)
  • 24. dec, 10 sc, dec (12)
  • 25. 12 sc (12)
  • 26. dec, 8 sc, dec (10)
  • 27. 10 sc (10)
  • 28. dec, 6 sc, dec (8)

Tie the edge around the entire perimeter with sc. Sew the chest to the body.

Here is your crochet kangaroo ready!

Search results for Cute Sheep Amigurumi Free Pattern

by


Design by: Softs Stories

Hello…

One of the free amigurumi crochet patterns we will share today is the amigurumi sheep, whose photos and design belong to @Softs Stories. You can learn how to crochet these sheep using the free amigurumi pattern. Thanks to @Softs Stories for this cute sheep. When finished, it will be 15 cm (5.9 “) in height.

Abbreviations

  • st: stitch
  • ch: chain
  • mr: magic ring
  • sc: single crochet
  • inc: 2 sc in next sc
  • dec: sc next 2 sts together
  • ( )*6 : Repeat whatever is between the brackets the number of times stated

Materials

  • Yarns: Jeans and Softy yarn in two colors
  • Hook: 2.5 mm and 4 mm
  • 10 mm eyes
  • For face shaping, fine black yarn
  • Fiberfill

AMIGURUMI CUTE SHEEP FREE PATTERN

Head:

Start with jeans yarn

  • 1) Magic ring and 6 sc into it (6)
  • 2) 6 inc (12)
  • 3) (sc, inc)*6 (18)
  • 4) (2 sc, inc)*6 (24)
  • 5) (3 sc, inc)*6 (30)
  • 6) (4 sc, inc)*6 (36)
  • 7) (5 sc, inc)*6 (42)
  • 8-16) sc in each st around (42) (9 rnds)
  • 17) (5 sc, dec)*6 (36)
  • 18-22) sc in each st around (36) (5 rnds)

Change the yarn with Softy yarn:

  • 23-25) sc in each st around (36) (3 rnds)
  • 26) (4 sc, dec)*6 (30)
  • 27) (3 sc, dec)*6 (24)
  • 28) (2 sc, dec)*6 (18)
  • 29) (sc, dec)*6 (12)
  • 30) 6 dec (6)

Place eyes between round 15th and 16th, leaving 9 sts between them.

Tail:

Start with jeans yarn

  • 1) Magic ring and 6 sc into it (6)
  • 2) 6 inc (12)
  • 3) (sc, inc)*6 (18)

Body:

Start with Softy yarn

  • 1) Magic ring and 6 sc into it (6)
  • 2) 6 inc (12)
  • 3) (sc, inc)*6 (18)
  • 4) (2 sc, inc)*6 (24)
  • 5) (7 sc, inc)*3 (27)
  • 6-13) sc in each st around (27) (8 rnds)
  • 14) (7 sc, dec)*3 (24)
  • 15) (2 sc, dec)*6 (18)
  • 16) (sc, dec)*6 (12)
  • 17) 6 dec (6)

Foot:

Start with beige color yarn

  • 1) Magic ring and 6 sc into it (6)
  • 2) 6 inc (12)
  • 3) (1 sc, inc)*6 (18)
  • 4) (2 sc, inc)*6 (24)
  • 5-11) 24 sc
  • 12) (2 sc, dec)*6 (18)

Ears:

Start with jeans yarn

  • 1) Magic ring and 6 sc into it (6)
  • 2) 6 inc (12)
  • 3) (sc, inc)*6 (18)
  • 4) (2 sc, inc)*6 (24)
  • 5-11) sc in each st around (24) (7 rnds)
  • 12) (2 sc, dec)*6 (18)

Legs:

Start with jeans yarn

  • 1) Magic ring and 6 sc into it (6)
  • 2) 6 inc (12)
  • 3) (sc, inc)*6 (18)
  • 4) (2 sc, inc)*6 (24)
  • 5-8) sc in each st around (24) (4 rnds)
  • 9) (2 sc, dec)*6 (18)
  • 10) (sc, dec)*6 (12)

Searchresults for Bunny Free Amigurumi Pattern

by


Hello amigurumi lovers and beautiful visitors, I wanted to share the free amigurumi patterns for you here. In my article I will share 1 pattern and how to make it for you. At the end of my article, I will share amigurumi patterns that can generate ideas for you.

Materials:

  • Size 6 mm crochet hook
  • Hobbii Snuggle Solid – color no. 05 & 03
  • Safety eyes 16 mm
  • Filling

Measurements:

Approx. 36 cm

Yarn needed:

  • Approx. 130g main color
  • 1 meter color 03 for nose

Abbreviations:

  • mr: Magic ring
  • st: stitch
  • sc: single crochet
  • tog: together

The Head:

  • Make a mr, 6 sc in the ring. (6 sts)
  • 2sc in each st around. (12 st)
  • Sc one round. (12)
  • Crochet 1 sc, 2 sc in next st. Repeat from * to * around. (18)
  • Crochet 2 sc, 2 sc in next st. Repeat from * to * around. (24)
  • Crochet 3 sc, 2 sc in next st. Repeat from * to * around. (30)
  • Crochet 4 sc, 2 sc in next st. Repeat from * to * around. (36)
  • Sc one round. (36)
  • Sc one round. (36)
  • Crochet 5 sc, 2 sc in next st. Repeat from * to * around. (42)
  • Sc one round. (42)
  • Sc one round. (42) – The eyes are attached between round 7 and 8, with 7-8 stitches distance in between.
  • Crochet 5 sc, 2 sc tog. Repeat from * to * around. (36)
  • Crochet 4 sc, 2 sc tog. Repeat from * to * around. (30) Fill the head with filling, make sure it is filled before the opening is closed off.
  • Crochet 3 sc, 2 sc tog. Repeat from * to * around. (24)
  • Crochet 2 sc, 2 sc tog. Repeat from * to * around. (18)
  • Crochet 1 sc, 2 sc tog. Repeat from * to * around. (12)
  • Crochet 2 sc tog. Repeat from * to * around. (6)
  • Sew the opening shut and fasten the yarn tail.

Tutorial – Setting the Eyes:

  1. Pull the yarn up through the head, out on the outer side of the eye.
  2. Poke the needle through the other side of the eye and towards the other eye through the head.
  3. Pull the yarn through on one side of the eye.
  4. Poke the needle through the other side of the eye and down through the head.
  5. Pull and tug both yarn tails until the eyes are set as desired. Fasten the yarn.
  6. Embroider a nose with pink yarn.

Ears (make two):

  • Make a mr, 6 sc in the ring. (6)
  • 2sc in each st around. (12 st)
  • Crochet 1 sc, 2 sc in next st. Repeat from * to * around. (18)
  • Crochet 2 sc, 2 sc in next st. Repeat from * to * around. (24)
  • Sc one round. (24)
  • Crochet 6 sc, 2 sc tog. Repeat from * to * around. (21)
  • Sc one round. (21)
  • Crochet 5 sc, 2 sc tog. Repeat from * to * around. (18)
  • Sc one round. (18)
  • Crochet 4 sc, 2 sc tog. Repeat from * to * around. (15)
  • Sc one round. (15)
  • Sc one round. (15)
  • Crochet 3 sc, 2 sc tog. Repeat from * to * around. (12)
  • Sc one round. (12)
  • Crochet 2 sc, 2 sc tog. Repeat from * to * around. (9)
  • Sc one round. (9)
  • Sc one round. (9)
  • Fold the ear flat and crochet the opening together with sc. Cut the yarn, leaving a long tail for assembly. Sew the ears onto the head.

Body:

  • Make a mr, 6 sc in the ring. (6 stitches)
  • 2sc in each st around. (12 st)
  • Crochet 1 sc, 2 sc in next st. Repeat from * to * around. (18)
  • Crochet 2 sc, 2 sc in next st. Repeat from * to * around. (24)
  • Crochet 3 sc, 2 sc in next st. Repeat from * to * around. (30)
  • Crochet 4 sc, 2 sc in next st. Repeat from * to * around. (36)
  • Crochet 5 sc, 2 sc in next st. Repeat from * to * around. (42)
  • Sc one round. (42)
  • Sc one round. (42)
  • Sc one round. (42)
  • Crochet 5 sc, 2 sc tog. Repeat from * to * around. (36)
  • Sc one round. (36)
  • Crochet 4 sc, 2 sc tog. Repeat from * to * around. (30)
  • Sc one round. (30)
  • Crochet 3 sc, 2 sc tog. Repeat from * to * around. (24)
  • Sc one round. (24)
  • Sc one round. (24)– Begin filling the body with stuffing.
  • Crochet 2 sc, 2 sc tog. Repeat from * to * around. (18)
  • Sc one round. (18)
  • Sc one round. (18)
  • Crochet 1 sc, 2 sc tog. Repeat from * to * around. (12)
  • Sc one round. (12) – Finish filling the body.
  • Cut the yarn leaving a long tail for assembly.
  • Sew the head onto the body.

Arms (make two):

  • Make a mr, 5sc in the ring. (5 sts)
  • 2sc in each st around. (10 st)
  • Crochet 1 sc, 2 sc in next st. Repeat from * to * around. (15)
  • Sc one round. (15)
  • Crochet 1 sc, 2 sc tog. Repeat from * to * around. (10)
  • Sc one round. (10)
  • Fill arms lightly with filling. Fold the ends flat and sc opening tog. Cut the yarn, leaving a long tail for assembly. Sew the arms to the sides of the top of the body.

Legs (make two):

  • Make a mr, 6sc in the ring. (6 stitches)
  • 2sc in each st around. (12 st)
  • Crochet 1 sc, 2 sc in next st. Repeat from * to * around. (18)
  • Sc one round. (18)
  • Crochet 1 sc, 2 sc tog. Repeat from * to * around. (12)
  • Sc one round. (12)
  • Fill legs lightly with filling. Fold the ends flat and sc opening tog. Cut the yarn, leaving a long tail for assembly.
  • Sew the legs to the bottom of the body.

Feel free to tag me (@freeamigurumii) in your photos on Instagram or Facebook if you’d like!

All Finished.

Search results for Amigurumi Cute Duck Free Pattern

by


Hello Amigurumi Lovers…

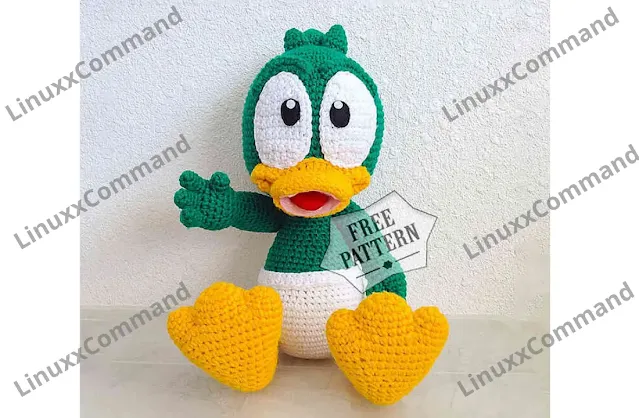
One of the free amigurumi knit designs we will share today is the amigurumi baby duck. You can figure out how to sew these ducks utilizing the free amigurumi design.

Materials:

  • Hook: 3.75mm
  • Yarn: Red Heart Super Saver – white, yellow, green
  • White, black, pink, and red felt
  • Tapestry needle
  • White, black, pink, and red threads and a needle
  • Filler
  • Yellow buttons (match the color of the legs) and a different color (for inside)
  • Finger wire

Abbreviations:

  • sc = single crochet
  • inc = increase
  • Mr = magic ring
  • dec = decrease
  • hdc = half double crochet
  • dc = double crochet
  • ch = chain

AMIGURUMI BABY DUCK CROCHET FREE PATTERN

Head

Rd 1: 6sc into magic ring – (6 sc)

Rd 2: 6inc – (12 sc)

Rd 3: (sc, inc) * to the end of the row – (18 sc)

Rd 4: [2sc, inc] * to the end of the row – (24 sc)

Rd 5: [3sc, inc] * to the end of the row – (30 sc)

Rd 6: [2sc, inc, 2sc] * to the end of the row – (36 sc)

Rd 7: 36sc – (36 sc)

Rd 8: [inc, 5sc] * to the end of the row – (42 sc)

Rd 9: [3sc, inc, 3sc] * to the end of the row – (48 sc)

Rd 10: [7sc, inc] * to the end of the row – (54 sc)

Rd 11: 54sc – (54 sc)

Rd 12: [4sc, inc, 4sc] * to the end of the row – (60 sc)

Rd 13: [inc, 9sc] * to the end of the row – (66 sc)

Rd 14-23: 66sc – (66 sc)

Rd 24: [dec, 9sc] * to the end of the row – (60 sc)

Rd 25: [4sc, dec, 4sc] * to the end of the row – (54 sc)

Rd 26: 54sc – (54 sc)

Rd 27: [7sc, dec] * to the end of the row – (48 sc)

Rd 28: [3sc, dec, 3sc] * to the end of the row – (42 sc)

Rd 29: [5sc, dec] * to the end of the row – (36 sc)

Rd 30: 36sc – (36 sc)

Rd 31: [2sc, dec, 2sc] * to the end of the row – (30 sc)

Rd 32: [3sc, dec] * to the end of the row – (24 sc)

Finish, leave the thread.

Hair

Medium Hair:

Rd 1: 3sc into magic ring – (3 sc)

Rd 2: 3inc – (6 sc)

Rd 3: [inc, 2sc] * to the end of the row – (8 sc)

Rd 4: 8sc – (8 sc)

Rd 5: [inc, 3sc] * to the end of the row – (10 sc)

Rd 6: [inc, 4sc] * to the end of the row – (12 sc)

Finish, leave the thread.

Left Hair:

Rd 1: 3sc into magic ring – (3 sc)

Rd 2: 3inc – (6 sc)

Rd 3: 6sc – (6 sc)

Rd 4: [inc, 2sc] * to the end of the row – (8 sc)

Finish, leave the thread.

Right Hair:

Rd 1: 3sc into magic ring – (3 sc)

Rd 2: 6inc – (6 sc)

Rd 3: 6sc – (6 sc)

Rd 4: [inc, 2sc] * to the end of the row – (8 sc)

Rd 5: 8sc – (8 sc)

Finish, leave the thread.

Body White

Rd 1: 6sc into magic ring – (6 sc)

Rd 2: 6inc – (12 sc)

Rd 3: (sc, inc) * to the end of the row – (18 sc)

Rd 4: [2sc, 2inc] * to the end of the row – (24 sc)

Rd 5: [3sc, inc] * to the end of the row – (30 sc)

Rd 6: [2sc, inc, 2sc] * to the end of the row – (36 sc)

Rd 7: [inc, 5sc] * to the end of the row – (42 sc)

Rd 8: 42sc – (42 sc)

Rd 9: [3sc, inc, 3sc] * to the end of the row – (48 sc)

Rd 10: 48sc – (48 sc)

Rd 11: [7sc, inc] * to the end of the row – (54 sc)

Rd 12-16: 54sc – (54 sc)

Rd 17: [dec, 7sc] * to the end of the row – (48 sc)

Rd 18: 48sc – (48 sc)

Rd 19: [3sc, dec, 3sc] * to the end of the row – (42 sc)

Rd 20: change the thread to green, for front half loops: 42sc– (42 sc)

Rd 21: [dec, 5sc] * to the end of the row – (36 sc)

Rd 22-24: 36sc – (36 sc)

Rd 25: [sc, dec] * 4 times, 4sc, inc, sc, inc, sc, inc, 4sc, dec, sc, dec, sc, dec, sc, dec – (31 sc)

Rd 26: 31sc – (31 sc)

Rd 27: sc, dec, sc, dec, sc, dec, 14sc, dec, sc, dec, sc, dec – (25 sc)

Rd 28-29: 25sc – (25 sc)

Rd 30: 6hdc, 13sc, 5hdc, sc – (25 sc)

Rd 31: 6hdc, 19sc – (25 sc)

Finish, leave the thread.

Top Edge Of The Nappy:

Rd 1: 52 fhdc – (52 sc)

The following shows how to knit fhdc. For clarity, 2 colors were used.

  1. We collect 2 air loops
  2. We make a crochet, insert the hook into the 2nd loop from the hook.
  3. Grab and pull the thread. There are 3 loops on the hook.
  4. Grab the thread, pull through 1 loop. There are 3 loops on the hook.
  5. Grab the thread, stretch through 3 loops. One dhdc is ready.
  6. We crochet and insert the hook into the loop made in step 4
  7. Grab and pull the thread. There are 3 loops on the hook.
  8. Grab the thread, pull through 1 loop. There are 3 loops on the hook.
  9. Grab the thread, stretch through 3 loops. The second dhdc is ready.

Finish, leave the thread.

Hands (x2) Green

Fingers (x3):

Rd 1: 5sc into magic ring

Rd 2-5: 5sc – (5 sc)

On 2 fingers, break the thread. On the 3rd, continue knitting.

Hands:

Rd 1: 3sc on the 2nd finger, 5sc on the 1st finger, 3sc on the 2nd finger, 5sc on the 3rd finger – (15 sc)

Rd 2: 15sc – (15 sc)

Rd 3: [inc, 4sc] * to the end of the row – (18 sc)

Rd 4-6: 18sc – (18 sc)

Rd 7: [dec, 4sc] * to the end of the row – (15 sc)

Rd 8: [sc, dec, 2sc] * to the end of the row – (12 sc)

Rd 9: 12sc

*** If you want moving fingers, take the wire and bend it, as in the picture. Insert into fingers and palm. Stuff your fingers and palm. Do not overstuff. I do not advise inserting wire if the toy is for children. ***

Rd 10: [inc, 3sc] * to the end of the row – (15 sc)

Rd 11-17: 15sc – (15 sc)

Rd 18: [dec, 3sc] * to the end of the row – (12 sc)

Rd 19-20: 12sc – (12 sc)

Finish, leave the thread.

Thumb:

Rd 1: 6sc into magic ring – (6 sc)

Rd 2-3: 6sc – (6 sc)

Finish, sew to hand.

Foot

Middle Finger:

Rd 1: 8sc into magic ring – (8 sc)

Rd 2: 8inc – (16 sc)

Rd 3-4: 16sc – (16 sc)

To finish

Side Fingers (x2):

Rd 1: 5sc into magic ring – (5 sc)

Rd 2: 5inc – (10 sc)

Rd 3: 10sc – (10 sc)

Break the thread on the first finger. On the 2nd, continue knitting.

Foot:

Rd 1: 8sc on the middle finger, 10sc on the 1st side finger, 8sc on the side finger, 10sc on the 2nd side – (36 sc)

Rd 2-3: 36sc – (36 sc)

Rd 4: [dec, 7sc] * to the end of the row – (32 sc)

Rd 5: 32sc – (32 sc)

Rd 6: [dec, 6sc] * to the end of the row – (28 sc)

Rd 7: [2sc, dec, 3sc] * to the end of the row – (24 sc)

Rd 8: [dec, 4sc] * to the end of the row – (20 sc)

Rd 9: 20sc – (20 sc)

Rd 10: [2sc, dec, sc] * to the end of the row – (16 sc)

Rd 11: 16sc – (16 sc)

Rd 11: [dec, 2sc] * to the end of the row – (12 sc)

Rd 12: 12sc – (12 sc)

Rd 13: 6dec – (6 sc)

Finish, fill. Sew holes between your fingers.

Legs (x2)

Rd 1: 5sc into magic ring – (5 sc)

Rd 2: 5inc – (10 sc)

Rd 3: [inc, 4sc] * to the end of the row – (12 sc)

Rd 4-14: 12sc – (12 sc)

Rd 15: [inc, 3sc] * to the end of the row – (15 sc)

Rd 16-18: 15sc – (15 sc)

Finish, leave the thread. To fill. The bottom is more dense.

Mouth

Bottom Part:

Rd 1: 12ch, with the 2nd loop from the hook: 10sc, 3sc in the 1st loop, 9sc, inc – (24 sc)

Rd 2: [10sc, 2inc] * to the end of the row – (28 sc)

Rd 3: 28sc – (28 sc)

Rd 4: [10sc, 2dec] * to the end of the row – (24 sc)

Finish, leave the thread.

Top Part:

Rd 1: 10ch, from the 2nd loop from the hook, 8sc, 3sc to the 1st loop, 7sc, inc – (20 sc)

Rd 2: [8sc, 2inc] * to the end of the row – (24 sc)

Rd 3: [9sc, 2inc, 10sc, 2inc, sc] – (28 sc)

Rd 4-5: 28sc – (28 sc)

Rd 6: 9sc, 2dec, 10sc, 2dec, sc – (24 sc)

Rd 7: 14sc, hdc, 4dc, hdc, 4sc – (24 sc)

Finish, leave the thread.

Mouth Side:

Rd 1: (Right side) Insert the hook into the 22nd loop in the last row of the upper part, inc in the 22nd and 23rd loops – (4 sc)

Rd 2-9: ch, turn, 4sc – (4 sc)

Rd 10: ch, turn, 2dec – (2 sc)

Finish, leave the thread

Rd 1: (Left side) Insert the hook into the 12th loop in the last row of the upper part, pr in the 12th and 13th loops (4 sc)

Rd 2-9: ch, turn, 4sc – (4 sc)

Rd 10: ch, turn, 2dec – (2 sc)

Finish, leave the thread.

*** Cut off the pink felt for the inside of the mouth and sew on. Cut out red felt tongue, sew, leaving a hole, twist, stuff a little, sew a hole, sew in center of mouth

Eyes (x2)

Eyeballs:

White, 6ch

Rd 1: from the 2nd loop from the hook: sc, hdc, dc, hdc, sc – (5 sc)

Rd 2: ch, turn, inc, 3sc, inc – (7 sc)

Rd 3-9: ch, turn, 7sc – (7 sc)

Rd 10: ch, turn, dec, 3sc, dec – (5 sc)

Rd 11: ch, turn, 5sc – (5 sc)

Rd 12: ch, rotate, dec, sc, dec – (3 sc)

Rd 13: ch, turn, dec, sc – (2 sc)

ch, sc in a circle

F / O and leave tail to sew onto face

Pupil:

cut an oval from black felt (0.75 ”wide and 1” long) for the pupil. You can do round. cut a small circle from white felt for highlight.

*** Attach to the head (10 rows down from the crown) ***

Eyebrows (x2):

Green, 9pc chain

1: from the 2nd loop from the hook, 4sc, inc, inc, 4sc – (21 sc)

2: sc to each loop – (14 sc)

3: 4sc, dec, dec, 3sc – (8 sc)

Finish leave thread

Search resultsfor Amigurumi Panda Free Crochet Pattern

by


Hello amigurumi lovers and beautiful visitors, I wanted to share the free amigurumi patterns for you here. In my article I will share 1 pattern and how to make it for you. At the end of my article, I will share amigurumi patterns that can generate ideas for you.

Skill level: Intermediate

Crochet hook: 2.50 mm

Measurements: Approx. 24 cm (9.4 inches)

Materials: A piece of black scrap yarn for the eyebrows, a piece of scrap yarn in 3 different colors for the ribbon, 2 safety eyes 8 mm, 1 wooden button 12 mm, 2 matches (or something else) for knitting needles in the ribbon, fiberfill

Note: We recommend not to use matches if the product is for babies/children

Yarn: Rainbow Cotton 8/4

  • White (#001) – 1 skein
  • Light Grey (#016) – 1 skein
  • Rose (#044) – 1 skein

Abbreviations:

  • ch = chain
  • sc = single crochet
  • sl st = slip stitch
  • mr = magic ring
  • hdc = half double crochet
  • inc = increase – 2 stitches in the same stitch
  • dec = decrease – 2 stitches together
  • rnd(s) = round(s)
  • (xx) = Number of stitches after ended round

Info and tips:

  • Always stuff the head and body firmly.
  • Always stuff between head and body as you sew the head on to avoid a wobbly head.
  • Work tightly to avoid holes between the stitches.

Arm

In Light Grey, make 2

Rnd 1: 6 sc in a mr

Rnd 2: (inc) 6 times (12)

Rnd 3: (1 sc, inc) 6 times (18)

Rnds 4-7: 1 sc in each st (18)

Stuff the hand and the arm lightly as you work.

Rnd 8: (dec) 5 times, 8 sc (13)

Rnds 9-23: 1 sc in each st (13)

Fasten off.

The white part around the eye

In White, make 2

Rnd 1: 4 sc in a mr

DON’T tighten the loop and leave a tail long enough for assembling. Alternatively, you can embroider a white edge around the eye.

The grey part of the eye

In Light Grey, make 2

Ch 1 to turn the work after each ended row.

Row 1: Ch 4, turn

Row 2: begin in the 2nd chain from the hook, (inc) 3 times, ch 1, turn (6)

Row 3: (inc) 6 times, ch 1, turn (12)

Row 4: make an edge around the entire eye working 1 sc in each st and 2 sc in each corner (19)

Fasten off and leave a tail long enough for sewing.

Attach the safety eye at the edge of the grey part of the eye 3 rounds below the top of the eye, be careful to make sure that the curved part points outwards.

Head

In White

Rnd 1: 6 sc in a mr

Rnd 2: (inc) 6 times (12)

Rnd 3: (1 sc, inc) 6 times (18)

Rnd 4: 1 sc in each st (18)

Rnd 5: (inc) 6 times, 12 sc (24)

Rnd 6: (1 sc, inc) 6 times, 12 sc (30)

Rnd 7: (4 sc, inc) 6 times (36)

Rnd 8: 1 sc in each st (36)

Rnd 9: (5 sc, inc) 6 times (42)

Rnd 10: (6 sc, inc) 6 times (48)

Rnd 11: (7 sc, inc) 6 times (54)

Rnd 12: (8 sc, inc) 6 times (60)

Rnd 13: (9 sc, inc) 6 times (66)

Now, attach the entire grey part of the eye together with the safety eye. Insert the safety eye between rounds 6 and 7 on the head with 12 sc in between the eyes and approx. 6 sc between the upper part of the grey part. Be careful to make sure that the snout points upwards.

Place the white part around the safety eye and tighten the magic ring. Sew the grey eye part on. See pictures.

Stuff the head as you make it.

Rnds 14-25: 1 sc in each st (66)

Rnd 26: (9 sc, dec) 6 times (60)

Rnd 27: (8 sc, dec) 6 times (54)

Rnd 28: (7 sc, dec) 6 times (48)

Rnd 29: (6 sc, dec) 6 times (42)

Rnd 30: (5 sc, dec) 6 times (36)

Rnd 31: (4 sc, dec) 6 times (30)

Rnd 32: (3 sc, dec) 6 times (24)

Rnd 33: (2 sc, dec) 6 times (18)

Rnd 34: (1 sc, dec) 6 times (12)

Rnd 35: (2 sc, dec) 3 times (9)

Fasten off and leave a tail long enough for closing the hole. Use a needle to gather the last 9 stitches in the front loop and tighten the yarn to close the hole nicely. Weave in ends.

Body

In White

Rnd 1: 6 sc in a mr

Rnd 2: (inc) 6 times (12)

Rnd 3: (1 sc, inc) 6 times (18)

Rnd 4: (2 sc, inc) 6 times (24)

Rnd 5: (3 sc, inc) 6 times (30)

Rnd 6: (4 sc, inc) 6 times (36)

Rnd 7: (5 sc, inc) 6 times (42)

Rnd 8: (6 sc, inc) 6 times (48)

Rnd 9: (7 sc, inc) 6 times (54)

Rnd 10: (8 sc, inc) 6 times (60)

Rnd 11: (9 sc, inc) 6 times (66)

Rnds 12-24: 1 sc in each st (66)

Stuff the body as you make it.

Rnd 25: (9 sc, dec) 6 times (60)

Rnds 26-27: 1 sc in each st (60)

Rnd 28: (8 sc, dec) 6 times (54)

Rnds 29-30: 1 sc in each st (54)

Rnd 31: (7 sc, dec) 6 times (48)

Rnds 32-33: 1 sc in each st (48)

Rnd 34: (6 sc, dec) 6 times (42)

Change to Light Grey

Rnds 35-36: 1 sc in each st (42)

Rnd 37: (5 sc, dec) 6 times (36)

Now, crochet the arms on this round, crochet through both layers of the arm, i.e. all 4 loops on the arm.

Rnd 38: 8 sc, 6 sc with arm, 15 sc, 6 sc with arm, 1 sc (36)

Rnd 39: 1 sc in each st (36)

Rnd 40: (4 sc, dec) 6 times (30)

Rnd 41: 1 sc in each st (30)

Fasten off and leave a tail long enough for sewing.

Leg

In Light Grey, make 2

Rnd 1: 6 sc in a mr

Rnd 2: (inc) 6 times (12)

Rnd 3: (1 sc, inc) 6 times (18)

Rnd 4: (2 sc, inc) 6 times (24)

Rnd 5: (3 sc, inc) 6 times (30)

Rnd 6: (4 sc, inc) 6 times (36)

Rnds 7-10: 1 sc in each st (36)

Rnd 11: (dec) 6 times, 24 sc (30)

Rnd 12: (3 sc, dec) 6 times (24)

Rnd 13: (2 sc, dec) 6 times (18)

Rnds 14-24: 1 sc in each st (18)

Stuff the foot firmly and the rest of the leg lightly with fiberfill.

Fasten off and leave a tail long enough for sewing.

Ear

In Light Grey, make 2

Rnd 1: 6 sc in a mr

Rnd 2: (inc) 6 times (12)

Rnd 3: (1 sc, inc) 6 times (18)

Rnd 4: (5 sc, inc) 3 times (21)

Rnds 5-7: 1 sc in each st (21)

Fasten off and leave a sufficiently long tail.

Apron

In Rose

Rnd 1: 6 sc in a mr

Rnd 2: (inc) 6 times (12)

Rnd 3: (1 sc, inc) 6 times (18)

Rnd 4: (2 sc, inc) 6 times (24)

Rnd 5: (3 sc, inc) 6 times (30)

Rnd 6: (4 sc, inc) 6 times (36)

Rnd 7: (5 sc, inc) 6 times (42)

Rnd 8: (6 sc, inc) 6 times (48)

Rnd 9: 1 sc in each st (48)

Now, crochet the front panel of the apron in rows and ch 1 to turn the work after each ended row.

Rows 10-13: 8 sc, ch 1, turn

Row 14: skip the first st, 7 sc, ch 1, turn

Row 15: skip the first st, 6 sc, ch 1, turn

Row 16: make an sc row around the entire apron (approx. 58 sc)

Row 17: skip 1 st, (1 sc, ch 2, 1 sc) in the same st, repeat all the way around.

Row 18: ch 40 for the strap which goes around the neck and attach it at the other side of the row. Fasten off and weave in ends.

Tie-strings for the apron

In Rose, make 2

Rnd 1: ch 37

Rnd 2: begin in the 3rd chain from the hook and work 35 hdc

Fasten off and leave a tail long enough for sewing.

Snout

In Light Grey

Rnd 1: 6 sc in a mr, 1 sl st

Fasten off and leave a tail long enough for sewing.

Tail

In Light Grey

Rnd 1: 6 sc in a mr

Rnd 2: (inc) 6 times (12)

Rnd 3: (1 sc, inc) 6 times (18)

Rnds 4-6: 1 sc in each st (18)

Stuff the tail lightly.

Rnd 7: (1 sc, dec) 6 times (12)

Fasten off and leave a tail long enough for sewing.

Ribbon

In Rose

Rnd 1: ch 75

Rnd 2: join into a ring in the first ch and work 74 sc

Fasten off and leave a tail long enough for sewing.

Balls of yarn for the ribbon

Wind 3 balls of yarn in the colors you prefer – one approx. 3.5 cm, one approx. 3 cm and one approx. 2.5 cm.

We have used 2 matches for knitting needles, the edges were smoothed off a bit with sandpaper.

Assembling

  • Sew on the ears on rnd 23 with approx. 13 sc in between
  • Embroider the eyebrows between rnds 11 and 12 with 6 sc in between
  • Sew the snout onto the tip and embroider a stripe downwards
  • Sew on the legs diagonally from rnd 3
  • Sew the balls of yarn onto the head together with the ribbon
  • Attach the apron and sew on the head
  • Sew on the tie-strings at each side of the apron and on the back side
  • Sew the button onto the tie-string on the back side of the apron
  • Sew on the tail in the middle of the back side

All Finished.

Top Ad 728x90