Top Ad 728x90

Amigurumi Dinosaur Crochet Free Pattern

by


Hello Amigurumi Lovers…

One of the free amigurumi crochet patterns we will share today is the dinosaur, whose photos and design belong to Karabiber Toys. You can learn how to crochet this dinosaur using the free amigurumi pattern. The size of the finished amigurumi dinosaur depends on your tension and materials. Thanks to dear Nadya Karabiber for this cute dino.

Materials:

  • Yarn: YarnArt Jeans (55% cotton, 45% acrylic, 50 g/160 m): white #01, blue #75
  • Hook size: 2.2 mm (Tulip #3/0)
  • Black safety eyes
  • Sewing needle
  • Scissors
  • Sewing pins
  • Fiberfill

Abbreviations:

  • R = row
  • mc = magic circle
  • ch = chain
  • sl st = slip stitch
  • sc = single crochet
  • inc = 2 sc in the next stitch
  • dec = single crochet 2 stitches together
  • F.o. = finish off
  • ( ) = number of stitches you should have at the end of the round/row
  • ( )*6 = repeat whatever is between the brackets the number of times stated

AMIGURUMI DINOSAUR FREE PATTERN

Head

Start crocheting from the muzzle:

  • R 1: 6 sc in mc (6)
  • R 2: (inc)*6 (12)
  • R 3: (1 sc, inc)*6 (18)
  • R 4: (2 sc, inc)*6 (24)
  • R 5: (3 sc, inc)*6 (30)
  • R 6: (4 sc, inc)*6 (36)
  • R 7: (5 sc, inc)*6 (42)
  • R 8-12: 42 sc (5 rows)
  • R 13: (12 sc, dec)*3 (39)
  • R 14: (11 sc, dec)*3 (36)
  • R 15: (10 sc, dec)*3 (33)
  • R 16: (9 sc, dec)*3 (30)
  • R 17: (8 sc, dec)*3 (27)
  • R 18: (7 sc, dec)*3 (24)
  • R 19: (3 sc, inc)*6 (30)
  • R 20: (4 sc, inc)*6 (36)
  • R 21-26: 36 sc (6 rows)
  • Insert safety eyes between R 22 and R 23.
  • R 27: (4 sc, dec)*6 (30)
  • R 28: (3 sc, dec)* 6 (24)
  • R 29: (2 sc, dec)*6 (18)
  • Stuff with fiberfill.
  • R 30: (1 sc, dec)*6 (12)
  • R 31: (dec)*6 (6)
  • F.o.

Body

  • R 1: 6 sc in mc (6)
  • R 2: (inc)*6 (12)
  • R 3: (1 sc, inc)*6 (18)
  • R 4: (2 sc, inc)*6 (24)
  • R 5: (3 sc, inc)*6 (30)
  • R 6: (4 sc, inc)*6 (36)
  • R 7: (5 sc, inc)*6 (42)
  • R 8: (6 sc, inc)*6 (48)
  • R 9: (7 sc, inc)*6 (54)
  • R 10-17: 54 sc (8 rows)
  • R 18: (16 sc, dec)*3 (51)
  • R 19: 51 sc
  • R 20: (15 sc, dec)*3 (48)
  • R 21: 48 sc
  • R 22: (14 sc, dec)*3 (45)
  • R 23: 45 sc
  • R 24: (13 sc, dec)*3 (42)
  • R 25: 42 sc
  • R 26: (12 sc, dec)*3 (39)
  • R 27: 39 sc
  • R 28: (11 sc, dec)*3 (36)
  • R 29: 36 sc
  • R 30: (10 sc, dec)*3 (33)
  • R 31: 33 sc
  • R 32: (9 sc, dec)*3 (30)
  • R 33: 30 sc
  • R 34: (8 sc, dec)*3 (27)
  • R 35: 27 sc
  • R 36: (7 sc, dec)*3 (24)
  • R 37: 24 sc
  • R 38: (6 sc, dec)*3 (21)
  • R 39: 21 sc
  • Stuff with fiberfill.
  • R 40: (5 sc, dec)*3 (18)
  • R 41: 18 sc
  • R 42: (4 sc, dec)*3 (15)
  • R 43: 15 sc
  • R 44: (3 sc, dec)*3 (12)
  • R 45: 12 sc
  • R 46: (2 sc, dec)*3 (9)
  • R 47: 9 sc
  • R 48: (1 sc, dec)*3 (6)
  • R 49: 6 sc
  • R 50: (dec)*3 (3)
  • R 51: 2 sc only
  • F.o.

Neck

  • Make 20 ch, join in ring with sl st.
  • Crochet in spiral:
  • R 1: 20 sc
  • R 2: 20 sc
  • R 3: inc, 19 sc (21)
  • R 4: 21 sc
  • R 5: inc, 20 sc (22)
  • R 6: 22 sc
  • R 7: inc, 21 sc (23)
  • R 8: 23 sc
  • R 9: inc, 22 sc (24)
  • R 10: 24 sc
  • R 11: inc, 23 sc (25)
  • R 12: 25 sc
  • R 13: inc, 24 sc (26)
  • R 14: 26 sc
  • F.o. and leave a long tail for sewing.

Legs (make 4)

  • R 1: 6 sc in mc (6)
  • R 2: (inc)*6 (12)
  • R 3: (1 sc, inc)*6 (18)
  • R 4-12: 18 sc (9 rows)
  • F.o. and leave a long tail for sewing.

Spikes (make 12)

  • With white yarn:
  • R 1: 6 sc in mc (6)
  • R 2: (inc)*6 (12)
  • R 3-5: 12 sc (3 rows)
  • F.o. and leave a long tail for sewing.

Spots (make 6)

  • With white yarn:
  • R 1: 6 sc in mc (6)
  • R 2: (inc)*6 (12)
  • F.o. and leave a long tail for sewing.

Assembly

  • Sew the head to the neck.
  • Sew the neck and legs to the body.
  • Sew the spikes on the head, neck, and body, putting some stuffing inside every spike.
  • Sew the spots on the sides of the body.

All finished! Enjoy your cute amigurumi dinosaur!

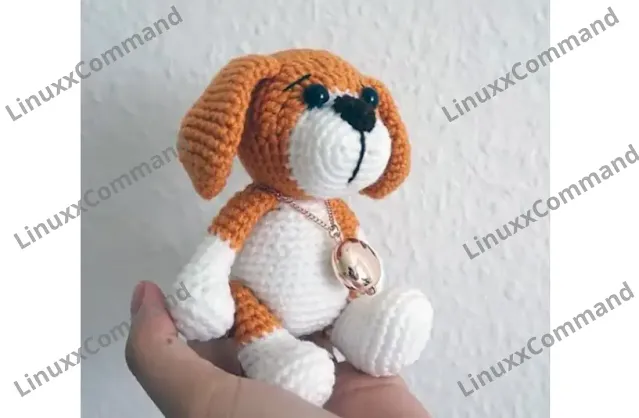
BARBOS THE DOG AMIGURUMI FREE PATTERN

by


Hello everyone…

One of the free amigurumi crochet patterns we will share today is the amigurumi dog, whose photos and design belong to Daria Baysh. You can learn how to crochet this dog using the free amigurumi pattern. Thanks to dear Daria Baysh for this cute dog.

Below you will find some information about this pattern. Remember, if you have any problems, you can write to us and ask for help. You can follow our Pinterest account for free amigurumi patterns and great amigurumi ideas. Have fun…

Materials:

  • Yarn: Yarn Art Jeans or Alize Cotton Gold
  • Hook: 2.00 mm
  • Size: 16 cm

Abbreviations:

  • R = row
  • mc = magic circle
  • ch = chain
  • sc = single crochet
  • st = stitch
  • sl st = slip stitch
  • inc = 2 sc in the next stitch
  • dec = single crochet 2 stitches together
  • BLO = back loop only
  • F.o. = finish off
  • ( ) = number of stitches you should have at the end of the round/row
  • ( )* 6 = repeat whatever is between the brackets the number of times stated

Head

  • R 1: 2 ch, 6 sc in ind ch from hook or 6 sc in mc (6)
  • R 2: 6 inc (12)
  • R 3: (1 sc, inc)*6 (18)
  • R 4: (2 sc, inc)*6 (24)
  • R 5: (3 sc, inc)*6 (30)
  • R 6: (4 sc, inc)*6 (36)
  • R 7: (5 sc, inc)*6 (42)
  • R 8: (6 sc, inc)*6 (48)
  • R 9: (7 sc, inc)*6 (54)
  • R 10-15: 54 sc (6 rows) (54)
  • R 16: (7 sc, dec)*6 (48)
  • R 17: (6 sc, dec)*6 (42)
  • R 18: (5 sc, dec)*6 (36)
  • R 19: (4 sc, dec)*6 (30)
  • R 20: (3 sc, dec)*6 (24)
  • R 21: (6 sc, dec)*3 (21), sl.st.

F.o. leaving a tail for sewing. Insert safety eyes between R 12 and 13.

Legs + Body

  • R 1: 2 ch, 6 sc in ind ch from hook (6)
  • R 2: 6 inc (12)
  • R 3: (1 sc, inc)*6 (18)
  • R 4: (5 sc, inc)*3 (21)
  • R 5-11: 21 sc (7 rows) (21)

Don’t cut the yarn when you finish the second leg. Continue crocheting the body starting from the second leg.

  • R 12: Crochet 2 ch from the second leg and join it with the first leg, 21 sc on first leg, sc in next 2 ch, 21 sc on second leg, sc in next 2 ch (opposite side) (46)
  • R 13-14: 46 sc (2 rows) (46)

Start to crochet a pullover. (You can change colours every row or 2-3 rows).

  • R 15: (5 sc, dec)*6, 4 sc (40)
  • R 16-17: 40 sc (2 rows) (40)
  • R 18: (4 sc, dec)*6, 4 sc (34)
  • R 19-20: 34 sc (2 rows) (34)
  • R 21: (3 sc, dec)*6, 4 sc (28)
  • R 22-24: 28 sc (3 rows) (28)
  • R 25: (2 sc, dec)*6, 4 sc (22)
  • R 26-28: 22 sc (3 rows) (22)

Arms (make 2)

  • R 1: 2 ch, 6 sc in ind ch from hook (6)
  • R 2: (1 sc, inc)*3 (9)
  • R 3-6: 9 sc (4 rows) (9)

Stuff only on bottom. With pullover colour: (change colours for the pullover every row or 2-3 rows)

  • R 7-15: 9 sc (9 rows) (9)

Fold top of arm flat and 4 sc through both sides across. F.o. leaving a tail for sewing.

Ears (make 2)

  • R 1: 2 ch, 6 sc in ind ch from hook (6)
  • R 2: 6 inc (12)
  • R 3: (1 sc, inc)*6 (18)
  • R 4: 18 sc (18)
  • R 5: (2 sc, inc)*6 (24)
  • R 6-8: 24 sc (3 rows) (24)
  • R 9: (2 sc, dec)*6 (18)
  • R 10-11: 18 sc (2 rows) (18)
  • R 12: (1 sc, dec)*6 (12)

F.o. leaving a tail for sewing.

Muzzle

Make 4 ch.

Make an oval starting from the 2nd ch from hook, work on both sides of the chain.

  • R 1: inc in 2nd ch from hook, 1sc in next st, 3sc in last st, on the other side: 1sc in next 1 st, 1sc in next 1st (8)
  • R 2: 2 inc, 1 sc, 3 inc, 1 sc, inc (14)
  • R 3: (1 sc, inc)*2, 1 sc, (1 sc, inc)*3, 2 sc, inc (20)
  • R 4-5: 20 sc (2 rows) (20)
  • R 6: (8 sc, dec)*2 (18), sl.st.

F.o. leaving a tail for sewing.

Tail

Make 8 ch.

Starting in 2nd ch from hook: 7 sc in every st. F.o. leaving a tail for sewing.

Scarf

Make 70 ch or more. Starting in 2nd ch from hook: BLO – sc in every st (make some rows).

All finished! Enjoy your cute amigurumi dog!

Search results forAmigurumi Little Bunny Free Pattern

by


Hello amigurumi lovers and beautiful visitors, I wanted to share the free amigurumi patterns for you here. In my article I will share 1 pattern and how to make it for you. At the end of my article, I will share amigurumi patterns that can generate ideas for you.

Materials and Tools

  • Plush yarn (YarnArt Dolce or Wolans Bunny)
  • Thread for decorating the muzzle
  • Hook 1.25 mm
  • Eyes for toys (8-10 mm)
  • Filler for toys
  • Ribbon
  • Needle for sewing details
  • Scissors

Conventions

  • KA – amigurumi ring
  • vp – air loop
  • sc – single crochet
  • pr – increase
  • ub – beauty
  • (...) xn – repeat n times

Handles (2 parts)

In KA we collect 6 sbn or we collect 2 ch and we knit 6 sbn in the first loop. We knit 5 rows of 6 sc. Then we fold the handle in half and knit 3 sc (for both parts of the handle).

Legs (2 parts)

In KA we collect 6 sc or we collect 2 ch and we knit 6 sc in the first loop:

  • 1st row: (1 sbn, pr) x 3 (9)
  • 2-5th row: 9 sbn

We cut the thread at the first part of the leg. The second one doesn’t.

Body

We continue knitting: 3 ch, 9 sbn on the first leg, 3 sbn along the chain from ch, 9 sbn on the second leg, 3 sbn along the chain (24). Here is the beginning of the row. We continue knitting the body:

  • 6th row: (3 sc, inc) x 6 (30)
  • 7-8th row: 30 sc
  • 9th row: (3 sc, dec) x 6 (24)
  • 10th row: 24 sc
  • 11th row: (2 sc, dec) x 6 (18)

An important point! You can adjust the height of the toy and the body. You can knit an additional row without increase.

  • 12th row: (1 sc, dec) x 6 (12)
  • 13th row: 12 sc
  • 14th row: 12 sc. In this row we knit handles. We attach the handle to the side and knit 3 sbn together with the body part, 3-4 sbn between the handles.

Before that, be sure to fill the body! And one moment! You can knit the handles in the 13th row and knit the 14th row just 12 sc. Then you get a small imitation of the neck.

Head

From the next row, knitting of the head begins:

  • 15th row: 12 inc (24)
  • 16th row: (3 sc, inc) x 6 (30)
  • 17-19th row: 30 sc
  • 20th row: (3 sc, dec) x 6 (24)
  • 21-22th row: 24 sc

We insert the eyes in about the 20th row. But be sure to try on your toy: make dimples under the eyes with your fingers and see where it is better to insert the eyes.

Ears (2 parts)

In KA we collect 6 sc or we collect 2 ch and we knit 6 sc in the first loop:

  • 1st row: 6 pr (12)
  • 2-6th row: 12 sbn
  • 7th row: (1 sbn, ub) x 3 (9)
  • 8th row: 9 sbn

Fold in half at the bottom and sew.

Tail

In the KA we collect 6 sbn or we collect 2 ch and in the first loop we knit 6 sbn, 2-3 rows of 6 sbn. Sew to the body. Or you can just embroider with a few stitches.

Feel free to tag me (@freeamigurumii) in your photos on Instagram or Facebook if you’d like!

All Finished.

Amigurumi Chubby Cats Crochet Pattern

by


Hello amigurumi lovers and beautiful visitors, I wanted to share the free amigurumi patterns for you here. In my article I will share 1 pattern and how to make it for you. At the end of my article, I will share amigurumi patterns that can generate ideas for you.

Materials and Tools

  • Yarn
  • Hook
  • Eyes for toys
  • Filler for toys
  • Polymer clay
  • Dry pastel or blush
  • Glue
  • Needle for sewing details
  • Scissors

Conventions

  • KA – amigurumi ring
  • vp – air loop
  • sc – single crochet
  • pssn – half-column with a crochet
  • pr – increase
  • ub – beauty
  • (...) xn – repeat n times

Handles (2 parts)

  • 1: 5 pr in KA (5)
  • 2: 5 inc (10)
  • 3: 10 pr (10)
  • 4: 8 pr, dec (9)
  • 5-7: 9 pr (9)
  • 8: 7 pr, dec (8)
  • 9-11: 8 sc (8)
  • 12: 6 sc, dec (7)
  • 13-14: 7 sc (7)

Fill only "palms". Fold in half, knit 3 sc for both edges.

Legs (2 parts)

  • 1: 8 sc in KA (8)
  • 2: 8 inc (16)
  • 3-5: 16 sc (16)

We connect the legs 2 in.

Body and Head

We knit in a circle, connecting two legs. 16 sbn on each leg, we also knit sbn in a chain of 2 ch from one and the back side.

  • 6: 36 sc (36)
  • 7: (17 sc, inc) x 2 (38)
  • 8-9: 38 sc
  • 10: 9 sc, inc, 18 sc, inc, 9 sc (40) – increases should be on the sides
  • 11-17: 40 sc
  • 18: (8 sc, dec) x 4 (36)
  • 19: (7 sc, dec) x 4 (32)
  • 20: (6 sc, dec) x 4 (28)
  • 21: (5 sc, dec) x 4 (24)
  • 22: (4 sc, dec) x 4 (20)
  • 23: We knit together with the hands – calculate so that the reductions come before and after the “binding” of the hand. I got it like this: dec, 3, dec, 3 with hand, dec, 3, dec, 3 with hand, dec (16)
  • 24: (1 sc, inc) x 8 (24)
  • 25: (2 sc, inc) x 8 (32)
  • 26: (3 sc, inc) x 8 (40)
  • 27: (4 sc, inc) x 8 (48)
  • 28: (5 sc, inc) x 8 (56)
  • 29: (6 sc, dec) x 8 (64)
  • 30-39: 64 sc (64)
  • 40: (14 sc, dec) x 4 (60)
  • 41: 60 sc (60)
  • 42: (8 sc, dec) x 6 (54)
  • 43: (7 sc, dec) x 6 (48)
  • 44: (6 sb, dec) x 6 (42)
  • 45: (5 sb, dec) x 6 (36) – Here I then sewed on the eyes
  • 46: (4 sb, dec) x 6 (30)
  • 47: (3 sc, dec) x 6 (24)
  • 48: (2 sc, dec) x 6 (18)
  • 49: (1 sc, dec) x 6 (12)
  • 50: 6 dec (6)

Ears (2 parts)

  • 1: 6 sc (6)
  • 2: (1 sc, inc) x 3 (9)
  • 3: (2 sc, inc) x 3 (12)
  • 4: (1 sc, inc) x 6 (18)
  • 5: 18 sc (18)
  • 6: (2 sc, inc) x 6 (24)
  • 7: 24 sc (24)
  • 8: 8 dec, 8 sc (16)

Leave the thread for sewing.

Tail

Dial 12 ch on the body and knit 10 pssn to the base of the tail.

Assembling the Toy

  • Sew all the details.
  • Make the muzzle tightening so that the cheeks seem even puffier.
  • As an eye, you can take sewn-on half-beads or beads. We sew.
  • The nose can be molded from polymer clay. The nostrils must be tinted with pastel or paint. Glue.
  • Decorate the cat as you wish.

Feel free to tag me (@freeamigurumii) in your photos on Instagram or Facebook if you’d like!

All Finished.

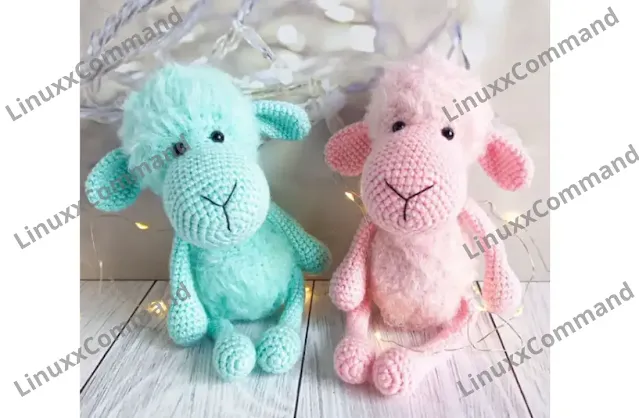
Search results forAmigurumİ Sheep Free Pattern

by


Hello amigurumi lovers and beautiful visitors, I wanted to share the free amigurumi patterns for you here. In my article I will share 1 pattern and how to make it for you. At the end of my article, I will share amigurumi patterns that can generate ideas for you.

Materials and Tools

  • Yarn Pehorka Children’s Novelty (for paws and face)
  • Nako Paris fluffy yarn (for head and body)
  • Hook
  • Filler for toys
  • Wire
  • Needle for sewing details
  • Scissors

Conventions

  • KA – amigurumi ring
  • vp – air loop
  • ss – connecting column
  • sc – single crochet
  • pr – increase
  • ub – beauty
  • (...) x n – repeat n times

Arms and Legs

We knit from smooth yarn. We fill only the lower part of the arms and legs.

  • 1 row: 6 sc in KA
  • 2 row: 6 inc (12)
  • 3 row: (1 sc, inc) x 6 (18)
  • 4-6 rows: 18 sc
  • 7 row: (1 sc, dec) x 6 (12)
  • 8 row: 12 sc
  • 9 row: (2 sc, dec) x 3 (9)
  • 10-23 rows: 9 sc – handles
  • 10-27 rows: 9 sc – legs

Fold in half, close by knitting 4 sc.

Ears (2 parts)

We knit from smooth yarn.

  • 1 row: 6 sc in KA
  • 2 row: 6 inc (12)
  • 3 row: (1 sc, inc) x 6 (18)
  • 4-10 rows: 18 sc
  • 11 row: (1 sc, dec) x 6 (12)

Fold in half and knit together 6 sc. Then fold in half again and grab with a needle.

Head

We start the muzzle with smooth, then switch to textured yarn. We stuff during knitting.

Smooth yarn:

  • 1 row: 6 sc in KA
  • 2 row: 6 inc (12)
  • 3 row: (1 sc, inc) x 6 (18)
  • 4 row: (2 sc, inc) x 6 (24)
  • 5 row: (3 sc, inc, inc) x 6 (30)
  • 6 row: (4 sc, inc) x 6 (36)
  • 7 row: (5 sc, inc) x 6 (42)
  • 8-14 rows: 42 sc
  • 15 row: (5 sc, dec) (36)
  • 16 row: 36 sc
  • 17 row: (4 sc, dec) x 6 (30)

Switching to knitting with textured yarn (change the hook from No. 1.75 mm to No. 2 mm or 2.5 mm, depending on the yarn). If using eyes on a secure mount, put them between rows 17 and 18 (keep in mind that the section of the row with 6 increments forms the forehead of the lamb). Between the eyes (optional) 4-6 sc.

  • 18 row: 12 sc, 6 inc, 12 sc (36)
  • 19 row: (5 sc, inc) x 6 (42)
  • 20-29 rows: 42 sc
  • 30 row: (5 sc, dec) x 6 (36)
  • 31 row: (4 sc, dec) x 6 (30)
  • 32 row: (3 sc, dec) x 6 (24)
  • 33 row: (2 sc, dec) x 6 (18)
  • 34 row: (1 sc, dec) x 6 (12)
  • 34 row: 6 dec

Close to the end, hide the thread inside the head.

Body

We knit from textured yarn. We stuff during knitting.

  • 1 row: 6 sc in KA
  • 2 row: 6 inc (12)
  • 3 row: (1 sc, inc) x 6 (18)
  • 4 row: (2 sc, inc) x 6 (24)
  • 5 row: (3 sc, inc, inc) x 6 (30)
  • 6 row: (4 sc, inc) x 6 (36)
  • 7 row: (5 sc, inc) x 6 (42)
  • 8-15 rows: 42 sc

We knit the legs in the 8th (or 9th row, if desired), 4 sbn together with the leg, 17 sbn between the legs.

  • 16 row: (5 sc, dec) x 6 (36)
  • 17 row: 36 sc
  • 18 row: (4 sc, dec) x 6 (30)
  • 19 row: 30 sc
  • 20 row: (3 sc, dec) x 6 (24)
  • 21 row: 24 sb
  • 22 row: (2 sb, dec) x 6 (18)
  • 23-24 rows: 18 sb

We knit the handles in the 24th row, parallel to the bottom (4 sb with the leg, 5 sb between the legs).

  • 25-27 rows: 18 sc

Finish knitting at the back, in the middle of the back, leaving the thread for sewing on the head.

Assembling the Toy

  • Sew the head to the body. From the bottom in front, sew on the loops on the border of the row with textured yarn (so that the head is slightly tilted forward).
  • Sew ears no higher than eye level, to your taste.
  • To knit the tail, I usually choose a place in the center of the back of the body, insert the hook into the fabric, pick up a chain of 7-8 air loops and return along the chain with half double crochets. I fasten both threads and hide the toy inside.
  • If you want, you can comb the body and head. I do it with Velcro.

Feel free to tag me (@freeamigurumii) in your photos on Instagram or Facebook if you’d like!

All Finished.

Search results for Amigurumi Little Dog Free Pattern

by


Hello amigurumi lovers and beautiful visitors, I wanted to share the free amigurumi patterns for you here. In my article, I will share 1 pattern and how to make it for you. At the end of my article, I will share amigurumi patterns that can generate ideas for you.

Materials and Tools

  • Yarn in two colors
  • Hook
  • Eyes for toys
  • Filler for toys
  • Decor
  • Needle for sewing details
  • Scissors

Conventions

  • KA – amigurumi ring
  • ss – connecting column
  • vp – air loop
  • sc – single crochet
  • pr – increase
  • ub – beauty
  • (...) x n – repeat n times

Head

White yarn:

  • 1: 4 sc, 3 sc in the last loop, on the other side – 3 sc, inc (12)
  • 2: (1 sc, inc) x 6 (18)
  • 3: (2 sc, inc) x 6 (24)
  • 4-6: 24 sc (24)
  • 7: (1 sc, inc) x 6, 12 sc (30)

Brown yarn:

  • 8: (2 dc, pr sn) x 6, 12 sbn (36)
  • 9: (3 sn, pr sn) x 6, 12 sbn (42)
  • 10-15: 42 sbn (42)
  • 16: (5 sbn, dec) x 6 (36)
  • 17: (4 sc, dec) x 6 (30)
  • 18: (3 sc, dec) x 6 (24)
  • 19: (2 sc, dec) x 6 (18)
  • 20: (1 sc, dec) x 6 (12)
  • 21: 6 dec

Body

White yarn:

  • 1: 6 sc in KA (6)
  • 2: 6 inc (12)
  • 3: (sc, inc) x 6 (18)
  • 4: (inc, 2 sc) x 6 (24)
  • 5: (3 sc, inc) x 6 (30)
  • 6: (4 sc, inc) x 6 (36)
  • 7-12: 36 sc (36)
  • 13: (4 sc, dec) x 6 (30)
  • 14: 30 sc (30)
  • 15: (3 sc, dec) x 6 (24)
  • 16: 24 sc (24)
  • 17: (2 sc, dec) x 6 (18)
  • 18: 18 sc (18)

Ears (2 parts)

Brown yarn:

  • 1: 6 sc in KA (6)
  • 2: 6 inc (12)
  • 3: (sc, inc) x 6 (18)
  • 4: (inc, 2 sc) x 6 (24)
  • 5-8: 24 sc
  • 9: (dec, 4 sc) x 4 (20)
  • 10-11: 20 sc
  • 12: (3 sc, dec) x 4 (16)
  • 13: 16 sc

Legs (2 parts)

White yarn:

  • 6 ch, from 2 loops:
  • 1: 4 sc, 3 sc in the last loop, on the other side – 3 sc, inc (12)
  • 2: (sc, inc) x 6 (18)
  • 3: (inc, 2 sc) x 6 (24)
  • 4-5: 24 sb
  • 6: 6 sb, 6 dec, 6 sb (18)
  • 7: 6 sb, 3 dec, 6 sb (15)
  • 8-10: 15 sb

Brown yarn:

  • 11-13: 15 sc (15)
  • 14: (3 sc, dec) x 3 (12)
  • 15: 12 sc
  • 16: 6 dec

Hands (2 parts)

White yarn:

  • 1: 6 sc in KA (6)
  • 2: 6 inc (12)
  • 3: (sc, inc) x 6 (18)
  • 4-5: 18 sc
  • 6: (1 sc, dec) x 6 (12)
  • 7: 3 dec, 6 sc (9)
  • 8-9: 9 sc

Brown yarn:

  • 10-15: 9 sc

Tail

White yarn:

  • 1: 6 sc in KA (6)
  • 2: 6 sc (6)
  • 3: (sc, inc) x 3 (9)
  • 4-6: 9 sc

Brown yarn:

  • 7: (2 sc, inc) x 3 (12)
  • 8-12: 12 sc

Nose

  • Black yarn:
  • 8 sc in KA, sl-st

Feel free to tag me (@freeamigurumii) in your photos on Instagram or Facebook if you’d like!

All Finished.

Top Ad 728x90