Top Ad 728x90

Amigurumi Kitten Mini Free Pattern

by


Hello amigurumi lovers and beautiful visitors, I wanted to share the free amigurumi patterns for you here. In my article, I will share 1 pattern and how to make it for you. At the end of my article, I will share amigurumi patterns that can generate ideas for you.

Materials and Tools

  • Plush yarn Wollans Bunny Baby or its equivalent Himalaya Dolphin Baby
  • YarnArt Jeans (a little to tighten the eyes and mustache)
  • Hook 4.5 mm
  • Eyes for toys 14 mm
  • Spout for toys 16×13 mm
  • Filler for toys
  • Lace for decoration
  • Knitting markers
  • Glue
  • Needle for sewing details
  • Scissors

Conventions

  • KA – amigurumi ring
  • sc – single crochet
  • pr – increase
  • ub – beauty
  • (…) x n – repeat n times

Legs

I knit the left leg first with white yarn for 4 rows, then change to gray.

1r. 7 sc in KA  
2r. 7 inc (14)  
3r. (1 sc, inc) x 7 (21)  
4-5r. 21 sc (2 rows)  
6r. 3 sc, (dec, 1 sc) x 5, 3 sc (16)  
7r. 5 sc, 3 dec, 5 sc (13)  
8r. 5 sc, dec, 6 sc (12)  
9-13r. 12 sc (5 rows)

Knit 1 sc to the middle of the leg, stuff the lower part tightly (up to about 9 rows), fold in half and knit 6 sc together. I hide the tip of the thread in the body when knitting. Tie the second leg in the same way.

Handles

1r. 7 sc in KA  
2r. pr x 7 (14)  
3r. 14 sc  
4r. 5 sc, 2 dec, 5 sc (12)  
5r. 4 sc, 2 dec, 4 sc (10)  
6-9r. 10 sc (4 rows)

Knit 1 sc, fill tightly the lower part (up to about 6-7 rows), fold in half and knit 5 sc together. I hide the tip of the thread in the body when knitting. Connect the second handle in the same way.

Body-Head

1r. 7 sc in KA  
2r. pr x 7 (14)  
3r. (1 sc, inc) x 7 (21)  
4r. (2 sc, inc) x 7 (28)  
5r. (3 sc, inc) x 7 (35)  
6r. (4 sc, inc) x 7 (42)  
7r. 42 sc  
8r. 1 sc, 6 sc together with the leg, 15 sc, 6 sc together with the leg, 14 sc (42)  
9-10r. 42 sc (2 rows)  
11r. (4 sc, dec) x 7 (35)  
12-13r. 35 sc (2 rows)  
14r. (3 sc, dec) x 7 (28)  
15-16r. 28 sc (2 rows)  
17r. (2 sc, dec) x 7 (21)

Stuff the body.

18r. 1 sc, 5 sc together with the handle, 6 sc, 5 sc together with the handle, 4 sc (21)  
19r. (1 sc, dec) x 7 (14)

We start knitting the head, we do not cut the thread.

20r. 14 inc (28)  
21r. 28 sc  
22r. (3 sc, inc) x 7 (35)  
23r. (4 sc, inc) x 7 (42)  
24r. (5 sc, inc) x 7 (49)  
25-27r. 49 sc (3 rows)  
28r. (5 sc, dec) x 7 (42)  
29-32r. 42 sc (4 rows)

Insert eyes between 30 and 31 rows at a distance of 5 sc. Fill the head as you knit.

33r. (4 sc, dec) x 7 (35)  
34r. (3 sc, dec) x 7 (28)  
35r. 28 sc  
36r. (2 sc, dec) x 7 (21)  
37r. (1 sc, dec) x 7 (14)  
38r. 7 dec (7)

Pull the hole with a needle, fasten the thread, hide it.

Ears

I knitted one white, one gray:

1r. 6 sc in KA  
2r. pr x 6 (12)  
3r. (1 sc, pr) x 6 (18)  
4r. 18 sc

Connect the second ear in the same way. Fold in half and knit 9 sc for both walls. Leave a thread for sewing, sew to the head between about 30 and 36 rows.

Tail

1r. 6 sc in KA  
2r. (1 sc, inc) x 3 (9)  
3-13r. 9 sc (11 rows)

Sew between the 8th and 9th rows of the body (I always try on, sometimes it is higher or lower).

Mustache

We take the YarnArt Jeans thread as close as possible to the color of the body, insert the needle into the mouth (1) and draw it in the middle of the outer side of the right eye (2).

Next, we insert the needle into the middle of the inner side of the right eye (3), and bring it back into the mouth (1). Stretch, tie 2 knots.

Similarly, we pull the second eye – we bring it out in the middle of the outer side of the left eye (4), we insert it into the middle of the inner side of the left eye (5), we bring out the needle in the mouth (1). Stretch, tie 2 knots. We repeat all the steps until the desired result.

Pulling the Muzzle

We insert the needle between the eyes (6), bring it into the mouth and sting it. We tie a knot, repeat the action until the desired result.

I have a spout on a secure mount, I cut off the pin with wire cutters, and glue it to the place where the needle is inserted between the eye (I try it on before that).

We embroider the mustache with white thread as shown in the photo above.

Tie a bow around the neck or head if desired.

Feel free to tag me (@freeamigurumii) in your photos on Instagram or Facebook if you’d like!

All Finished.

Search results forAmigurumi Cat and Bunny Free Pattern

by


Hello amigurumi lovers and beautiful visitors, I wanted to share the free amigurumi patterns for you here. In my article I will share 1 pattern and how to make it for you. At the end of my article, I will share amigurumi patterns that can generate ideas for you.

Materials and Tools

  • Gazzal Baby Cotton yarn
  • Hooks 1.75 mm (main) and 2 mm (for clothes)
  • Eyes for toys 10 mm
  • Filler for toys
  • T-pins 2×20 (4 pcs)
  • O-pins 2×25 (2 pcs)
  • Disks for handles 15 mm (4 pcs)
  • Discs for legs 22 mm (2 pcs)
  • Discs for head 22 mm (2 pcs)
  • Washers (10 pcs)
  • Dry pastel or blush
  • Glue
  • Pins
  • Needle for sewing details
  • Round nose pliers
  • Scissors

Conventions

  • KA – amigurumi ring
  • vp – air loop
  • ss – connecting column
  • sc – single crochet
  • ssn – double crochet
  • pssn – half-column with a crochet
  • ub – beauty
  • pr – increase
  • p / pp – knit for the front half loops
  • s / pp – knit for the back half loops
  • (…) x n – repeat n times

Legs (2 parts)

The marker runs along the heel. Let’s start knitting socks:

1p: 5 ch, knit from the second loop from the hook 3 sc, 3 sc in 1, turn the knitting and continue knitting on the other side of the chain 2 sc, inc (10)

2r: inc, 2 sc, 3 inc, 2 sc, 2 inc (16)

3r: sc, inc, 3 sc, (sc, inc) x 3, 5 sc (20)

4-6r: 20 sc

7r: sc, dec, 3 sc, (sc, dec) x 3, 3 sc , dec (15)

8r: 4 sc, 3 dec, 5 sc (12)

9-11r: 12 sc

At the bunny, the socks are higher (9-13 rows).

For p/pp 11 rows knit (sc, 4 sc in 1) x in a circle.

To the remaining c/pp 11 rows, we attach the thread of the main color.

12-20r: 12 sc

Stuff the leg. In the 18th row, we put a splint mount (The splint mount for the paws is assembled as follows: a washer is put on under the head of the cotter pin, then a disk. The mount is inserted into the limb.)

21r: 6 dec

Handles (2 parts)

1r: 6 sc in KA

2r: inc x 6 (12)

3r: (3 sc, inc) x 3 (15)

4-6r: 15 sc

7r: sc, dec, 4 sc, 2 dec, 4 sc (12)

8-19r: 12 sc

We fill the handle loosely, in the 17th row we put a cotter pin. Pay attention, the inside of the handle is where there are 2 decreases.

20th: 6 ub

Bunny Tail

1r: 6 sc in KA

2r: inc x 6 (12)

3r: (3 sc, inc) x 3 (15)

4-6r: 15 sc

7r: (3 sc, dec) x 3 (12)

Fasten and cut the thread, leaving a tail for sewing.

Cat Tail

White:

1r: 6 sc in KA

2r: inc x 6 (12)

3-7r: 12 sc

Change to the main color

8-21r: 12 sc

Fill in half, fold in half and tie ss. Fasten and cut the thread, leaving a tail for sewing.

Body

1st row: 6 sb in KA

2nd row: pr x 6 (12)

3rd: (sb, sb) x 6 (18)

4th: (2 sb, sb) x 6 (24)

5th: (3 sb, sb) x 6 (30)

6p: (4 sc, pr) x 6 (36)

7-11p: 36 sc

Fold the part in half (marker at the back) in the 8th row, fasten the legs on the sides (we put a disk, a washer on the antennae of the cotter pin and twist the antennae).

12r: (10 sb, dec) x 3 (33)

13-15r: 33 sb

16r: (9 sb, dec) x 3 (30)

17-19r: 30 sb

20r: (3 sb, dec) x 6 (24)

21-22r: 24 sb

23r: (2 sb, dec) x 6 (18)

24-25r: 18 sb

In the 22nd row, set the handles, fill the body. Install rocking head mount

26r: (sc, dec) x 6 (12)

27r: 6 dec

Sew on a ponytail. Stuff the tail of the bunny as you sew.

Cotter Pin (for bobble head)

For it we need:

  • Cotter pins 2 pcs
  • Discs 2 pcs
  • Washers 2 pcs
  • Pliers

We insert one cotter pin into another, for this we bend a little antennae of one cotter pin;

From above, on one of the cotter pins we install a disk and a washer;

Twist the antennae with the help of round-nose pliers;

The finished part of the splint fastening is inserted into the unsewn hole of the body. Pull the hole.

We insert the cotter pin without a disc into the head, put on the disc and washer and twist the antennae of the second cotter pin.

Head

1r: 6 sc in KA

2r: inc x 6 (12)

3r: (sc, inc) x 6 (18)

4p: sc, inc, (2 sc, inc) x 5, (sc, inc) x 5 (30)

5-6r: 30 sc

7r: (5 sc, dec) x 5 (25)

8r: (4 sc, dec) x 5 (20)

9-12r: 20 sc

13r: (3 sc, dec) x 5 (15)

14r: (2 sc, dec) x 5 (10)

15r: 5 dec

Fasten the thread, leaving a tail for sewing. Sew the ear to the top of the head.

Details of our bunny should now be connected! I hope the pattern helped you. Have a lot of fun!

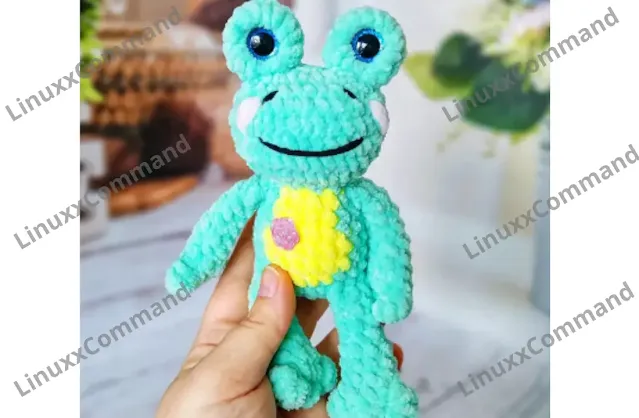
Amigurumi Plush Frog Free Pattern

by


Hello amigurumi lovers and beautiful visitors, I wanted to share the free amigurumi patterns for you here. In my article I will share 1 pattern and how to make it for you. At the end of my article, I will share amigurumi patterns that can generate ideas for you.

Materіals аnd tools

  • Ρlush уаrn LаvÑ–ta Î¥arn оr Wolаns Î’unny Ваbу: grееn (35 g), yellow
  • Hook 4 mm
  • Eyes for toys 14 mm
  • Thread for embroidery muzzle
  • Filler for toys
  • Knitting markers
  • Needle for sewing details
  • Scissors

Conventions

  • ΚΑ – amigurumi ring
  • νp – air loop
  • ss – connecting column
  • sc – single crochet
  • Ш – knob (4 columns with 1 crochet in 1 loop with a common top)
  • Ñ€r – increase
  • ub — beauty
  • (…) x n – repeat n times

Eyes: do not stuff

8 in KA

8 inc (insert eyes into KA)

16 sc

10 dec despite the beginning of the row

Close the hole.

Paws (4pcs): do not stuff!

6 ch, from 2 loops from the hook we knit: (W, 1 sbn) x 2, W in the last loop, on the 2nd side 5 sbn (10)

2. 10 sbn

3. (dec, 3 sbn) x 2 (8)

4-5. 8 sc (2 rows)

(dec, 2 sc) x 2 (6)

7-8. 6 sc (2 rows) fold in half, knit 3 sc on both sides, if necessary, make 1 offset loop

Body-head: fill as you knit

4 ch, with 2 we knit: inc, 1 sc, 4 sc in one, 1 sc, inc (10)

2. 2 inc, 1 sc, 4 inc, 1 sc, 2 inc (18)

(1 sc , inc) x 2, 1 sc, (1 sc, inc) x 4, 1 sc, (1 sc, inc) x 2 (26)

4. 2 sc, 3 sc with foot, 4 sc, 3 sc with foot, 14 sbn (26)

26 sbn, do a color change on the tummy (optional).

14 sc, (dec, 1 sc) x 4 (22)

14 sc, 4 dec (decreases go down the back) (18)

8-9. 18 sc (2 rows)

1 sc, 3 sc with foot, 6 sc, 3 sc with foot, 5 sc (18) if necessary, make ps 11. (1 sc, dec) x 6 (12)

12 inc

(2 sc, inc) x 8 (32)

14-16. 32 sc (3 rows)

(2 sc, dec) x 8 (24)

24 sc

(1 sc, dec) x 8 (16) sl-st

We fill the body and head. Fold in half, sew a hole on the head, sew eyes around the edges. Embroider mouth, nose, cheeks.

Feel free to tag me (@freeamigurumii) in your photos on Instagram or Facebook if you’d like!

All Finished.

Amigurumi Octopus Free Pattern

by


Hello amigurumi lovers and beautiful visitors! I wanted to share some free amigurumi patterns with you here. In this article, I will share one pattern and how to make it for you. At the end of my article, I will share amigurumi patterns that can generate ideas for you.

Materials

  • Hook: 3.5 mm
  • Plush yarn (I used Himalayan Baby Dolphins, 100g/120m), colors white or any other color.
  • Black and white DMC thread for embroidery eyes (DMC thread colors 310 and white)
  • Stuffing materials
  • Sewing needle
  • Sewing pins
  • Scissors

Abbreviations

  • (sc)/(sc): Single crochet
  • (BO): Hazelnut stitch
  • (ml)/(ch): Chainette, Air stitch
  • (MR): Magic ring
  • (dim)/(dec): Decrease, decreasing
  • (augm)/(inc): Increase
  • (M)/(st): Stitch
  • (FLO): Work only in front loops
  • (BLO): Work only in back loops
  • (d-dc, dble.b)/(tr): Double treble crochet
  • (br)/(dc): Double treble crochet
  • (dB)/(hdc): Half treble crochet
  • (sc)/(sl-st): Slip stitch, small stitch
  • (db/dbr)/(dtr): Double treble crochet
  • (mct)/(tch): Chain stitches to turn
  • (3msm)/(sc3tog): 3 sc in the same stitch
  • (Fo): Stop the thread

Tentacles (Make 8)

The detail is done using the spiral technique.

  • Rnd 1. 6 sc in MR (6)
  • Rnd 2. 6 inc (12)
  • Rnd 3-11. 12 sc (9 rows) (12)
  • Rnd 12. (2 sc, dec) x 3 (9)
  • Rnd 13. (1 sc, dec) x 3 (6)

Fill in the detail with padding material. Only the tips of the tentacles are filled with stuffing material.

Head and Body

The detail is done using the spiral technique.

  • Rnd 1. 6 ms in MR (6)
  • Rnd 2. 6 augm (12)
  • Rnd 3. (1 ms, augm) x 6 (18)
  • Rnd 4. (2 ms, augm) x 6 (24)
  • Rnd 5. (3 ms, augm) x 6 (30)
  • Rnd 6. (4 ms, augm) x 6 (36)
  • Rnd 7. (5 ms, augm) x 6 (42)
  • Rnd 8. (6 ms, augm) x 6 (48)
  • Rnd 9. (7 ms, augm) x 6 (54)
  • Rnd 10-19. 54 ms (10 rows) (54)
  • Rnd 20. (7 ms, dim) x 6 (48)
  • Rnd 21. (6 ms, dim) x 6 (42)
  • Rnd 22. (5 ms, dim) x 6 (36)

Fill the detail with the filler material.

  • Rnd 23. (4 sc, dim) x 6 (30)
  • Rnd 24. (3 sc, dim) x 6 (24)
  • Rnd 25. Take the first tentacle, attach it to the head and body, and join these pieces together by crocheting 3 sc (see photo). Then, take the next tentacle, attach it to the head and the body, and join these pieces together by crocheting 3 sc. Continue attaching all eight tentacles at the end of the round. (24)
  • Rnd 26. (2 sc, dim) x 6 (18)
  • Rnd 27. (1 sc, dim) x 6 (12)
  • Rnd 28. 6 dim (6)

Then, using a needle, tighten the hole: move the needle inward from the outside into the outer wall of each loop of row 28 and tighten.

Cut the thread and attach your work.

Feel free to tag me (@freeamigurumii) in your photos on Instagram or Facebook if you’d like!

All Finished.
Search results forAmigurumi Bear Free Pattern

by


Hello amigurumi lovers and beautiful visitors! I wanted to share some free amigurumi patterns with you here. In this article, I will share one pattern and how to make it for you. At the end of my article, I will share amigurumi patterns that can generate ideas for you.

Materials and Tools

  • Yarn: Alize Lanagold (Acrylic 51%, Wool 49%, 100 g / 240 m) – about 40 g
  • Hook: 3.5 mm
  • Eyes for toys: 8 mm
  • Thread for embroidery (muzzle)
  • Filler for toys
  • Needle
  • Scissors

Conventions

  • KA – amigurumi ring
  • vp – air loop
  • sc – single crochet
  • pr – increase
  • ub – beauty
  • (...) x n – repeat n times

Head

Knit in a spiral.

  • 1r. 2 ch, 6 sbn in the second loop from the hook (6)
  • 2p. 6 inc (12)
  • 3p. (1 sc, inc) x 6 (18)
  • 4r. (2 sc, inc) x 6 (24)
  • 5r. (3 sc, inc) x 6 (30)
  • 6r. (4 sc, inc) x 6 (36)
  • 7r. (5 sc, inc) x 6 (42)
  • 8-13r. 42 sc (6 rows)
  • 14r. (5 sc, dec) x 6 (36)
  • 15r. 2 sc, (dec, 4 sc) x 5, dec, 2 sc (30)

Fasten the safety eyes in the 11th row at a distance of 5 columns from each other.

  • 16r. (3 sc, ub) x 6 (24)
  • 17r. 1 sc, (sc, 2 sc) x 5, sc, 1 sc (18)
  • 18r. (4 sc, dec) x 3 (15)

Cut the thread. Stuff the detail.

Ears (2 parts)

Knit in circles. Start each new row with a ch rise.

  • 1r. 2 ch, 6 sbn in the second loop from the hook (6)
  • 2p. 6 inc (12)
  • 3-4r. 12 sc (2 rows)

Cut the thread, leave 20 cm for sewing. Do not stuff the part.

Muzzle

Knit in circles. Start each new row with a ch rise.

  • 1r. 2 ch, 6 sbn in the second loop from the hook (6)
  • 2p. 6 inc (12)
  • 3p. (3 sc, inc) x 3 (15)
  • 4r. 15 sc

Cut the thread, leave 30 cm of sewing thread.

Handles (2 parts)

Knit in a spiral.

  • 1r. 2 ch, 6 sbn in the second loop from the hook (6)
  • 2p. 6 inc (12)
  • 3p. 12 sc
  • 4r. (4 sc, dec) x 2 (10)
  • 5r. (3 sc, dec) x 2 (8)
  • 6-10r. 8 sc (5 rows)

Stuff the bottom of the handle.

  • 11r. 6 sc, dec (7)
  • 12-16r. 7 sc (5 rows)
  • 17r. 1 sc, ss

Fill only the lower part of the arm. Leave the thread for sewing.

Legs (2 parts)

Knit in a spiral. Start knitting from the right leg.

Right Leg

  • 1r. 2 ch, 6 sbn in the second loop from the hook (6)
  • 2p. 6 inc (12)
  • 3p. (1 sc, inc) x 6 (18)
  • 4r. 18 sbn
  • 5r. 2 sc, 3 dec, 10 sc (15)
  • 6p. 2 sc, 2 dec, 3 sc, 2 dec, 2 sc (11)
  • 7-9r. 11 sbn (3 rows)
  • 10r. (1 sc, inc) x 5, 1 sc (16)
  • 11r. 16 sc, ss

Cut the thread, leave 15 cm for stitching the hole.

Left Leg

  • 1r. 2 ch, 6 sbn in the second loop from the hook (6)
  • 2p. 6 inc (12)
  • 3p. (1 sc, inc) x 6 (18)
  • 4r. 18 sbn
  • 5r. 2 sc, 3 dec, 10 sc (15)
  • 6p. 1 sc, 2 dec, 4 sc, 2 dec, 2 sc (11)
  • 7-9r. 11 sbn (3 rows)
  • 10r. (inc, 1 sc) x 3, (1 sc, inc) x 2, 1 sc (16)
  • 11r. 16 sc

Do not cut the thread. Continue knitting the body. Stuff both legs tightly.

Body

Continue knitting on the left side of the left leg.

  • 1r. 8 sbn, (continue knitting on the second leg from the loop that follows the last one on which knitting of the right leg was finished) 16 sbn, continue along the left leg, 8 sbn (32)
  • 2p. 7 sc, 2 inc, 14 sc, 2 inc, 7 sc (36)

Sew up the hole between the legs with two stitches, use the remaining thread from the right leg.

  • 3-5r. 36 sc (3 rows)
  • 6r. 1 sc, dec, 13 sc, dec, 2 sc, dec, 11 sc, dec, 1 sc (32)
  • 7-8r. 32 sbn (2 rows)

Stuff the part in the process.

  • 9r. (dec, 6 sc) x 4 (28)
  • 10-11r. 28 sbn (2 rows)
  • 12r. (dec, 5 sc) x 4 (24)
  • 13-14r. 24 sbn (2 rows)
  • 15r. (dec, 4 sc) x 4 (20)
  • 16r. 20 sb
  • 17r. (2 sc, dec) x 5 (15)

Stuff the part tightly, cut the thread, leave about 30 cm for sewing on the head. Sew details, embroider nose, smile, and eyebrows.

Feel free to tag me (@freeamigurumii) in your photos on Instagram or Facebook if you’d like!

All Finished.

Amigurumi New Year Bunny Free Pattern

by


Hello amigurumi lovers and beautiful visitors! I wanted to share some free amigurumi patterns with you here. In this article, I will share one pattern and show you how to make it. At the end, I will also provide additional amigurumi patterns to inspire you!

Materials and Tools

  • Yarn: beige, red, white, pink
  • Thread for decorating the muzzle
  • Hook
  • Eyes for toys
  • Filler for toys
  • Needle for sewing details
  • Scissors

Conventions

  • KA = amigurumi ring
  • ss = connecting loop
  • vp = air loop
  • sc = single crochet
  • dc = double crochet
  • hdc = half-double crochet
  • inc = increase
  • ub = beauty
  • (…) x n = repeat n times

Hands (2 Parts)

Beige yarn:

  • 1: 6 sc in KA (6)
  • 2: 6 inc (12)
  • 3-5: 12 sc (12)
  • Red yarn: (For striped pullover, alternate between red and white yarn)
  • 6: dec, 10 sc (11)
  • 7: 11 sc behind the back wall (11)
  • 8: dec, 9 sc (10)
  • 9-14: 10 sc (10)
  • 15: dec, 8 sc (9)
  • 16: 9 sc (9)
  • Stuff hands from rows 1 to 10, but leave the rest unfilled.
  • Fold in half and stitch 4 sc to close. For ruffled sleeves, attach white yarn to the front sts of row 6 and work: (ch 2, sl st in next st) x11.

Ears (2 Parts)

Inner ears:

  • Ch 17, from 2 loops from the hook: 6 sc, 5 dc, 4 dc, {5 dc}, 4 dc, 5 dc, 6 dc (35)

Outer ears:

  • 1: Ch 17, from 2 loops from the hook: 6 sc, 5 dc, 4 dc, {5 dc}, 4 dc, 5 dc, 6 dc (35)
  • 2: 35 dc
  • Connect the parts together and tie off.

Head

Beige yarn:

  • 1: 8 sc in KA (8)
  • 2: 8 inc (16)
  • 3: (1 sc, 1 inc) x 8 (24)
  • 4: (3 sc, 1 inc) x 6 (30)
  • 5: (4 sc, 1 inc) x 6 (36)
  • 6: (5 sc, 1 inc) x 6 (42)
  • 7: (6 sc, 1 inc) x 6 (48)
  • 8-11 (4p.): 48 sc (48)
  • 12: (7 sc, 1 inc) x 6 (54)
  • 13-16: 54 sc (54)
  • 17: (8 sc, 1 inc) x 6 (60)
  • 18: 4 sc, 1 inc, (9 sc, 1 inc) x 6, 5 sc (66)
  • 19: (9 sc, dec) x 6 (60)
  • 20: 4 sc, dec, (8 sc, dec) x 5, 4 sc (60)
  • 21: (7 sc, dec) x 6 (48)
  • 22: (4 sc, dec) x 8 (40)
  • 23: (3 sc, ub) x 8 (32)
  • 24: (4 sc, ub) x 8 (24)
  • 25: (2 sc, ub) x 6 (18)
  • 26: (1 sc, ub) x 6 (12)
  • 27: 6 ub
  • Insert safety eyes between rows 15 and 16, 9 stitches apart. Stuff the head tightly.

Legs (2 Parts)

Beige yarn:

  • 1: 8 sc in KA (8)
  • 2: 8 inc (16)
  • 3: (1 sc, 1 inc) x 8 (24)
  • 4-5: 24 sc (24)
  • 6: 6 sc, 6 dec, 6 sc (18)
  • 7: 18 sc (18)
  • 8: 6 sc, (1 sc, inc) x 3, 6 sc (21)
  • Fasten off and cut the thread for the left leg, place a marker on the 13th loop for the right leg.

Body

  • Connect the legs and start from the marked loop on the left leg.
  • 1: 21 sc on the left leg, 3 sc on the chain, 21 sc on the right leg, 3 sc on the chain (48)
  • 2: 6 sc, 1 inc, (7 sc, inc) x 5, 1 sc (54)
  • 3-7: 54 sc (54)
  • 8: (17 sc, dec) x 3, 12 sc, dec, 1 sc (50)
  • Red yarn: If you'd like a striped pullover, alternate rows with red and white yarn. Otherwise, continue with one color.
  • 9: 50 sc (50)
  • 10: 50 sc behind the back wall (50)
  • 11: 50 sc (50)
  • 12: 4 sc, dec, 10 sc, dec, 11 sc, dec, 10 sc, dec, 7 sc (46)
  • 13-15: 46 sc (46)
  • 16: (9 sc, dec) x 3, 10 sc, dec, 1 sc (42)
  • 17-18: 42 sc (42)
  • 19: (5 sc, dec) x 6 (36)
  • 20-21: 36 sc (36)
  • 22: (2 sc, dec, 2 sc) x 6 (30)
  • 23-24: 30 sc (30)
  • 25: (3 sc, dec) x 6 (24)
  • 26: 24 sc

Tail

  • Beige yarn:
  • 1: 6 sc in KA (6)
  • 2: 6 sc (12)
  • 3: 6 sc
  • Red yarn: 6 sc in KA, increase and decrease in subsequent rows, following the pattern in the original instructions.

Collar

  • White yarn:
  • 1: Ch 34, from 7 loops (button loop), 28 sc
  • 2: Turn, ch 5, dc, (ch 1, skip 2 loops, {ch, ch 2, dc}) x 9
  • 3: Turn, ch 3, {4 dc in an arch of 2 ch}, (sl-st in an arch of 1 ch, {5 dc in an arch of 2 ch}) x 9

Feel free to tag me (@freeamigurumii) in your photos on Instagram or Facebook if you'd like!

All finished. Enjoy your creation!

Top Ad 728x90