Top Ad 728x90

Crochet plush elephant free pattern

by


Plush Elephant Free Crochet Pattern

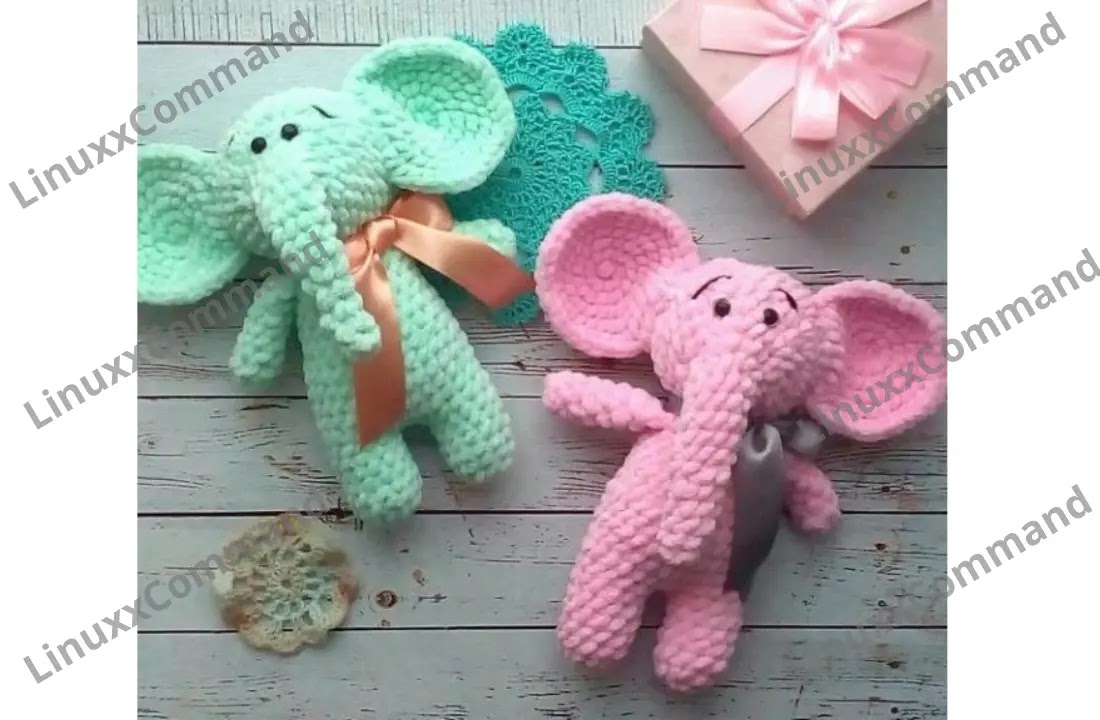
This cute and cuddly plush elephant is the perfect gift for kids or anyone who loves amigurumi! The finished elephant stands at approximately 23-25 cm (9-9.8″) tall. It’s easy to make with this free pattern, designed by @dariya_kozenko.

Materials:

  • Himalaya Dolphin Baby, Kartopu Yumurcak, or YarnArt Dolce yarn (1/2 skein)
  • 3.5 mm or 4.0 mm crochet hook
  • Safety or sewing eyes
  • Some cotton yarn (similar color to the main yarn)
  • Black embroidery floss or thin yarn for eyebrows
  • Satin ribbon for the bow
  • Tapestry needle
  • Scissors
  • Fiberfill

Abbreviations:

  • R = row
  • ch = chain
  • sl st = slip stitch
  • sc = single crochet
  • inc = increase (2 sc in one stitch)
  • dec = decrease (2 sc together)
  • [...] = number of stitches at the end of the row
  • (...) = repeat the instructions within the parentheses the given number of times

Free Amigurumi Elephant Pattern

Head

Start crochet from the trunk (do not stuff the trunk).

  • R 1: 2 ch, 4 sc in 2nd ch from hook [4]
  • R 2-4: 4 sc (3 rows)
  • R 5: inc, 3 sc [5]
  • R 6: inc, 4 sc [6]
  • R 7: inc, 5 sc [7]
  • R 8-10: 7 sc (3 rows)
  • R 11: inc, 6 sc [8]
  • R 12: inc, 7 sc [9]
  • R 13: inc, 8 sc [10]
  • R 14: (1 sc, inc) repeat 5 times [15]
  • R 15: (2 sc, inc) repeat 5 times [20]
  • R 16: 12 sc, 8 inc [28]
  • Insert safety eyes between R 14 and R 15, 2 stitches apart.
  • R 17: 12 sc, (1 sc, inc) repeat 8 times [36]
  • R 18-21: 36 sc (4 rows)
  • R 22: (4 sc, dec) repeat 6 times [30]
  • R 23: (3 sc, dec) repeat 6 times [24]
  • R 24: (2 sc, dec) repeat 6 times [18]
  • R 25: (1 sc, dec) repeat 6 times [12]
  • Stuff the head with fiberfill.
  • R 26: (dec) repeat 6 times [6]
  • Fasten off.

Ears (Make 2)

  • R 1: 2 ch, 6 sc in 2nd ch from hook [6]
  • R 2: (inc) repeat 6 times [12]
  • R 3: (1 sc, inc) repeat 6 times [18]
  • R 4: (2 sc, inc) repeat 6 times [24]
  • R 5: (3 sc, inc) repeat 6 times [30]
  • R 6: (4 sc, inc) repeat 6 times [36]
  • Sl st, leave a yarn tail 10-15 cm long.

Sew the ears to the head between R 17 and R 18 using cotton yarn (similar color to the main yarn). Attach the ear with the side where we finished crocheting, leaving the yarn tail for sewing. Use a crochet hook or tapestry needle to hide the plush yarn tail into the head. Embroider the eyebrows using black floss or yarn.

Arms (Make 2)

  • R 1: 2 ch, 7 sc in 2nd ch from hook [7]
  • R 2-8: 7 sc (7 rows)
  • Do not stuff.
  • Fold the top opening flat and crochet 3 sc through both sides.
  • Fasten off.

Legs and Body

Stuff as you go.

Legs (Make 2)
  • R 1: 2 ch, 6 sc in 2nd ch from hook [6]
  • R 2: (inc) repeat 6 times [12]
  • R 3-7: 12 sc (5 rows)
  • Fasten off.

For the second leg, do not fasten off. Make 3 ch on the second leg and join it with the first leg.

Continue crocheting the body in the round:
  • R 8: 12 sc on the first leg, 3 sc in 3 ch, 12 sc on the second leg, 3 sc in 3 ch (opposite side) [30]
  • R 9-12: 30 sc (4 rows)
  • R 13: (4 sc, dec) repeat 5 times [25]
  • R 14: 25 sc
  • R 15: (3 sc, dec) repeat 5 times [20]
  • R 16-17: 20 sc (2 rows)
  • R 18: (8 sc, dec) repeat 2 times [18]
  • R 19: Attach arms on the sides of the body (crochet sc of the body together with sc of the arm) [18 sc]
  • R 20: 18 sc
  • Sl st, fasten off.

Sew the head to the body using a cotton yarn. Tie a satin ribbon bow around the neck to finish the look.

Happy Crocheting!

Search results forAmigurumi cute bunny pattern

by


Plush Bunny Free Crochet Pattern

This adorable plush bunny is the perfect gift for children, or anyone who loves cute, handmade toys. Designed by @nasty_schastlivaya_, this bunny stands about 30 cm (11.8 inches) tall. Follow this easy-to-follow crochet pattern and create your very own bunny!

Materials:

  • Yarn: Himalaya Dolphin Baby or YarnArt Dolce
  • Hook size: 4.0 mm
  • 12 mm safety eyes
  • White cotton yarn for embroidering eye whites
  • Black cotton yarn for embroidering eyebrows
  • Pink yarn for embroidering nose
  • Yarn marker, scissors
  • Sewing thread and needle
  • Fiberfill

Abbreviations:

  • R = row
  • mc = magic circle
  • ch = chain
  • sc = single crochet
  • dc = double crochet
  • hdc = half double crochet
  • tr = treble crochet
  • sl st = slip stitch
  • inc = increase (2 sc in the next stitch)
  • dec = decrease (single crochet 2 stitches together)
  • F.o. = finish off
  • (12) = number of stitches at the end of the row
  • (…) *6 = repeat the instructions within the parentheses 6 times

Free Crochet Plush Bunny Pattern

Legs (Make 2)

With main color:

  • R 1: 2 ch, 8 sc on the 2nd ch (8)
  • R 2: (inc) *8 (16)
  • R 3-5: 16 sc (3 rows)
  • R 6: 4 sc, 4 dec, 4 sc (12)
  • R 7-21: 12 sc (15 rows)
  • Stuff with fiberfill till R 12.
  • Fold top of leg flat and 6 sc through both sides across.
  • F.o.

Arms (Make 2)

With main color:

  • R 1: 2 ch, 5 sc on the 2nd ch (5)
  • R 2: (inc) *5 (10)
  • R 3-14: 10 sc (12 rows)
  • Stuff only the bottom part of the arm.
  • Fold top of arm flat and 5 sc through both sides across.
  • F.o.

Ears (Make 2)

With main color:

  • R 1: 2 ch, 6 sc on the 2nd ch (6)
  • R 2: (inc) *6 (12)
  • R 3: (1 sc, inc) *6 (18)
  • R 4: (2 sc, inc) *6 (24)
  • R 5-7: 24 sc (3 rows)
  • R 8: (2 sc, dec) *6 (18)
  • R 9-11: 18 sc (3 rows)
  • Sl st. F.o. and leave a long tail for sewing.

Body and Head (For Boy)

With main color:

  • Stuff as you go.
  • R 1: 2 ch, 6 sc on the 2nd ch (6)
  • R 2: (inc) *6 (12)
  • R 3: (1 sc, inc) *6 (18)
  • R 4: (2 sc, inc) *6 (24)
  • R 5: (3 sc, inc) *6 (30)
  • R 6: (4 sc, inc) *6 (36)
  • R 7: 36 sc
  • R 8: Attach legs: 6 sc, 6 sc together with sc of the 1st leg, 12 sc, 6 sc together with sc of the 2nd leg, 6 sc (36)
  • R 9: 36 sc
  • Change to sweater color:
  • R 10-11: 36 sc (2 rows)
  • R 12: 9 sc, dec, 14 sc, dec, 9 sc (34)
  • R 13: 7 sc, dec, 16 sc, dec, 7 dc (32)
  • R 14: 32 sc
  • R 15: 13 sc, dec, 2 sc, dec, 13 sc (30)
  • R 16: 4 sc, dec, 18 sc, dec, 4 sc (28)
  • R 17: 7 sc, dec, 10 sc, dec, 7 sc (26)
  • R 18: 5 sc, dec, 12 sc, dec, 5 sc (24)
  • R 19: Attach arms: 5 sc, 5 sc together with sc of the 1st arm, 6 sc, 5 sc together with sc of the 2nd arm, 3 sc (24)
  • R 20: (2 sc, dec) *6 (18)
  • R 21: BLO 18 sc
  • Crochet additional 4 sc (or more/less) to get the position of the yarn marker in the middle of the back.
  • Change to main color:
  • R 22: (inc) *18 (36)
  • R 23: (5 sc, inc) *6 (42)
  • R 24-28: 42 sc (5 rows)
  • R 29: 9 sc, dec, 20 sc, dec, 9 sc (40)
  • R 30: 9 sc, dec, 18 sc, dec, 9 sc (38)
  • R 31: 10 sc, dec, 14 sc, dec, 10 sc (36)
  • R 32: 36 sc
  • R 33: (4 sc, dec) *6 (30)
  • R 34: (3 sc, dec) *6 (24)
  • Insert safety eyes between R 28 and R 29, 5 stitches apart.
  • R 35: 24 sc
  • R 36: (2 sc, dec) *6 (18)
  • R 37: (1 sc, dec) *6 (12)
  • R 38: (dec) *6 (6)
  • F.o.

Tail

  • With main color:
  • R 1: 2 ch, 6 sc on the 2nd ch (6)
  • R 2: (1 sc, inc) *3 (9)
  • R 3: 9 sc
  • Sl st. F.o. and leave a long tail for sewing. Stuff gently with fiberfill.
  • Sew tail to the body between R 9 and R 10 (hide the transition from one color to the next on the body).

Collar for Boy

With sweater color:

  • Attach yarn to the front loop of R 21 of the body.
  • R 1: FLO 2 ch, 2 dc in every st to the end of row, sl st (36)
  • R 2: 2 ch, 2 dc in every st to the end of row, sl st (72)
  • F.o.

Collar for Girl

With dress color:

  • Make 29 ch.
  • From the 2nd ch from hook: 1 sc, 1 hdc, 24 dc, 1 hdc, 1 sc.
  • Put the collar on the bunny and sew the edges together.
  • You can fix the collar with some stitches using a needle and thread.

Skirt

With dress color:

  • Attach yarn to the back loop of R 11 of the body.
  • R 1: FLO 2 ch, 2 dc in every st to the end of row, sl st (72)
  • R 2: 2 ch, 2 dc in every st to the end of row, sl st (144)
  • F.o.

Bow

With dress color:

  • Make 5 ch.
  • In the 5th ch from hook: 4 tr, 4 ch, 1 sl st in the main ch.
  • Make 4 ch and 4 tr, sl st in the main ch.
  • Leave a long tail for sewing.

Sew ears and bow on the head.

Embroider the whites of the eyes with white yarn, eyebrows with black yarn, and nose with pink yarn.

Happy Crocheting!

Baby mouse amigurumi pattern

by


Amigurumi Mouse Free Crochet Pattern

This adorable baby mouse is a simple yet delightful project that makes the perfect gift for loved ones. Designed by @svetlana_kids_toys, this cute mouse stands about 13 cm (5.1") tall with its ears. Follow along with this easy-to-follow crochet pattern to make your own little friend!

Materials:

  • Yarn: YarnArt Jeans yarn, fine yarn for the nose
  • Hook size: 1.75-2.0 mm
  • Black beads for eyes
  • Sewing needle and scissors
  • Fiberfill

Abbreviations:

  • R = Row
  • mc = Magic Circle (Magic Ring)
  • ch = Chain
  • st = Stitch
  • sc = Single Crochet
  • inc = Increase (2 sc in the next stitch)
  • dec = Decrease (Single crochet 2 stitches together)
  • FLO = Front Loop Only
  • (12) = Number of stitches at the end of the row
  • (…) x 6 = Repeat the instructions within the parentheses 6 times

Free Crochet Mouse Pattern

Legs (Make 2)

With main color:

  • R 1: 6 sc in mc (6)
  • R 2: (inc) x 6 (12)
  • R 3: (1 sc, inc) x 6 (18)
  • R 4-8: 18 sc (5 rows)
  • F.o.
  • Don't cut the yarn when finishing the second leg!

Continue crocheting the body in the round:

  • R 9: 18 sc on the first leg, 18 sc on the second leg (36)
  • Change to sweater color:
  • Alternate two colors for stripes (change color every 2 rows).
  • R 10-24: 36 sc (15 rows)
  • R 25: (4 sc, dec) x 6 (30)
  • R 26: (3 sc, dec) x 6 (24)
  • Change to main color:
  • R 27: 24 sc
  • F.o. and leave a long tail for sewing.

Arms (Make 2)

With main color:

  • R 1: 6 sc in mc (6)
  • R 2: (inc) x 6 (12)
  • R 3-5: 12 sc (3 rows)
  • Change to sweater color:
  • Alternate two colors for stripes (change color every 2 rows).
  • R 6-14: 12 sc (9 rows)
  • R 15: (2 sc, dec) x 3 (9)
  • Fold the top of the arm flat and 4 sc through both sides across.
  • F.o. and leave a long tail for sewing.

Muzzle and Head

With main color:

  • R 1: 6 sc in mc (6)
  • R 2: (1 sc, inc) x 3 (9)
  • R 3: (2 sc, inc) x 3 (12)
  • R 4: (2 sc, inc) x 4 (16)
  • R 5: (3 sc, inc) x 4 (20)
  • R 6: (4 sc, inc) x 4 (24)
  • R 7: (5 sc, inc) x 4 (28)
  • R 8: (6 sc, inc) x 4 (32)
  • R 9: (7 sc, inc) x 4 (36)
  • R 10: 36 sc
  • R 11: (5 sc, inc) x 6 (42)
  • R 12-18: 42 sc (7 rows)
  • R 19: (5 sc, dec) x 6 (36)
  • R 20: 36 sc
  • R 21: (4 sc, dec) x 6 (30)
  • R 22: (3 sc, dec) x 6 (24)
  • R 23: (2 sc, dec) x 6 (18)
  • R 24: (1 sc, dec) x 6 (12)
  • R 25: (dec) x 6 (6)
  • F.o.

Nose

With pink color:

  • R 1: 6 sc in mc (6)
  • R 2: (1 sc, inc) x 3 (9)
  • Pull off the opening with a needle and thread in FLO of R 2.
  • Sew the nose on top of the muzzle as shown in the picture. Embroider a mouth.

Tail

With main color:

  • R 1: 6 sc in mc (6)
  • R 2: (1 sc, inc) x 3 (9)
  • R 3-20: 9 sc (18 rows)
  • Fold the top of the tail flat and 4 sc through both sides across.
  • F.o. and leave a long tail for sewing.

Ears (Make 2)

With main color:

  • R 1: 6 sc in mc (6)
  • R 2: (inc) x 6 (12)
  • R 3: (1 sc, inc) x 6 (18)
  • R 4-6: 18 sc (3 rows)
  • R 7: (4 sc, dec) x 3 (15)
  • R 8: (3 sc, dec) x 3 (12)
  • F.o. and leave a long tail for sewing.

Assembly

  • Sew the black beads onto the eyes between R 9 and R 10 of the head, about 10-11 stitches apart.
  • Sew the ears to the head between R 17 and R 18, about 7 stitches apart.
  • Sew the arms to the body between R 24 and R 25.
  • Sew the tail to the body.

Scarf

This scarf is knitted in stockinette stitch (1 row knit, next row purl).

  • With beige color, cast on 6 sts.
  • Knit the scarf as long as you wish, then finish.

Enjoy making your adorable little mouse! 🐭

AMIGURUMI KIKI THE MONKEY PDF FREE PATTERN

by


Amigurumi Monkey Free Crochet Pattern

This adorable amigurumi monkey, designed by @aquariwool, is a perfect project for crocheters of all levels! The finished size is approximately 12 cm. Follow along with the step-by-step instructions and enjoy making this cute little Kiki the monkey!

Materials

Yarn colors:

  • (A) White: YarnArt Jeans 03 (50g, 160m)
  • (B) Brown: YarnArt Jeans 70 (50g, 160m)
  • (C) Red: YarnArt Jeans 51 (50g, 160m)

Other materials:

  • Crochet hook size 2-2.5 mm
  • Knitting needles size 3.5-4 mm
  • 1 wooden button
  • 1 pair of 10 mm safety eyes
  • Tapestry needle, pins, stitch markers, scissors

Abbreviations

  • Ch = Chain
  • Sc = Single crochet
  • Inc = Increase
  • Dec = Decrease
  • Hdc = Half double crochet
  • Sl st = Slip stitch
  • MR = Magic ring
  • Dc = Double crochet
  • Tr = Treble crochet
  • Bobble = Bobble stitch (4 hdc in the same st)
  • BLO = Back loop only
  • FLO = Front loop only
  • Rnd = Round
  • Sts = Stitches
  • K = Knit
  • P = Purl

Legs (Make 2)

Yarn A

  • Rnd 1: 6 sc in MR [6]
  • Rnd 2: (1 sc, inc) * 3 [9]
  • Rnd 3: (2 sc, inc) * 3 [12]
  • Rnd 4: (3 sc, inc) * 3 [15]
  • Break the yarn. Make the second leg the same way, but do not cut the yarn. Connect the 2 legs together: sc 15 (leg 1) + sc 15 (leg 2) = 30.
  • Move to the body part, change to Yarn B.

Body

Yarn B

  • Rnd 1: (4 sc, inc) * 6 [36]
  • Rnd 2-7: 36 sc (6 rows) [36]
  • Rnd 8: (4 sc, dec) * 6 [30]
  • Rnd 9: 30 sc [30]
  • Rnd 10: (3 sc, dec) * 6 [24]
  • Rnd 11: 24 sc [24]
  • Rnd 12: (2 sc, dec) * 6 [18]
  • Rnd 13: 18 sc [18]
  • Break the yarn with a long tail. Stuff the body.

Arms (Make 2)

Yarn A

  • Rnd 1: 6 sc in MR [6]
  • Rnd 2: (1 sc, inc) * 3, change to Yarn B [9]
  • Rnd 3-7: 9 sc (5 rows) [9]
  • Rnd 4: dec 1, sc 7 [8]
  • Rnd 5: dec 1, sc 6 [7]
  • Rnd 6: dec 1, sc 5 [6]
  • Break the yarn with a long tail. Stuff lightly. Sew 2 edges together.

Head

Yarn A

  • Rnd 1: 6 sc in MR [6]
  • Rnd 2: 6 inc [12]
  • Rnd 3: (1 sc, inc) * 6 [18]
  • Rnd 4: (2 sc, inc) * 6 [24]
  • Rnd 5: (3 sc, inc) * 6 [30]
  • Rnd 6: (4 sc, inc) * 6 [36]
  • Rnd 7: (5 sc, inc) * 6 [42]
  • Rnd 8: (6 sc, inc) * 6 [48]
  • Rnd 9: (7 sc, inc) * 6 [54]
  • Rnd 10: 54 sc [54]
  • Rnd 11: (8 sc, inc) * 6 [60]
  • Rnd 12-19: 60 sc (8 rows) [60]
  • Rnd 20: (8 sc, dec) * 6 [54]
  • Rnd 21: 54 sc [54]
  • Rnd 22: (7 sc, dec) * 6 [48]
  • Rnd 23: (6 sc, dec) * 6 [42]
  • Rnd 24: (5 sc, dec) * 6 [36]
  • Rnd 25: (4 sc, dec) * 6 [30]
  • Rnd 26: (3 sc, dec) * 6 [24]
  • Rnd 27: (2 sc, dec) * 6 [18]
  • Break the yarn with a long tail. Stuff the head.

Hat

Yarn B

  • Rnd 1-9: Crochet Rnd 1-9 of the head [60]
  • Rnd 10: (8 sc, inc) * 6 [60]
  • Rnd 11-17: 60 sc (7 rows) [60]
  • Rnd 18: sc 15, hdc 2, (dc 3), hdc 2, sc 8, hdc 2, (dc 3), hdc 2, sc 8, hdc 2, (dc 3), hdc 2, sc 14 [66]
  • Rnd 19: sc 15, hdc 3, (dc, tr, dc), hdc 3, sc 8, hdc 3, (dc, tr, dc), hdc 3, sc 8, hdc 3, (dc, tr, dc), hdc 3, sc 14 [72]
  • Continue with sc stitches. Break the yarn with a long tail.

Inner Ears (Make 2)

Yarn A

  • Rnd 1: 6 sc in MR [6]
  • Rnd 2: 6 inc [12]
  • Rnd 3: (2 sc, inc) * 6 [16]
  • Break the yarn with a long tail.

Outer Ears (Make 2)

Yarn B

  • Rnd 1: 6 sc in MR [6]
  • Rnd 2: 6 inc [12]
  • Rnd 3: (1 sc, inc) * 6 [18]
  • Rnd 4: (2 sc, inc) * 6 [24]
  • Rnd 5: 24 sc [24]
  • Rnd 6: (2 sc, dec) * 6 [18]
  • Break the yarn with a long tail. Place the inner ear on the outer ear and sew both together.

Tail

Yarn B

  • Rnd 1: 7 sc in MR [7]
  • Rnd 2-21: 7 sc (20 rows) [7]
  • Break the yarn with a long tail to sew later.

Scarf

Yarn C, using knitting needles

  • Cast on 6 sts.
  • Row 1: K6
  • Row 2: P6
  • Repeat Rows 1 and 2 until the scarf reaches 14 cm.
  • Cast off, break the yarn, and hide the remaining yarn.
  • Attach the wooden button to the scarf using a tapestry needle.

Assembly

Now that you've completed all the pieces, sew them together. Attach the head, arms, legs, ears, and tail to the body. Don't forget to sew the hat and scarf onto your little monkey!

Enjoy your adorable new Kiki the Monkey! 🐒

Amigurumi bear in sweater pattern

by


Amigurumi Bear in Sweater Free Crochet Pattern

This adorable bear wearing a sweater is a fun and easy crochet project! The finished bear is about 14 cm (5.5 inches) tall. You can adjust the size depending on your choice of yarn and hook. Designed by @lullaby_toys, with translation by Amiguroom Toys. Let’s get started!

Materials

  • Gazza Baby Cotton yarn (60% cotton, 40% acrylic) in beige and a color for the sweater
  • 1.5 mm crochet hook
  • 2.5 mm knitting needles
  • 6 mm black beads for eyes
  • Sewing needle and scissors
  • Brown and white embroidery floss
  • Fiberfill

Abbreviations

  • R = row
  • mc = magic circle
  • ch = chain
  • sl st = slip stitch
  • sc = single crochet
  • inc = 2 sc in the next stitch
  • dec = single crochet 2 stitches together
  • BLO = back loop only
  • F.o. = finish off
  • (12) = number of stitches at the end of the row
  • (…) * 6 = repeat the pattern inside the brackets as stated

Arms (Make 2)

With beige yarn:

  • R 1: 6 sc in mc [6]
  • R 2: (inc) * 6 [12]
  • R 3: (3 sc, inc) * 3 [15]
  • R 4-5: 15 sc (2 rows)
  • Change to blue yarn:
  • R 6-16: 15 sc (11 rows)
  • R 17: (3 sc, dec) * 3 [12]
  • Stuff gently with fiberfill until R 14.
  • Fold the top of the arm flat and crochet 6 sc through both sides across.
  • F.o.

Legs, Body, and Head (Crocheted as One Piece)

Legs (Make 2):

  • With beige yarn:
  • R 1: 6 sc in mc [6]
  • R 2: (inc) * 6 [12]
  • R 3: 5 sc, 2 inc, 5 sc [14]
  • R 4: 14 sc
  • R 5: 6 sc, 2 inc, 6 sc [16]
  • R 6: 16 sc
  • R 7: 7 sc, 2 inc, 7 sc [18]
  • R 8: 18 sc

Do not cut the yarn when finishing the second leg! Continue crocheting the body in the round:

  • From the second leg: ch 5, join to the first leg with sl st in the last stitch of R 18.
  • Continue crocheting the body-head:
  • R 9: On the first leg: 8 sc, 2 inc, 8 sc; 5 sc in the 5 ch, on the second leg: 8 sc, 2 inc, 8 sc; 5 sc in the 5 ch (opposite side) [50]
  • R 10: (4 sc, inc) * 10 [60]
  • R 11: 20 sc, (inc, 2 sc) * 5, inc, 24 sc [66]
  • Change to blue yarn:
  • R 12: (10 sc, inc) * 6 [72]
  • R 13-20: 72 sc (8 rows)
  • R 21: 14 sc, dec, 36 sc, dec, 18 sc [70] (decreases must be on the sides of the body)
  • R 22-23: 70 sc (2 rows)
  • R 24: 14 sc, dec, 35 sc, dec, 17 sc [68]
  • R 25-26: 68 sc (2 rows)
  • R 27: 12 sc, (2 sc, dec, 2 sc with sc of the 1st hand), 29 sc, (2 sc, dec, 2 sc with sc of the 2nd hand), 15 sc [66]
  • Change to beige yarn:
  • R 28: BLO (9 sc, dec) * 6 [60]
  • R 29-34: 60 sc (6 rows)
  • R 35: 4 sc, dec, (8 sc, dec) * 5, 4 sc [54]
  • R 36-37: 54 sc (2 rows)
  • R 38: (7 sc, dec) * 6 [48]
  • R 39-42: 48 sc (4 rows)
  • R 43: 3 sc, dec, (6 sc, dec) * 5, 3 sc [42]
  • R 44: (5 sc, dec) * 6 [36]
  • R 45: 2 sc, dec, (4 sc, dec) * 5, 2 sc [30]
  • R 46: (3 sc, dec) * 6 [24]
  • R 47: 1 sc, dec, (2 sc, dec) * 5, 1 sc [18]
  • R 48: (1 sc, dec) * 6 [12]
  • R 49: (dec) * 6 [6]
  • F.o.

Muzzle

  • With beige yarn:
  • R 1: 6 sc in mc [6]
  • R 2: (inc) * 6 [12]
  • R 3: (1 sc, inc) * 6 [18]
  • R 4: (2 sc, inc) * 6 [24]
  • R 5-6: 24 sc (2 rows)
  • F.o. and leave a long tail for sewing.
  • Sew the muzzle to the head, positioning it between R 27 and R 28. Add fiberfill inside the muzzle before finishing.
  • Embroider the eyebrows and nose with brown floss.

Ears (Make 2)

  • With beige yarn:
  • R 1: 6 sc in mc [6]
  • R 2: (inc) * 6 [12]
  • R 3: (1 sc, inc) * 6 [18]
  • R 4-6: 24 sc (3 rows)
  • Do not stuff with fiberfill.
  • Fold the top of the ear flat and crochet 12 sc through both sides across.
  • F.o. and leave a long tail for sewing.

Collar

Using 2.5 mm needles, cast on 68 stitches (adjust depending on your knitting density).

  • R 1: K2, *P2, K2, repeat from * to end
  • R 2: P2, *K2, P2, repeat from * to end
  • Repeat the first 2 rows 5 times for a total of 12 rows of ribbing.
  • Cast off and leave a long tail.
  • Sew the ends of the collar together, then attach the collar to the front loop of R 28 of the body.

Now you have your cute, cozy bear in a sweater! Enjoy your new crochet friend!

Plush bunny free crochet pattern

by


Amigurumi Bunny Free Crochet Pattern

This cute little bunny amigurumi stands at about 18 cm (7") without ears. With this free crochet pattern, you can make your very own plush bunny! Designed by @__katerin_ka__, and translated by Amiguroom Toys. Let’s get crafting!

Materials

  • Yarn: Himalaya Dolphin Baby
  • Hook size: 4.5 mm and 5.0-5.5 mm for ears
  • Safety eyes or black beads
  • Yarn or embroidery floss for nose and eyebrows
  • Satin ribbon
  • Fiberfill

Abbreviations

  • R = row
  • mc = magic circle (magic ring)
  • sc = single crochet
  • inc = 2 sc in the next stitch
  • dec = single crochet 2 stitches together
  • (12) = number of stitches you should have at the end of the row
  • (…)*6 = repeat the pattern between brackets the number of times stated
  • F.o. = fasten off

Head

  • R 1: 6 sc in mc [6]
  • R 2: (inc)*6 [12]
  • R 3: (1 sc, inc)*6 [18]
  • R 4: (2 sc, inc)*6 [24]
  • R 5: (3 sc, inc)*6 [30]
  • R 6-9: 30 sc (4 rows)
  • R 10: (3 sc, dec)*6 [24]
  • R 11: (2 sc, dec)*6 [18]
  • R 12: (4 sc, dec)*3 [15]
  • F.o.

Legs (Make 2)

  • R 1: 6 sc in mc [6]
  • R 2: (inc)*6 [12]
  • R 3-4: 12 sc (2 rows)
  • Stuff with fiberfill.
  • R 5: (1 sc, dec)*4 [8]
  • R 6-9: 8 sc (4 rows)
  • Fold top of leg flat and 4 sc through both sides across.
  • F.o.

Arms (Make 2)

  • R 1: 6 sc in mc [6]
  • R 2: (1 sc, inc)*3 [9]
  • R 3-4: 9 sc (2 rows)
  • R 5: (1 sc, dec)*3 [6]
  • R 6-9: 6 sc (4 rows)
  • F.o. (Don’t stuff with fiberfill.)

Ears (Make 2)

Use a 5.0-5.5 mm crochet hook:

  • R 1: 6 sc in mc [6]
  • R 2: inc, 2 sc, inc, 2 sc [8]
  • R 3: 1 sc, inc, 3 sc, inc, 2 sc [10]
  • R 4: 2 sc, inc, 4 sc, inc, 2 sc [12]
  • R 5: 3 sc, inc, 5 sc, inc, 2 sc [14]
  • R 6: 4 sc, inc, 6 sc, inc, 2 sc [16]
  • R 7-8: 16 sc (2 rows)
  • R 9: 4 sc, dec, 6 sc, dec, 2 sc [14]
  • R 10: 3 sc, dec, 5 sc, dec, 2 sc [12]
  • R 11: 2 sc, dec, 4 sc, dec, 2 sc [10]
  • R 12: 1 sc, dec, 3 sc, dec, 2 sc [8]
  • R 13: 8 sc
  • R 14: dec, 2 sc, dec, 2 sc [6]
  • R 15: 6 sc
  • Fold top of ear flat and 3 sc through both sides across.
  • F.o. and leave a long tail for sewing.

Tail

  • R 1: 6 sc in mc [6]
  • R 2: (1 sc, inc)*3 [9]
  • Pull off the opening.
  • F.o. and leave a long tail for sewing.

Body

  • R 1: 6 sc in mc [6]
  • R 2: (inc)*6 [12]
  • R 3: (1 sc, inc)*6 [18]
  • R 4: (2 sc, inc)*6 [24]
  • R 5: 4 sc together with sc of the 1st leg, 7 sc, 4 sc together with sc of the 2nd leg, 9 sc [24]
  • R 6-7: 24 sc (2 rows)
  • R 8: (2 sc, dec)*6 [18]
  • R 9: 18 sc
  • R 10: (4 sc, dec)*3 [15]
  • R 11: 3 sc together with sc of the 1st arm, 4 sc, 3 sc together with sc of the 2nd arm, 5 sc [15]
  • R 12: 15 sc
  • Stuff with fiberfill.
  • F.o. and leave a long tail for sewing.

Now you’ve completed your cute bunny! Don’t forget to add the satin ribbon and embroider the nose and eyebrows for extra charm. Enjoy your finished creation!

Top Ad 728x90