Top Ad 728x90

Zaya Velvet Crochet Bunny PDF Amigurumi Free Pattern

by


Zaya Plush PDF Crochet Bunny Amigurumi Free Pattern

Dear friends,
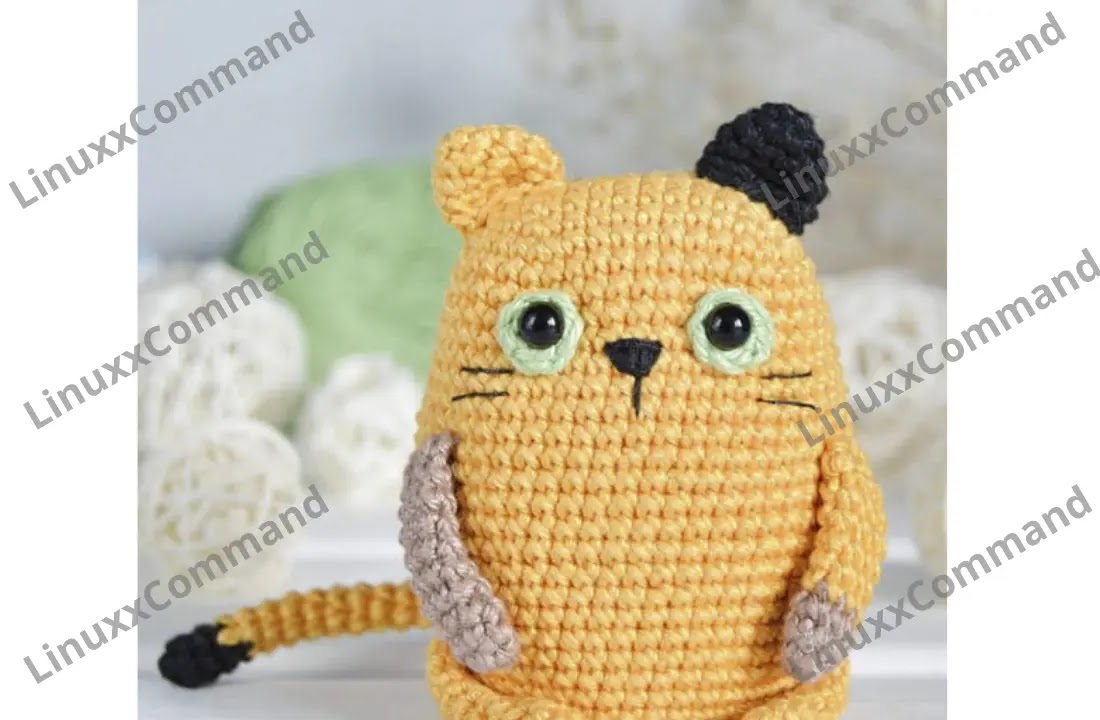
Hello everyone first of all. Today I will share a crochet amigurumi pattern prepared using velvet yarn for you. As you know, plush crochet amigurumi is made using velvet yarn. This is how this cute crochet bunny was crocheted. It’s usually not easy to crochet such an amigurumi, but I don’t think you’ll find it very difficult thanks to the step-by-step pattern instructions. Therefore, I can say that it is one of the good options for beginners.

First of all, there is no dress pattern in the amigurumi pattern. I’m so sorry for this. You can contact the pattern designer for the dress. However, I think it has a very impressive appearance as it is. An extremely large amigurumi pattern. The size of the finished amigurumi crochet bunny toy will be about 40 cm. I wish you success in advance, don’t forget to keep following us for new free amigurumi patterns.

Designer: j_toys1

Materials:

  • Hook, any plush yarn (1 skein) white plush yarn (for the muzzle), pink for the nose.
  • Black floss for cilia embroidery, eyes on a secure mount.
  • Filler.

Terms:

  • Single Crochet (sc)
  • Amigurumi magic ring
  • Increase (inc)
  • Decrease (dec)

Head

  1. 1. 6 sc in amigurumi magic ring
  2. 2. 6 sc (12)
  3. 3. (1 sc, 1 inc) x 6 = 18
  4. 4. (2 sc, 1 inc) x 6 = 24
  5. 5. (3 sc, 1 inc) x 6 = 30
  6. 6. (4 sc, 1 inc) x 6 = 36
  7. 7-8. 36 sc (2 rounds)
  8. 9. (5 sc, 1 inc) x 6 = 42
  9. 10-13. 42 sc (4 rounds)
  10. 14. (5 sc, 1 inc) x 6 = 36
  11. 15. (4 sc, 1 inc) x 6 = 30
  12. 16. (3 sc, 1 inc) x 6 = 24 (stuff the head)
  13. 17. (2 sc, 1 inc) x 6 = 18
  14. 18. (1 sc, 1 inc) x 6 = 12. Fasten and cut the yarn.

Ears

  1. 1. 6 sc in amigurumi magic ring
  2. 2. 6 inc = 12
  3. 3. (1 sc, 1 inc) x 6 = 18
  4. 4. (2 sc, 1 inc) x 6 = 24
  5. 5-8. 24 sc (4 rounds)
  6. 9. (6 sc, 1 inc) x 3 = 21
  7. 10. 21 sc
  8. 11. (5 sc, 1 inc) x 3 = 18
  9. 12-14. 18 sc (3 rounds). Add up in half and knit the sides together.

Muzzle

  1. 1. 6 sc in magic ring
  2. 2. 6 inc = 12
  3. 3. (1 sc, 1 inc) x 6 = 18
  4. 4. 18 sc

Spout

  1. 1. 6 sc in magic ring
  2. 2. 6 sc

Legs

  1. 1. 6 sc in magic ring
  2. 2. 6 inc = 12
  3. 3. (1 sc, 1 inc) x 6 = 18
  4. 4. (2 sc, 1 inc) x 6 = 24
  5. 5-6. 24 sc (2 rounds)
  6. 7. 6 inc, 12 sc = 18
  7. 8. 3 inc, 12 sc = 15
  8. 9. 3 inc, 9 sc = 12 (stuff the legs)
  9. 10-17. 12 sc (8 rounds)
  10. Fold in half and knit sides together.

Heels

  1. 1. 6 sc in magic ring
  2. 2. 6 sc = 12

Arms

  1. 1. 5 sc in magic ring
  2. 2. 5 inc = 10
  3. 3. (1 sc, 1 inc) x 5 = 15
  4. 4-5. 15 sc (2 rounds)
  5. 6. 3 inc, 9 sc = 12
  6. 7. 2 inc, 8 sc = 10 (stuff the arms)
  7. 8-15. 10 sc (8 rounds). Fold in half and knit the sides together.

Body

  1. 1. 6 sc in magic ring
  2. 2. 6 inc = 12
  3. 3. (1 sc, 1 inc) x 6 = 18
  4. 4. (2 sc, 1 inc) x 6 = 24
  5. 5. (3 sc, 1 inc) x 6 = 30
  6. 6. (4 sc, 1 inc) x 6 = 36
  7. 7. (5 sc, 1 inc) x 6 = 42
  8. 8. 42 sc in this round, we knit legs.
  9. 9-11. 42 sc (3 rounds)
  10. 12. (5 sc, 1 inc) x 6 = 36
  11. 13-14. 36 sc (2 rounds)
  12. 15. (4 sc, 1 inc) x 6 = 30
  13. 16-17. 30 sc (2 rounds)
  14. 18. (3 sc, 1 inc) x 6 = 24
  15. 19. 24 sc
  16. 20. (2 sc, 1 inc) x 6 = 18
  17. 21. 18 sc, in this row we knit hands.
  18. 22. 18 sc, fasten and cut the yarn. We stuff the body.

Tail

  1. 1. 6 sc in magic ring
  2. 2. 6 inc = 12
  3. 3-4. 12 sc (2 rounds)
  4. 5. 6 inc, fasten and cut the thread, stuff the tail.

Enjoy crocheting your plush bunny! Don't forget to share your work with us and follow for more patterns!

Search results for Little Crochet Cat Amigurumi Free Pattern

by


Little Cat Amigurumi Crochet Free Pattern

Dear friends, hello to all of you.
I’ve recently started dedicating a little extra space to amigurumi crochet cat patterns. Crochet cat patterns have started to attract my attention lately. This cute amigurumi cat pattern today is one of them. A pretty small amigurumi. It is the size that you can use as a keychain and can be a very nice keychain.

You can find the making of Amigurumi and its detailed step-by-step explanation below. I am adding these cute amigurumi cat pictures created with different colors as an example for you. I hope you like this cute crochet kitty. The finished amigurumi cat toy size is 9cm. Start crocheting this free amigurumi pattern now to gift handmade items to your loved ones during the holidays. Have fun.

Designer: @lucy_rose_toys

Materials and Tools

  • About 30g of 100% cotton DK yarn 50g 125m (for example, Vita cotton Lily) or sport yarn. Size of the toy made with this yarn is about 9cm.
  • Colors: Body color and color of the eyes of your choice.
  • Crochet hook according to your yarn. (I use clover 1.75 or 2.0)
  • Yarn needle, sewing needle.
  • Thread for embroidering the nose (e.g., YarnArt Canarias.) Embroidery or sewing thread for embroidering whiskers.
  • Safety eyes or button eyes diameter 6mm, sewing thread of black color to sew the eyes.
  • Polyester fiberfill.

Abbreviations

  • MR: Magic Ring
  • sc: Single crochet
  • inc: Increase
  • dec: Decrease
  • tr: Treble/Triple crochet
  • TRinc: Work 2 tr sts into the same st.
  • dc: Double crochet
  • hdc: Half double crochet
  • sl-st: Slip stitch
  • ch: Chain
  • st/sts: stitch/stitches
  • FLO: Front loop only
  • BLO: Back loop only
  • BL: Bobble Stitch: (Yarn over, insert your hook into the st, and pull up a loop. Yarn over again and pull through 2 loops) repeat the steps in the same st until you have a total of 5 loops on your hook. Yarn over and pull through all 5 loops at once.
  • Reverse single crochet: Ch 1, working from left to right, insert your hook into the next st, turn hook to the left side, grab yarn and pull through. There are now 2 loops on your hook. Draw up a loop, bring yarn over the hook again and draw this loop through both loops.
  • (…)- x times: Repeat the instructions between parentheses x times.
  • (…): Represents the number of sts you should have at the end of the round.

Body

  1. 1 rnd: 9ch, start in the second chain from the hook: 1 inc, 6 sc, 3 sc in the last st, turn and continue on the other side of the chain, 7 sc (18)
  2. Continue crocheting in spiral.
  3. 2 rnd: 2 inc, 6 sc, 3 inc, 6 sc, 1 inc (24)
  4. 3 rnd: (1 sc, 1 inc) x 2, 6 sc, (1 sc, 1 inc) x 3, 7 sc, 1 inc (30)
  5. 4 rnd: (2 sc, 1 inc) x 2, 6 sc, (2 sc, 1 inc) x 3, 8 sc, 1 inc (36)
  6. 5 rnd: (3 sc, 1 inc) x 2, 6 sc, (3 sc, 1 inc) x 3, 9 sc, 1 inc (42)
  7. 6-7 rnds: 42 sc (2 rnds)
  8. 8 rnd: 4 sc, 1 inc, 20 sc, 1 inc, 16 sc (44)
  9. 9-10 rnds: 44 sc (2 rnds)
  10. If you use safety eyes, first crochet the iris of the eyes, insert the safety eyes into the iris, then insert the eyes into the body between rounds 9 and 10. The distance between the points where you insert the eyes is 7 stitches.
  11. 11 rnd: 5 sc, 1 inc, 21 sc, 1 inc, 16 sc (46)
  12. 12 rnd: 46 sc
  13. 13 rnd: 6 sc, 1 inc, 22 sc, 1 inc, 16 sc (48)
  14. 14 rnd: 48 sc
  15. 15 rnd: 7 sc, 1 inc, 23 sc, 1 inc, 16 sc (50)
  16. 16-20 rnds: 50 sc (5 rnds)
  17. 21 rnd: 7 sc, 1 dec, 23 sc, 1 dec, 16 sc (48)
  18. 22-23 rnds: 48 sc (2 rnds)
  19. 24 rnd: 7 sc, 1 dec, 22 sc, 1 dec, 15 sc (46)
  20. 25 rnd: 46 sc
  21. 26 rnd: 2 sc, (1 dec, 3 sc) x 3, 8 sc, (1 dec, 3 sc) x 3, 6 sc (40)
  22. 27-28 rnds: 40 sc (2 rnds)
  23. 29 rnd: (3 sc, 1 dec) x 8 (32)
  24. 30 rnd: (2 sc, 1 dec) x 8 (24)
  25. 31 rnd: (1 sc, 1 dec) x 8 (16)
  26. Stuff the body tightly, but it must not be too round.
  27. 32 rnd: 8 dec (8)
  28. Add some fiberfill if you need to. Cut the yarn leaving a long tail. Close the remaining hole using a yarn needle: weave in the yarn through the front loops of all 8 stitches and pull tightly. Hide the remaining yarn tail inside the detail.

Tail

  1. 1 rnd: 6 sc in MR
  2. 2-23 rnds: 6 sc (22 rnds)
  3. Fasten off, cut the yarn leaving a long tail for sewing.

Arms (make two)

  1. 1 rnd: 6 sc in MR
  2. 2 rnd: (2 sc, 1 inc) x 2 (8)
  3. 3-9 rnds: 8 sc (7 rnds)
  4. Don’t stuff the arms.
  5. Fold the detail and crochet 4 sc joining both sides together. Fasten off, cut the yarn leaving a long tail for sewing.

Legs (make two)

  1. 1 rnd: 6 sc in MR
  2. 2 rnd: (1 sc, 1 inc) x 3 (9)
  3. 3-8 rnds: 9 sc (6 rnds)
  4. 9 rnd: 4 sc, 1 inc, 4 sc (10)
  5. 10 rnd: 10 sc
  6. Don’t stuff the legs.
  7. Fold the detail and crochet 5 sc joining both sides together. Fasten off, cut the yarn leaving a long tail for sewing.

Ears (make 2)

  1. 1 rnd: 4 sc in MR
  2. 2 rnd: 4 inc (8)
  3. 3 rnd: (1 sc, 1 inc) x 4 (12)
  4. 4-5 rnds: 12 sc (2 rnds)
  5. Don’t stuff the ears.
  6. Fasten off, cut the yarn leaving a long tail for sewing.

Iris of the Eyes (make two)

  1. 1 rnd: 6 sc in MR, 1 sl-st
  2. Don’t tighten the rings too much, we will insert the eyes in them.
  3. Fasten off, cut the yarn leaving a long tail for sewing.

Assembling

  • Sew on the ears.
  • Sew the arms on rounds 14-16.
  • Sew the legs on rounds 23-26.
  • Sew the tail in the center of the back approximately on round 25.
  • Embroider the nose on round 10, the length of the nose is 2 stitches.
  • Sew on the eyes between rounds 9 and 10. The distance between the points where you sew the eyes is 7 stitches. To make the process of sewing easier, you may enlarge the holes where the eyes are sewn with the help of tapestry needle or reverse hook end. First, match the holes in the body with the holes of the iris. Then sew the eyes over the iris.
  • Fix the iris with some stitches around. Embroider the whiskers.

Enjoy your cute little cat amigurumi!

Crochet PDF Teddy Bear Mishka Amigurumi Free Pattern

by


PDF The Bear Mishka Amigurumi Crochet Free Pattern

The Bear Mishka amigurumi is made with plush crochet. Thanks to its soft appearance, you will want to hug it all the time. The sweet face of the teddy bear will make you happy. Because it’s so cute. You should make this wonderful pattern right away and show it to your friends.

Designer: Instagram: plush_happy_toys

Abbreviations

  • MR: Magic (amigurumi) ring
  • sc: Single crochet
  • inc: Increase
  • dec: Decrease
  • (..)*n: Repeat in braces n times

Materials and Tools

  • Hook size 3.5
  • Yarn: Himalaya Dolphin Baby (100g/120m)
  • Black and white cotton yarn for muzzle and eyes decoration
  • Polyester toy filling
  • Needle and sewing thread
  • Safety eyes size 10 mm
  • Safety nose
  • Scissors

Head

White Yarn:

  1. 1. 6 sc in MR
  2. 2. 6 inc (12)
  3. 3. (1 sc, inc)*6 (18)
  4. 4. 18 sc
  5. 5. 6 sc, 6 inc, 6 sc (24)

Main Color Yarn:

  1. 6. 6 sc, (inc, 1 sc)*6, 6 sc (30)
  2. 7. (4 sc, inc)*6 (36)
  3. We insert the nose approximately between 2-3 rows.
  4. 8. (5 sc, inc)*6 (42)
  5. 9-13. 42 sc – 5 rows
  6. We insert the eyes approximately between 6-7 rows. The distance between the eyes is 6 single crochet.
  7. 14. (5 sc, dec)*6 (36)
  8. 15. (4 sc, dec)*6 (30)
  9. 16. (3 sc, dec)*6 (24)
  10. 17. (2 sc, dec)*6 (18)
  11. 18. (1 sc, dec)*6 (12)
  12. 19. 6 dec

Arms (x2)

  1. 1. 6 sc in MR
  2. 2. 6 inc (12)
  3. 3. (1 sc, inc)*6 (18)
  4. 4-5. 18 sc – 2 rows
  5. 6. (1 sc, dec)*6 (12)
  6. 7. 12 sc
  7. 8. (4 sc, dec)*2 (10)
  8. 9-14. 10 sc – 6 rows
  9. Fold together, crochet over both edges 5 sc

Legs (x2)

  1. 1. 6 sc in MR
  2. 2. 6 inc (12)
  3. 3. (1 sc, inc)*6 (18)
  4. 4. (2 sc, inc)*6 (24)
  5. 5-6. 24 sc – 2 rows
  6. 7. 6 sc, 6 dec, 6 sc (18)
  7. 8. 7 sc, 2 dec, 7 sc (16)
  8. 9. 7 sc, dec, 7 sc (15)
  9. 10-16. 15 sc – 6 rows
  10. Fold together, crochet over both edges 7 sc

Ears (x2)

  1. 1. 6 sc in MR
  2. 2. 6 inc (12)
  3. 3. (1 sc, inc)*6 (18)
  4. 4-5. 18 sc – 2 rows

Body

  1. 1. 6 sc in MR
  2. 2. 6 inc (12)
  3. 3. (1 sc, inc)*6 (18)
  4. 4. (2 sc, inc)*6 (24)
  5. 5. (3 sc, inc)*6 (30)
  6. 6. 30 sc
  7. 7. (4 sc, inc)*6 (36)
  8. 8. (5 sc, inc)*6 (42)
  9. 9. 42 sc
  10. 10. 7 sc, 7 sc with the leg, 14 sc, 7 sc with the leg, 7 sc (42)
  11. 11-13. 42 sc – 3 rows
  12. 14. 15 sc, 6 dec, 15 sc (36)
  13. 15. 36 sc
  14. 16. (4 sc, dec)*6 (30)
  15. 17. 30 sc
  16. 18. (3 sc, dec)*6 (24)
  17. 19. 24 sc
  18. 20. (2 sc, dec)*6 (18)
  19. 21. 2 sc, 5 sc with the arm, 4 sc, 5 sc with the arm, 2 sc (18)
  20. 22. (1 sc, dec)*6 (12)

Tail

  1. 1. 6 sc in MR
  2. 2. 6 inc (12)
  3. 3. (1 sc, inc)*6 (18)
  4. 4. (1 sc, dec)*6 (12)
  5. 5. 6 dec (6)

Assembly and Design

  • Sew the head and the tail to the body
  • Sew the ears to the head
  • Embroider the white of the eyes with white thread, eyebrows, and muzzle with black thread

Enjoy your finished Bear Mishka Amigurumi!

Snow White Cat Amigurumi Free PDF Pattern

by


Crochet Snow White Cat Amigurumi Free PDF Pattern

Designer: tezukuri.love.diy

My dears, today we are going to make a magnificent cat amigurumi in snow white. Making the crochet cat is a little challenging. In particular, you need to carefully do the tightening process on the cat’s face. Although this process is difficult, a very pleasant expression emerges when it is done successfully. Cat amigurumi pattern free. Now if you’re ready, let’s get started and crochet the cute cat.

Materials

  • Crochet Hook
  • Yarn:
    • White
    • Black
    • Pink
    • Blue
  • Fiberfill
  • Safety Eyes (9mm)
  • Embroidery Needle
  • Aluminum Wire

Abbreviations

  • MR: Amigurumi Magic Ring
  • sc: Single Crochet
  • inc: Increase
  • dec: Decrease
  • tr: Triple Crochet / Treble Crochet
  • st: Stitch
  • dc: Double Crochet
  • hdc: Half Double Crochet
  • slst: Slip Stitch
  • ch: Chain
  • ..in: Make increase into the same stitch as many times as the number given (e.g., 3inc, 4inc)
  • FLO: Crochet into front loops only
  • BLO: Crochet into back loops only

Front Leg (x2)

Start with white yarn:

  1. (5) 5sc in MR
  2. (10) 5inc
  3. 3-10: (10) 10sc
  4. Stuff less firmly
  5. Cut the yarn

Back Leg (x2)

Start with white yarn:

  1. (4) 4sc in MR
  2. (8) 4inc
  3. 3-6: (8) 8sc
  4. Stuff less firmly
  5. Cut the yarn, and leave a long tail

Ears (x2)

Start with white yarn:

  1. (4) 4sc in MR
  2. (8) 4inc
  3. (12) (sc, inc)*4
  4. (16) sc, (inc, 2sc)*3, inc, sc
  5. (16) 16sc
  6. (20) (3sc, inc)*4
  7. (20) 20sc
  8. Cut the yarn, and leave a long tail

Body

Start with white yarn:

  1. (8) 8sc in MR
  2. (16) 8inc
  3. (24) (sc, inc)*8
  4. (32) sc, (inc, 2sc)*7, inc, sc
  5. (40) (3sc, inc)*8
  6. (44) (9sc, inc)*4
  7. (48) 5sc, (inc, 10sc)*3, inc, 5sc
  8. 8-10: (48) 48sc
  9. (50) 24sc, (7sc, inc)*2, 8sc
  10. (52) 28sc, (inc, 8sc), inc, 12sc
  11. (48) (dec, 2sc)*3, dec, 12sc, 5sc (with leg), 4sc, 5sc (with leg), 4sc, 5sc (with leg), 11sc
  12. (48) 48sc
  13. (40) (sc, dec)*4, (7sc, dec)*4
  14. (36) 11sc, (dec, 6sc)*3, dec, 3sc
  15. (28) 4dec, (5sc, dec)*4
  16. (28) 28sc
  17. (24) 6sc, (dec, 4sc)*3, dec, 2sc
  18. (24) 24sc
  19. Cut the yarn, and leave a long tail

Head

Start with white yarn:

  1. (5) ch5
  2. (12) sc into the 2nd st from the hook, 2sc, 4sc in the same st, flip, 2sc, 3sc into the same st
  3. (20) inc, 2sc, 4inc, 2sc, 3inc
  4. (28) sc, inc, 2sc, (sc, inc)*4, 2sc, (sc, inc)*3
  5. (36) sc, inc, 4sc, (inc, 2sc)*3, inc, 4sc, (inc, 2sc)*2, inc, sc
  6. (44) 3sc, inc, 2sc, (3sc, inc)*4, 2sc, (3sc, inc)*3
  7. (52) 2sc, inc, 6sc, (inc, 4sc)*3, inc, 6sc, (inc, 4sc)*2, inc, 2sc
  8. (60) 5sc, inc, 2sc, (5sc, inc)*4, 2sc, (5sc, inc)*3
  9. (60) 60sc
  10. (68) 3sc, inc, 8sc, (inc, 6sc)*3, inc, 8sc, (inc, 6sc)*2, inc, 3sc
  11. (68) 68sc
  12. (60) 3sc, dec, 8sc, (dec, 6sc)*3, dec, 8sc, (dec, 6sc)*2, dec, 3sc
  13. 13-16: (60) 60sc
  14. (54) 4sc, (dec, 8sc)*5, dec, 4sc
  15. (54) 54sc
  16. (48) (7sc, dec)*6
  17. (48) 48sc
  18. (42) 3sc, (dec, 6sc)*5, dec, 3sc
  19. (36) (5sc, dec)*6
  20. (30) 2sc, (dec, 4sc)*5, dec, 2sc
  21. (24) (3sc, dec)*6
  22. (18) sc, (dec, 2sc)*5, dec, sc
  23. (12) (sc, dec)*6
  24. (6) 6dec
  25. Cut the yarn

Tail

Start with white yarn:

  1. (5) 5sc in MR
  2. 2-40: (5) 5sc
  3. Cut the yarn. Leave a long tail

Assembly

  • Sew back legs
  • Place eyes between round 13 and round 14 with 9 stitches between the eyes
  • Place ears on the 4th round from the top of the head and sew
  • Use aluminum wire to support the tail
  • Sew the tail on round 3
  • Use pink yarn to embroider a muzzle, black yarn to embroider a mouth
  • The top of the muzzle should be placed between rounds 12 and 11 with 3 stitches
  • The bottom part of the muzzle should be placed between rounds 10 and 9. Only use 1 stitch
  • Use black yarn to embroider whiskers
  • Use blue yarn to make lines around the eyes
  • Use pink yarn to embroider paws (3 lines per paw)
  • Do needle sculpt the face

Enjoy your finished Snow White Cat amigurumi!

Bunny in Overalls Amigurumi PDF Crochet Free Pattern

by


Amigurumi Bunny Pattern

Dear friends, today we will crochet a very different and easy bunny amigurumi. When you examine the bunny amigurumi pattern, you will see that it can be made with basic crochet knowledge. You can try to make color transitions and parts even if there are many. The bunny may look a little big, but once you start making it, you can easily finish it. As for the color, I don’t think the right choices were made. If you choose more vibrant colors, you can make a more cute amigurumi. Now let’s crochet the bunny amigurumi step by step.

Designer: toys_give_joys

Necessary Materials

  • Yarn: Alize Cotton Gold or YarnArt Jeans (main and additional colors)
  • Hook: 1.75 mm or 2 mm (whichever is convenient for you to crochet)
  • Eyes: 8mm safe eyes or beads
  • Yarn for tightening and embroidering faces
  • Holofiber or synthetic fluff
  • Rattles (optional)
  • Two buttons: 8-9mm
  • Needle

Abbreviations

  • AR – Amigurumi Magic Ring
  • LL – Lifting Loop
  • MR – Amigurumi Magic Ring
  • App – Application
  • sc – Single Crochet
  • inc – Increase
  • dec – Decrease
  • tr – Triple Crochet / Treble Crochet
  • st – Stitch
  • dc – Double Crochet
  • hdc – Half Double Crochet
  • sl-st – Slip Stitch
  • ch – Chain
  • ..in – Make increase into the same stitch as many times as the number given (e.g., 3inc, 4inc)
  • FLO – Crochet into front loops only
  • BLO – Crochet into back loops only
  • BL – Bobble Stitch: Do 5 dc all in the same stitch, then yarn over and pull through all the loops on your hook (the original loop + 1 loop for each partially completed dc)

Head

  1. 1. 6 sc in MR
  2. 2. 6 increase (12 sc)
  3. 3. (1 sc, 1 inc) x6 (18 sc)
  4. 4. (2 sc, 1 inc) x6 (24 sc)
  5. 5. (3 sc, 1 inc) x6 (30 sc)
  6. 6. (4 sc, 1 inc) x6 (36 sc)
  7. 7. (5 sc, 1 inc) x6 (42 sc)
  8. 8. (6 sc, 1 inc) x6 (48 sc)
  9. 9. (7 sc, 1 inc) x6 (54 sc)
  10. 10. (8 sc, 1 inc) x6 (60 sc)
  11. 11-15. 60 sc (5 rows)
  12. 16. 7 sc, (3 sc, 1 inc) x4, 14 sc, (3 sc, 1 inc) x4, 7 sc (68 sc)
  13. 17. 7 sc, (4 sc, 1 inc) x4, 14 sc, (4 sc, 1 inc) x4, 7 sc (76 sc)
  14. 18-20. 76 sc (3 rows)
  15. At this stage, insert safe eyes. In the 16th row, count 6 sc from the marker to the left and 6 sc to the right. Insert, secure, and fix. Start stuffing the head gradually.
  16. 21. 7 sc, (4 sc, 1 dec) x4, 14 sc, (4 sc, 1 dec) x4, 7 sc (68 sc)
  17. 22. 7 sc, (3 sc, 1 dec) x4, 14 sc, (3 sc, 1 dec) x4, 7 sc (60 sc)
  18. 23. (8 sc, 1 dec) x6 (54 sc)
  19. 24. (7 sc, 1 dec) x6 (48 sc)
  20. 25. (6 sc, 1 dec) x6 (42 sc)
  21. 26. (5 sc, 1 dec) x6 (36 sc)
  22. 27. (4 sc, 1 dec) x6 (30 sc)
  23. 28. (3 sc, 1 dec) x6 (24 sc)
  24. 29. (2 sc, 1 dec) x6 (18 sc)
  25. 30. (1 sc, 1 dec) x6 (12 sc)
  26. 31. 6 dec, close and tighten the hole, secure and cut the yarn.

Upper Legs (Hands)

  1. 1. 6 sc in MR
  2. 2. 6 increase (12 sc)
  3. 3. (1 sc, 1 inc) x6 (18 sc)
  4. 4. (2 sc, 1 inc) x6 (24 sc)
  5. 5. (3 sc, 1 inc) x6 (30 sc)
  6. 6-8. 30 sc (3 rows)
  7. Insert the rattles.
  8. 9. (3 sc, 1 dec) x6 (24 sc)
  9. 10. 24 sc (stuff the foot while crocheting)
  10. 11. (2 sc, 1 dec) x6 (18 sc)
  11. 12. (4 sc, 1 dec) x3 (15 sc)
  12. 13-27. 15 sc (15 rows)
  13. 28. Fold the crocheting in half, crochet 7 sc together. Fasten off and cut the yarn.
  14. Crochet the second foot the same way.

Lower Foot (Leg)

  1. 1. 6 sc in MR
  2. 2. 6 increase (12 sc)
  3. 3. (1 sc, 1 inc) x6 (18 sc)
  4. 4. (2 sc, 1 inc) x6 (24 sc)
  5. 5. (3 sc, 1 inc) x6 (30 sc)
  6. 6. (4 sc, 1 inc) x6 (36 sc)
  7. 7-8. 36 sc (2 rows)
  8. Insert the rattles.
  9. 9. (4 sc, 1 dec) x6 (30 sc)
  10. 10. 30 sc
  11. 11. (3 sc, 1 dec) x6 (24 sc)
  12. 12. 24 sc
  13. 13. (2 sc, 1 dec) x6 (18 sc)
  14. 14. 18 sc
  15. Do not stuff the lower legs.
  16. 15. Fold crocheting in half, crochet 9 sc. Fasten off and cut the yarn.
  17. Crochet the second foot the same way.

Shorts (Blank for Shorts)

  1. Make a chain of 26 air loops, join them into a ring, and crochet 6 rows in an additional color. Finish with a row of connecting stitches. Secure and cut the yarn.
  2. Make the second shorts piece the same way.

Assemble the Legs in Shorts

  1. Insert the finished legs into the shorts piece, fold the piece in half so that the leg is centered, and crochet everything together with 13 sc. Fasten off and cut the yarn.
  2. Repeat for the second piece.

Body

  1. Start crocheting with the additional color (for the shorts).
  2. 1. 8 sc in MR
  3. 2. 8 increase (16 sc)
  4. 3. (1 sc, 1 inc) x8 (24 sc)
  5. 4. (2 sc, 1 inc) x8 (32 sc)
  6. 5. (3 sc, 1 inc) x8 (40 sc)
  7. 6. (4 sc, 1 inc) x8 (48 sc)
  8. 7. (5 sc, 1 inc) x8 (56 sc)
  9. 8. (6 sc, 1 inc) x8 (64 sc)
  10. 9. (7 sc, 1 inc) x8 (72 sc)
  11. 10. 72 sc
  12. 11. Crochet the legs together.
  13. 12-14. 72 sc (3 rows)
  14. 15. (7 sc, 1 dec) x8 (64 sc)
  15. 16-18. 64 sc (3 rows)
  16. 19. (6 sc, 1 dec) x8 (56 sc)
  17. 20-21. 56 sc (2 rows)
  18. 22. Change the color to the main one and crochet in BLO (56 sc)
  19. 23. (5 sc, 1 dec) x8 (48 sc)
  20. 24-31. 48 sc (8 rows)
  21. 32. (4 sc, 1 dec) x8 (40 sc)
  22. 33. Crochet the legs together (focus on the lower legs). Crochet 7 sc with a foot, 14 sc, 7 sc with a foot, 14 sc (40 sc)
  23. 34. (3 sc, 1 dec) x8 (32 sc)
  24. 35. (2 sc, 1 dec) x8 (24 sc)
  25. 36. (1 sc, 1 dec) x8 (16 sc)
  26. 37. 8 dec, pull off the hole, secure and cut the yarn.

Ears

  1. Use a 2 mm hook if crocheting without changes.
  2. 1. 4 sc in MR
  3. 2. 4 increase (8 sc)
  4. 3. (1 sc, 1 inc) x4 (12 sc)
  5. 4. (2 sc, 1 inc) x4 (16 sc)
  6. 5. (3 sc, 1 inc) x4 (20 sc)
  7. 6. (4 sc, 1 inc) x4 (24 sc)
  8. 7. (5 sc, 1 inc) x4 (28 sc)
  9. 8. (6 sc, 1 inc) x4 (32 sc)
  10. 9-13. 32 sc (5 rows)
  11. 14. (6 sc, 1 dec) x4 (28 sc)
  12. 15. 28 sc
  13. 16. (5 sc, 1 dec) x4 (24 sc)
  14. 17-20. 24 sc (4 rows)
  15. 21. (4 sc, 1 dec) x4 (20 sc)
  16. 22-24. 20 sc (3 rows)
  17. 25. Fold in half and crochet 10 sc, finish crocheting and fasten yarn.

Face Decoration

  • Sew on the ears closer together.
  • Embroider the nose 2 rows below the center of the muzzle with 3 sc stitches.
  • Secure the eyes and embroider any final face details as desired.

How to Add Straps to Shorts

  1. Divide the tummy in half, and from the center to the left, crochet 7 loops for the front loops of the 22nd row. Crochet 15 sc, 1 ch (turn crocheting), continue crocheting 15 sc, 1 ch (turn crocheting), and crochet 15 sc for 6 rows.
  2. For the back straps, divide visually in half, and crochet 7 sc, 1 ch (turn crocheting). Continue crocheting 7 sc, 1 ch, from the second loop, crochet 6 sc, 1 ch, and repeat for the other side.
  3. Finally, sew the straps with buttons to the front of the shorts.

Enjoy your finished cute bunny amigurumi!

Amigurumi Sleeping Bunny Free Pattern

by


Sleeping Bunny Amigurumi Free Pattern

Abbreviations:

  • R – row
  • ch – chain
  • st – stitch
  • sc – single crochet
  • sl st – slip stitch
  • inc – increase (2 sc in one stitch)
  • dec – decrease (2 sc together)
  • […] – number of stitches you should have at the end of the row
  • (…) – repeat whatever is between the brackets the given number of times

Head

  • R 1: 6 sc in magic ring [6]
  • R 2: (inc) repeat 6 times [12]
  • R 3: (1 sc, inc) repeat 6 times [18]
  • R 4: (2 sc, inc) repeat 6 times [24]
  • R 5: (3 sc, inc) repeat 6 times [30]
  • R 6: (4 sc, inc) repeat 6 times [36]
  • R 7: (5 sc, inc) repeat 6 times [42]
  • R 8-16: 42 sc (9 rows)
  • R 17: (5 sc, dec) repeat 6 times [36]
  • R 18: (4 sc, dec) repeat 6 times [30]
  • R 19: (3 sc, dec) repeat 6 times [24]
  • R 20: (2 sc, dec) repeat 6 times [18]
  • Sl st. Fasten off.

Legs (make 2)

  • R 1: 7 sc in magic ring [7]
  • R 2-6: 7 sc (5 rows)
  • Sl st. Fasten off.

Don’t cut the yarn when you finish the second leg. Continue crocheting the body.

Body

  • R 7: Crochet 2 ch from second leg and join it with the 1st leg with sl st, 7 sc on the 1st leg, sc in next 2 ch, 7 sc on the 2nd leg, sc in next 2 ch (opposite side) [18]
  • R 8: (2 sc, inc) repeat 6 times [24]
  • R 9-13: 24 sc (5 rows)
  • R 14: (2 sc, dec) repeat 6 times [18]
  • R 15: 18 sc
  • Sl st. Fasten off, leaving a long tail for sewing.

Arms (make 2)

  • R 1: 6 sc in magic ring [6]
  • R 2-6: 6 sc (5 rows)
  • Sl st. Fasten off, leaving a long tail for sewing.

Ears (make 2)

  • R 1: 5 sc in magic ring [5]
  • R 2: (inc) repeat 5 times [10]
  • R 3: (1 sc, inc) repeat 5 times [15]
  • R 4-6: 15 sc (3 rows)
  • R 7: (5 sc, dec) repeat 2 times, 1 sc [13]
  • R 8-9: 13 sc (2 rows)
  • R 10: (4 sc, dec) repeat 2 times, 1 sc [11]
  • R 11: 11 sc
  • Sl st. Fasten off, leaving a long tail for sewing.

Top Ad 728x90