Top Ad 728x90

Hazel The Hedgehog Crochet Free Pattern

by


Designer: Instagram: @mes.mignonneries

Hello Amigurumi Lovers…

One of the free amigurumi crochet patterns we will share today is Hazel the hedgehog, whose photos and design belong to @mes.mignonneries. You can learn how to crochet this cute hedgehog using the free amigurumi pattern below. Thanks to dear @mes.mignonneries for this adorable design!

Abbreviations

  • Rnd - round
  • MR - magic ring
  • ch - chain
  • slst - slip stitch
  • sc - single crochet
  • inc - increase
  • dec - decrease
  • BLO - Back loop only
  • (* ) - repeat till the end of round

Materials

  • Cotton ricorumi yarn: beige (054), brown (057), pink (065)
  • Crochet hook: 3mm
  • 6mm safety eyes (you may need to use smaller/larger eyes, depending on hook/yarn size)
  • Yarn needle
  • Black embroidery thread
  • Fiberfill for stuffing
  • Scissors

Size with the materials above will be about 9cm.

AMIGURUMI HEDGEHOG FREE PATTERN

Head & Body

Stuff as you go along your work.

In beige:

  • Rnd 1: MR, 6sc (6)
  • Rnd 2: (inc) x (12)
  • Rnd 3: (1sc, inc) x (18)
  • Rnd 4: (2sc, inc) x (24)
  • Rnd 5: (3sc, inc) x (30)
  • Rnd 6: (4sc, inc) x (36)
  • Rnd 7-9: 36sc (36)
  • Rnd 10: (5sc, inc) x (42)
  • Rnd 11: 42sc (42)

Insert the safety eyes between rounds 10 and 11.

  • Rnd 15: (5sc, dec) x (36)
  • Rnd 16: (4sc, dec) x (30)
  • Rnd 17: (3sc, dec) x (24)
  • Rnd 18: (2sc, dec) x (18)
  • Rnd 19: (2sc, inc) x (24)
  • Rnd 20: 24sc (24)
  • Rnd 21: (3sc, inc) x (30)
  • Rnd 22-24: 30sc (30)
  • Rnd 25: (4sc, inc) x (36)
  • Rnd 26-29: 36sc (36)
  • Rnd 30: (5sc, inc) x (42)
  • Rnd 31: 42sc (42)
  • Rnd 32: through BLO (5sc, dec) x (36)

Finish to stuff.

  • Rnd 33: (2sc, dec) x (27)
  • Rnd 34: (1sc, dec) x (18)
  • Rnd 35: (dec) x (9)
  • Rnd 36: (1sc, dec) x (6)

Fasten off and close. Embroider the eyelashes and muzzle with black embroidery thread and the cheeks with pink embroidery thread.

Arms (x2)

In beige:

  • Rnd 1: MR, 4sc (4)
  • Rnd 2: (1sc, inc) x (6)
  • Rnd 3-7: 6sc (6)
  • Sew the arms to the body.

Ears (x2)

In beige:

  • Rnd 1: MR, 4sc (4)
  • Rnd 2: (1sc, inc) x (6)
  • Sew the ears onto the head.

Hedgehog Spines

Cut many strips of brown yarn and make a lark’s head knot. Using your crochet hook, pull the strands through a stitch on the top of the head to create a loop. Pull your ends through the loop and pull tight. Cut and adjust the length of the spines as desired.

All Finished! Your adorable Hazel the Hedgehog is now complete!

AMIGURUMI SLOTH FREE PATTERN

by


Designer: Instagram: GraceAndYarn

Hello everyone…

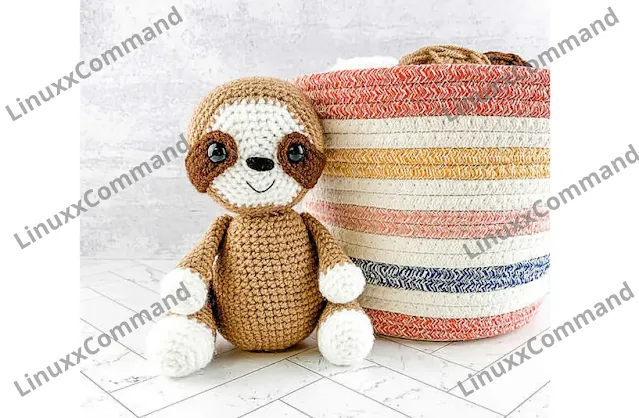
One of the free amigurumi crochet patterns we will share today is the amigurumi Sloth, whose design belongs to GraceAndYarn. You can learn how to crochet this cute sloth amigurumi pattern. Thanks to dear GraceAndYarn for this adorable design!

Below you will find some information about this pattern. Remember, if you have any questions, you can write to us and ask for help. You can also follow our Pinterest account for more free amigurumi patterns and great amigurumi ideas. Have fun crocheting!

Amigurumi cats, dolls, dogs, unicorns, lambs, dinosaurs, foxes, bears, giraffes, pigs, birds, penguins, pandas, llamas, bunnies, clowns, elephants, hippos, monkeys… All the amigurumi toy patterns and ideas you are looking for are here.

Materials

  • Size 4 worsted weight yarn (75 yards of light brown; small amount of dark brown, white, and black)
  • 3.5 mm crochet hook
  • 12mm safety eyes
  • Black crochet/embroidery thread for smile (optional)
  • Scissors
  • Tapestry needle
  • Stuffing
  • Stitch markers

Abbreviations

  • Mc - Magic circle
  • Sc - Single crochet
  • Sc Inc - Single crochet increase
  • Inv Dec - Invisible decrease
  • St(s) - Stitch(es)

Notes

Slowly stuff as you go, you want it to be firm but not stretched. You will be working in the round, and it is helpful to use a stitch marker at the beginning of each round.

Finished sloth measures approximately 7 inches tall in its sitting position.

Eye Patch (Make 2)

This piece is worked crocheting on both sides of the foundation chain to create an oval shape. Keep your chain tight to avoid holes, and work in the round.

  • With dark brown, chain 10
  • Round 1: SC in the 2nd chain from hook, SC in the next 7 chains, 3SC in the last chain; working down the other side of the foundation chain, SC in the next 7 chains, complete 2SC in the last chain (20)
  • Round 2: 2SC in the first st, SC in the next 7, 2SC in each of the next 3 sts, SC in the next 7, 2SC in each of the last 2 sts (26)
  • Fasten off, leaving a long tail for sewing. Insert your safety eye into round one, by an edge, and set aside; do not secure the backs yet.

Head

With white yarn:

  • Round 1: Create a magic circle with 6 SC
  • Round 2: SC INC in each st (12)
  • Round 3: SC in the first st, SC INC in the next, rep around (18)
  • Round 4: SC in the first 2 sts, SC INC in the next, rep around (24)
  • Round 5: SC in the first 3 sts, SC INC in the next, rep around (30)
  • Round 6: SC in the first 4 sts, SC INC in the next, rep around (36)
  • Round 7: SC in the first 5 sts, SC INC in the next, rep around (42)
  • Change to light brown
  • Round 8: SC in the first 6 sts, SC INC in the next, rep around (48)
  • Round 9: SC in the first 7 sts, SC INC in the next, rep around (54)
  • Rounds 10-16: SC around (54)
  • Note: Here is where we attach the facial features. Place the safety eyes (inside of the eye patches) between rounds 5 and 6 on each side. Angle your eye patches to your liking (down and to the side). Once happy with the angle, sew the eye patches into place and secure your safety eyes.
  • Nose – With black yarn and tapestry needle, pass through 3 rounds between your eyes. Continue to pass through to create your desired thickness.
  • Smile (optional) – With black embroidery thread (or yarn), create a smile below the nose by making a 'v'. You can add this after closing the head, but doing it earlier can make it easier.
  • Round 17: SC in the first 7 sts, INV DEC in the next, rep around (48)
  • Round 18: SC in the first 6 sts, INV DEC in the next, rep around (42)
  • Round 19: SC in the first 5 sts, INV DEC in the next, rep around (36)
  • Round 20: SC in the first 4 sts, INV DEC in the next, rep around (30)
  • Round 21: SC in the first 3 sts, INV DEC in the next, rep around (24)
  • *Continue to stuff firmly*
  • Round 22: SC in the first 2 sts, INV DEC in the next, rep around (18)
  • Round 23: SC in the first st, INV DEC in the next, rep around (12)
  • Round 24: INV DEC around (6)
  • Fasten off and sew remaining hole closed, weave in your end.

Body

With light brown yarn:

  • Round 1: Create a magic circle with 6 SC
  • Round 2: SC INC in each stitch around (12)
  • Round 3: SC in the first stitch, SC INC in the next, rep around (18)
  • Round 4: SC in the first 2 sts, SC INC in the next, rep around (24)
  • Round 5: SC in the first 3 sts, SC INC in the next, rep around (30)
  • Round 6: SC in the first 4 sts, SC INC in the next, rep around (36)
  • Round 7: SC in the first 5 sts, SC INC in the next, rep around (42)
  • Round 8: SC in the first 6 sts, SC INC in the next, rep around (48)
  • Rounds 9-15: SC around (48)
  • Round 16: SC in the first 6 sts, INV DEC in the next, rep around (42)
  • Rounds 17-18: SC around (42)
  • Round 19: SC in the first 5 sts, INV DEC in the next, rep around (36)
  • Rounds 20-21: SC around (36)
  • Round 22: SC in the first 4 sts, INV DEC in the next, rep around (30)
  • Rounds 23-24: SC around (30)
  • Round 25: SC in the first 3 sts, INV DEC in the next, rep around (24)
  • Round 26: SC in the first 2 sts, INV DEC in the next, rep around (18)
  • Fasten off leaving a long tail for sewing.

Arms (Make 2)

Stuff lightly at the bottom

  • With white yarn
  • Round 1: Create a magic circle with 6 SC
  • Round 2: SC INC in each stitch around (12)
  • Round 3: SC in the first st, SC INC in the next, rep around (18)
  • Round 4: SC around (18)
  • Round 5: SC in the first stitch, INV DEC in the next, rep around (12)
  • Change to light brown
  • Rounds 6-17: SC around (12)
  • Fasten off leaving a long tail for sewing.

Legs (Make 2)

Stuff lightly at the bottom

  • With white yarn
  • Round 1: Create a magic circle with 6 SC
  • Round 2: SC INC in each stitch around (12)
  • Round 3: SC in the first st, SC INC in the next, rep around (18)
  • Round 4: SC in the first 2 sts, SC INC in the next, rep around (24)
  • Rounds 5-6: SC around (24)
  • Round 7: SC in the first 2 sts, INV DEC in the next, rep around (18)
  • Change to light brown
  • Rounds 8-19: SC around (18)
  • Fasten off leaving a long tail for sewing.

Assembly

  • Sew the head onto the body, adding extra stuffing as you go to ensure a strong connection.
  • Sew the legs onto the body, starting at round 9 and ending at round 17 (counted from the bottom).
  • Sew the arms onto the body at a slight angle (so they rest on the legs when sitting). I sewed the arms starting at round 20 and ending at round 25 (counted from the bottom).

All Finished!

Amigurumi Totoro Free Pattern

by


Hello amigurumi lovers and beautiful visitors, I wanted to share the free amigurumi patterns for you here. In my article I will share 1 pattern and how to make it for you. At the end of my article, I will share amigurumi patterns that can generate ideas for you.

Materials and Tools

  • Yarn: gray, white, black, cream, green
  • Hook
  • Eyes for toys 5 mm
  • Filler for toys
  • White felt
  • Button
  • Dry pastel or blush
  • Needle for sewing details
  • Scissors

Conventions

  • KA – amigurumi ring
  • vp – air loop
  • ss – connecting column
  • sc – single crochet
  • ssn – double crochet
  • pssn – half-column with a crochet
  • pr – increase
  • ub – beauty
  • (...) xn – repeat n times

Head-Body

Regular font is gray yarn.
Bold font is white yarn.

We start knitting with gray yarn.

  • 8 sc in KA (8)
  • 8 inc (18)
  • (sc, inc) x 8 (24)
  • (2 sc, inc) x 8 (32)
  • sc, inc, (3 sc, inc) x 7, 2 sc (40)
  • 40 sc (40)
  • (4 sc, inc) x 8 (48)
  • 8-9: 48 sc (48)
  • (5 sc, inc) x 8 (56)
  • 56 sc (56)
  • (6 sc, inc) x 8 (64)
  • 13-14: 64 sc (64)
  • (7 sc, inc) x 8 (72)
  • 16-21: 72 sc (72)
  • (8 sc, inc) x 8 (80)
  • 80 sc (80)
  • 40 sc, 8 sc, 32 sc (80)
  • 37 sc, 14 sc, 29 sc (80)
  • 36 sbn, 16 sbn, 28 sb (80)
  • (9 sb, inc) x 3, 5 sb, 4 sb, inc, 9 sb, inc, 3 sb, 6 sb, inc, (9 sb, pr) x 2 (88)
  • 37 sc, 22 sc, 29 sc (88)
  • 36 sc, 24 sc, 28 sc (88)
  • 35 sc, 26 sc, 27 sc (88)
  • 34 sc, 28 sc, 26 sbn (88)
  • 32-33: 34 sc, 29 sc, 25 sc (88)
  • (10 sc, inc) x 3, sc, 9 sc, inc, 10 sc, inc, 9 sc, sc, inc, (10 sc, inc) x 2 (96)
  • 35-37: 37 sc, 32 sc, 27 sc (96)
  • 38-43: 37 sc, 33 sc, 26 sc (96)
  • (10 sc, dec) x 3, sc, 9 sc, dec, 10 sc, dec, 10 sc, dec, (10 sc, dec) x 2 (88)
  • 45-46: 34 sc, 31 sc, 23 sc (88)
  • 35 sc, 30 sc, 23 sc (88)

Cut out two circles from felt or foamiran, attach the circles to the eyes. Insert eyes between 16 and 17 rows. Fill with filler as we knit.

  • (9 sc, dec) x 3, 3 sc, 6 sc, (dec, 9 sc) x 2, dec, (9 sc, dec) x 2 (80)
  • 34 sc, 24 sc, 22 sc (80)
  • 36 sbn, 21 sbn, 23 sbn (80)
  • 51-53: 80 sc (80)
  • (8 sc, dec) x 8 (72)
  • (7 sc, dec) x 8 (64)
  • (6 sc, dec) x 8 (56)
  • (5 sc, dec) x 8 (48)
  • (4 sc, dec) x 8 (40)
  • (3 sc, dec) x 8 (32)
  • Knit behind the back walls of the loops: (2 sc, dec) x 8 (24)
  • (sc, dec) x 8 (16)
  • 8 dec (8)

Fasten and cut the thread. Embroider the nose and mustache with black thread. Sew a V-shaped pattern on the belly with gray thread.

Ears (2 parts)

We knit with gray yarn.

  • 4 sc in KA (4)
  • (sc, inc) x 2 (6)
  • (2 sc, inc) x 2 (8)
  • (3 sc, inc) x 2 (10)
  • (4 sc, inc) x 2 (12)
  • (5 sc, inc) x 2 (14)
  • 7-8: 14 sc (14)
  • 7 dec (7)
  • 7 sc (7)

Fasten and leave the thread for sewing. Sew to the head between 3 and 5 rows.

Hands (2 parts)

We knit in gray. We knit a chain of 7 ch, we start knitting from the second loop from the hook.

  • 5 sc, inc, knit on the other side: 5 sc (12)
  • We knit for the front walls of the loops: inc, 4 sc, 2 inc, 4 sc, inc (16)
  • 3-16: 16 sc (16)
  • We fill with filler in half. Fold in half and knit 7 sc.

Fingers

We knit in the first row hands for the front walls of the loops.

  • 4 ch, knit in the second loop from the hook: 3 sl-st, sl-st
  • 4 ch, knit in the second loop from the hook: 3 sl-st, sl-st
  • 5 ch, knit in the second loop from the hook: 4 sl-st, sl-st
  • 4 ch, knit in the second loop from the hook: 3 sl-st, sl-st

Similarly, we knit fingers on the second hand. We sew the arms to the body at the level of the 25th row.

Tail

We knit with gray yarn.

  • 6 sc in KA (6)
  • 6 inc (12)
  • (sc, inc) x 6 (18)
  • (5 sc, inc) x 3 (21)
  • 5-6: 21 sc (21)
  • (6 sc, inc) x 3 (24)
  • 8-11: 24 sc (24)

Fasten and leave the thread for sewing. Stuff the tail with filler. Sew to the body.

Hat

We knit in cream color.

  • 8 prs in KA (8)
  • 8 inc (16)
  • pss, pss inc, pss, 5 ch, skip three loops, (pss, pss inc) x 2, 5 ch, skip three loops, 2 pss, inc (24)
  • (2 sc, inc) x 8 (32)
  • (3 sc, inc) x 8 (40)
  • (4 sc, inc) x 8 (48)
  • (5 sc, inc, inc) x 8 (56)
  • (6 sc, inc) x 8 (64)
  • 9-13: 64 sc (64)
  • (3 sc, inc) x 16 (80)
  • 20 sc, 40 pss, 20 sc (80)

Embroider three lines on the hat with black thread. Sew the hat to the head.

Bag

We knit in white. We knit a chain of 13 ch, we start knitting from the second loop from the hook.

  • 11 sc, inc, knit on the other side: 11 sc (24)
  • 2-8: 24 sc (24)

Strap:

  • From the bag we knit 80 ch or 82 ch, attach the strap to the other edge of the bag. We fasten and cut the thread.

Leaflet

We knit with green yarn.

  • A chain of 9 ch, we knit in the second loop from the hook: sl-st, 2 prs, 2 prss, prs, pss, prs, inc, we knit on the other side: pss, prs, 2 prss, 2 prs, sl-st

Fasten and cut the thread. Sew the leaf to the top of the hat.

Feel free to tag me (@freeamigurumii) in your photos on Instagram or Facebook if you’d like!

All Finished.

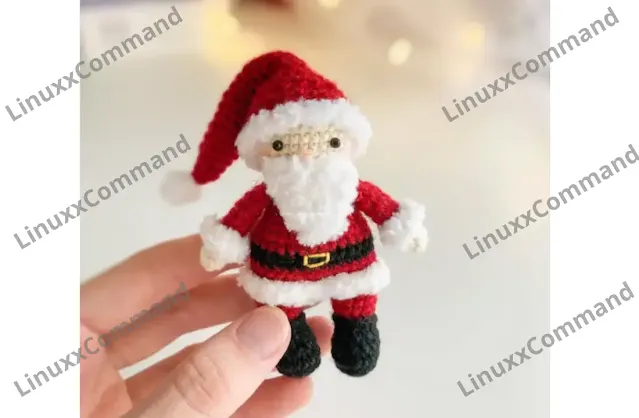
Amigurumi Santa Claus Free Pattern

by


Hello amigurumi lovers and beautiful visitors, I wanted to share the free amigurumi patterns for you here. In my article I will share 1 pattern and how to make it for you. At the end of my article, I will share amigurumi patterns that can generate ideas for you.

Materials and Tools

  • Yarn Alize Bella: beige
  • Yarn Vita Brilliant: black
  • Yarn Alize Angora Real: red
  • Yarn Alize Softy: white
  • Hook 1.5 mm
  • Eyes for toys 3 mm
  • Filler for toys
  • Glue
  • Needle for sewing details
  • Scissors

Conventions

  • KA – amigurumi ring
  • vp – air loop
  • ss – connecting column
  • sc – single crochet
  • pr – increase
  • ub – beauty
  • ZPR – rear half loop
  • (…) xn – repeat n times

Hands (2 parts)

Beige color.

  • 1: 6 sc in KA
  • 2: (1 sc, inc) x 3 (9)
  • 3-4: 9 sc (2 rows)
  • Change to red
  • 5: RFP 9 sc
  • 6-10: 9 sc (5 rows)

Do not stuff, fold the handle in half and knit 4 sc. Cut the thread, hands will be tied. Attach white fluffy yarn to the 4th row and tie 9 sc in a circle. Cut the threads and hide.

Legs (2 parts)

Black color.

  • 1: 6 sc in KA
  • 2: 6 inc (12)
  • 3: (1 sc, inc) x 6 (18)
  • 4: 18 sc
  • 5: 2 sc, 4 dec, 8 sc (14)
  • 6: 2 sc, 2 dec, 8 sbn (12)

Knit 8 more sbn (to the middle of the back) and change the color to red.

  • 7: ZPP 12 sbn
  • 8-11: 12 sbn (4 rows) – stuff

Cut the thread on the first leg, tie the second leg in the same way, after that do not cut the thread. Attach black yarn to the 6th row and tie in a circle 12 sl-st. Fasten and hide the threads. Continue knitting the body.

Torso

Dial 3 ch from the second leg and attach the chain with sc to the first leg.

  • 12: 12 sc on the first leg, inc, 1 sc, inc (increases in front), 12 sc on the second leg, 3 sc (32)
  • 12: RFP 32 sc
  • 14-15: 32 sc (2 rows)
  • Change to black
  • 16-17: 32 sc (2 rows)
  • Change to red
  • 18: 32 sc
  • 19: 2 dec on the sides (30)
  • 20: (3 sc, dec) x 6 (24)
  • 21: 24 sc
  • 22: (2 sc, dec) x 6 (18)
  • 23: In this row, knit the handles symmetrically on the sides, 18 sc
  • 24: (1 sc, dec) x 6 (12) – fill the body
  • Change to beige
  • 25: 12 sc

Next, we knit the head without cutting the thread.

Head

  • 26: 12 inc (24)
  • 27: (3 sc, inc) x 6 (30)
  • 28-33: 30 sc (6 rows)
  • 34: (3 sc, dec) x 6 (24)
  • 35: (2 sc, dec) x 6 (18)
  • 36: (1 sc, dec) x 6 (12) – fill the neck and head.
  • 37: 6 dec

Cut the thread, pull the hole with a needle, fasten and hide the thread inside the head. Attach a white fluffy spin to the 12th row of the body and tie in a circle 32 sc, at the end of the sl-st. Fasten the threads and hide inside.

Beard

White fluffy yarn. At the beginning, leave a long thread, then sew a beard with it. Knit in turning rows = at the end of the row ch 1 and turn.

  • 1: ch 7, from the second loop from the hook 6 sc
  • 2: dec, 2 sc, dec (4)
  • 3: 4 sc
  • 4: 2 dec
  • 5: 1 dec

Cut the thread, fasten and hide.

Hat

With red yarn, dial 27 ch and connect the chain in a circle with the help of ss. Knit in a circle.

  • 1-2: 27 sc (2 rows)
  • 3: (7 sc, dec) x 3 (24)
  • 4-5: 24 sc (2 rows)
  • 6: (6 sc, dec) x 3 (21)
  • 7-8: 21 sc (2 rows)
  • 9: (5 sc, dec) x 3 (18)
  • 10-11: 18 sc (2 rows)
  • 12: (4 sc, dec) x 3 (15)
  • 13-14: 15 sc (2 rows)
  • 15: (3 sc, dec) x 3 (12)
  • 16-17: 12 sc (2 rows)
  • 18: (2 sc, dec) x 3 (9)
  • 19: 9 sc
  • 20: (1 sc, dec) x 3 (6)
  • 21: 6 sc

Cut the thread, pull the loops with a needle and hide the thread. Knit a pom-pom with white fluffy yarn: 6 sc in KA, sl-st in the first loop. Leave the thread for sewing, sew the pom-pom to the hat. Then attach white fluffy yarn to the edge of the cap and tie 27 sc in a circle, at the end of the sl-st, fasten and hide the thread.

Santa’s hat is ready.

Assembling the Toy

  • Glue the eyes between the 5th and 6th rows of the head (counting from the beginning of knitting the head), between the eyes 6 sc.
  • Embroider a nose with beige yarn between 4 and 5 rows, width 2 sc.
  • Sew a beard under the nose.
  • Put a hat on your head and sew it to your head.
  • With a thin yellow thread, embroider a buckle on a black belt, width 2 sc, height 1 sc.

Feel free to tag me (@freeamigurumii) in your photos on Instagram or Facebook if you’d like!

All Finished.

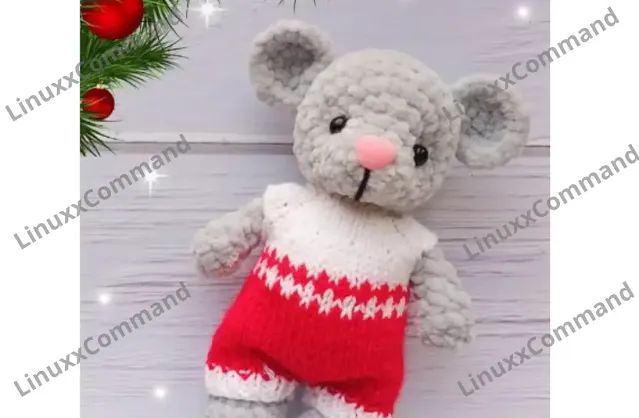
Amigurumi Baby Mouse Free Pattern

by


Hello amigurumi lovers and beautiful visitors, I wanted to share the free amigurumi patterns for you here. In my article I will share 1 pattern and how to make it for you. At the end of my article, I will share amigurumi patterns that can generate ideas for you.

Materials and Tools

  • Plush yarn (for mouse)
  • Semi-cotton yarn (for clothes)
  • Hook 4.0-4.5 mm
  • Strokes
  • Eyes for toys
  • Spout for toys
  • Filler for toys
  • Needle for sewing details
  • Scissors

Conventions

  • KA – amigurumi ring
  • sc – single crochet
  • pr – increase
  • Ub – beauty
  • (…) xn – repeat n times

For knitting overalls:

  • lp – front loop
  • purl – purl loop
  • pr – an increase in a crossed loop or yarn

Head

1r. 5 sc in KA

2p. 5 inc (10)

3p. 10 sc

4r. 2 sc, 6 inc, 2 sc (16)

5p. 2 sc, (1 sc, inc) x 6r, 2 sc (22)

6r. 2 sc, (2 sc, inc) x 6r, 2 sc (28)

7-11r. 28 sc (5r)

12r. (5 sc, dec) x 4r (24)

13r. (2 sc, dec) x 6r (18)

14r. (sc, dec) x 6r (12)

15r. 6 ub, pull off the hole.

Handles (2 parts)

1r. 6 sc

2p. (1 sc, inc) x 3r (9)

3r. 9 sc

4r. (1 sc, dec) x 3r (6)

5-8r. 6 sb. 4 rows

Fold in half, knit 3 sc.

Legs (2 parts)

1r. 6 sc in KA

2p. 6 inc (12)

3p. 3 sc, inc x 3r (15)

4r. 15 sc 5r

5p. 4 sc, 4 dec, 3 sc (11)

6p. 3 sc, 3 dec, 2 sc (8)

7-9r. 8 sc (3 rows)

Fold in half, knit together 4 sc.

Body

1r. 6 sc

2p. 6 inc (12)

3p. (1 inc, 1 sc) x 6r (18)

4r. (2 sc, inc) x 6r (24)

5-8r. 24 sc (4r)

In the 6th row we knit legs

9r. (2 sc, dec) x 6r (18)

10r. 18 sbn

In the 10th row we knit handles.

11r. (1 sc, dec) x 6r (12)

12r. 12 sc

Fasten the thread and cut.

Ears (2 parts)

1st. 6 sc

2nd. 6 inc (12)

3rd. (1 pr, 1 sc) x 6p (18)

4p. (2 sc, pr) x 6p (24)

Tail

Knіt a chаіn of 15 ch, knit 15 connecting posts.

We start knitting with white thread.

Dial 24p.

1r. 4lp, inc, 1lp, inc, 3lp, inc, 1lp, inc, 6lp, inc, 1lp, inc, 3lp, inc, 1lp, inc, 4lp

2p. purl loops

3p. 5lp, inc, 1lp, inc, 5lp, inc, 1lp, inc, 8lp, inc, 1lp, inc, 5lp, inc, 1lp, inc, 1lp, 2 together, yarn over, 2lp

4r. purl loops

5p. 6lp, inc, 1lp, inc, 7lp, inc, 1lp, inc, 10lp, inc, 1lp, inc, 7flp, inc, 1lp, inc, 6lp

6r. purl loops

7r. 7lp, inc, 1lp, inc, 9lp, inc, 1lp, inc, 12lp, inc, 1lp, inc, 9flp, inc, 1lp, inc, 7lp

8p. purl loops

9r. 3lp, inc, 3lp, inc, 3lp, bind off 11 sts, (3lp, inc) x 4 times, 4lp, cast off 11 sts, 3lp, inc, 3lp, inc, 3lp

10r. 11 out, 5 p. Dial, 20 out, 5 p. dial, 11 out

11-12 rows. by pic

Next, we will knit the pattern

13r. white st, red st, alternate to the end of the row

14r. purl loops with red thread

15r. repeat row 13 (at the end of the row, make a hole under the button (1lp, 2 together, nakid, 2lp))

16r. purl loops with white thread

17r. repeat 13 row

18-34 rows. according to the pattern with red thread

Divide the fabric in half into two legs, and finish each part separately (with white thread) with an elastic band 1×1 for four rows.

Assembling the Toy

  • Make a muzzle (my eyes are located in the fifth row)
  • Make a tightening
  • Sew on the head, ears, and tail

Feel free to tag me (@freeamigurumii) in your photos on Instagram or Facebook if you’d like!

All Finished.

AMIGURUMI CATERPILLAR FREE PATTERN

by


Hello everyone…

One of the free amigurumi crochet patterns we will share today is the amigurumi caterpillar. You can learn how to crochet these caterpillars using the free amigurumi pattern. Thanks to the creator for this cute pattern.

Below you will find some information about this pattern. Remember, if you have any problems, you can write to us and ask for help. You can follow our Pinterest account for free amigurumi patterns and great amigurumi ideas. Have fun…

Amigurumi cats, amigurumi dolls, amigurumi dogs, amigurumi unicorns, amigurumi lambs, amigurumi dinosaurs, amigurumi foxes, amigurumi bears, amigurumi giraffes, amigurumi pigs, amigurumi birds, amigurumi penguins, amigurumi panda, amigurumi llama, amigurumi bunny, amigurumi clowns, amigurumi elephants, amigurumi hippos, amigurumi monkeys… All the amigurumi toys pattern recipes and ideas you are looking for are here…

Materials

  • Yarn Himalaya Dolphin Baby (7 different colors)
  • Filler (holofiber)
  • Hook No: 4
  • Eyes 16mm
  • Spout 15mm
  • Stitching needle
  • Threads in the color of the yarn for sewing details
  • Red threads for embroidering the mouth
  • Scissors
  • Marker to designate a new row
  • Bow for decoration
  • Eyelashes (optional)

Abbreviations

  • MR – Magic ring
  • Ch – Chain
  • Sc – Single crochet
  • Inc – Increase
  • Dec – Decrease
  • Slst – Slip stitch

CROCHET PLUSH CATERPILLAR AMIGURUMI FREE PATTERN

Head

  1. Rnd 1: 6 sc in MR (6)
  2. Rnd 2: (inc)*6 (12)
  3. Rnd 3: (1 sc, inc)*6 (18)
  4. Rnd 4: (2 sc, inc)*6 (24)
  5. Rnd 5: (3 sc, inc)*6 (30)
  6. Rnd 6: (4 sc, inc)*6 (36)
  7. Rnd 7: (5 sc, inc)*6 (42)
  8. Rnd 8-11: 42 sc (42)
  9. Rnd 12: (5 sc, dec)*6 (36)
  10. Rnd 13: (4 sc, dec)*6 (30)
  11. Rnd 14: (3 sc, dec)*6 (24)
  12. At this stage, you can install eyes and nose.

  13. Rnd 15: (2 sc, dec)*6 (18)
  14. Rnd 16: (1 sc, dec)*6 (12)
  15. Rnd 17: 6 dec (6)
  16. Pull hole, thread hide.

Horns (2 pcs)

  1. Rnd 1: 6 sc in MR (6)
  2. Rnd 2: 6 inc (12)
  3. Rnd 3: (3 sc, inc)*3 (15)
  4. Rnd 4: (3 sc, dec)*6 (12)
  5. Rnd 5: 6 dec (6)
  6. At the end of the row, change the color of the thread.

  7. Rnd 6-12: We knit without change 6 sc (6), sl st, cut the thread.

Body

The body is crocheted in one piece. We start crocheting the first ball.

  1. Rnd 1: 6 sc in MR (6)
  2. Rnd 2: 6 inc (12)
  3. Rnd 3: (1 sc, inc)*6 (18)
  4. Rnd 4: (2 sc, inc)*6 (24)
  5. Rnd 5-6: 24 sc (24)
  6. Rnd 7: (2 sc, dec)*6 (18)
  7. Rnd 8: (1 sc, dec)*6 (12)
  8. Rnd 9: 6 dec (6)
  9. At the end of the row, change thread color and start crocheting the second ball.

  1. Rnd 10: 6 inc (12)
  2. Rnd 11: (1 sc, inc)*6 (18)
  3. Rnd 12: (2 sc, inc)*6 (24)
  4. Rnd 13: (3 sc, inc)*6 (30)
  5. Rnd 14-16: 30 sc (30)
  6. Rnd 17: (3 sc, dec)*6 (24)
  7. Rnd 18: (2 sc, dec)*6 (18)
  8. Rnd 19: (1 sc, dec)*6 (12)
  9. At the end of the row, change the color of the thread.

    We begin to crochet the third ball.

  1. Rnd 20: (1 sc, inc)*6 (18)
  2. Rnd 21: (2 sc, inc)*6 (24)
  3. Rnd 22: (3 sc, inc)*6 (30)
  4. Rnd 23: (4 sc, inc)*6 (36)
  5. Rnd 24-27: 36 sc (36)
  6. Rnd 28: (4 sc, dec)*6 (30)
  7. Rnd 29: (3 sc, dec)*6 (24)
  8. Rnd 30: (2 sc, dec)*6 (18)
  9. Rnd 31: (1 sc, dec)*6 (12)
  10. At the end of the row, change the color of the thread.

    We begin to crochet the fourth ball.

  1. Rnd 32: (1 sc, inc)*6 (18)
  2. Rnd 33: (2 sc, inc)*6 (24)
  3. Rnd 34: (3 sc, inc)*6 (30)
  4. Rnd 35: (4 sc, inc)*6 (36)
  5. Rnd 36: (5 sc, inc)*6 (42)
  6. Rnd 37-40: 42 sc (42)
  7. Rnd 41: (5 sc, dec)*6 (36)
  8. Rnd 42: (4 sc, dec)*6 (30)
  9. Rnd 43: (3 sc, dec)*6 (24)
  10. Rnd 44: (2 sc, dec)*6 (18)
  11. Change color at the end of the row.

    We begin to crochet the fifth ball.

  1. Rnd 45: (2 sc, inc)*6 (24)
  2. Rnd 46: (3 sc, inc)*6 (30)
  3. Rnd 47: (4 sc, inc)*6 (36)
  4. Rnd 48: (5 sc, inc)*6 (42)
  5. Rnd 49-52: 42 sc (42)
  6. Rnd 53: (5 sc, dec)*6 (36)
  7. Rnd 54: (4 sc, dec)*6 (30)
  8. Rnd 55: (3 sc, dec)*6 (24)
  9. Rnd 56: (2 sc, dec)*6 (18)
  10. Rnd 57: (1 sc, dec)*6 (12)
  11. Rnd 58: 6 dec (6)
  12. Pull the hole, cut the thread, and hide it.

Paws

Don’t forget to change the color. Paws must be in the color of the ball.

Paws for the first (smallest) ball:

  1. Rnd 1: 6 sc in MR (6)
  2. Rnd 2-3: 6 sc (6), sl st.
  3. Cut the thread.

Paws for the second and third ball:

  1. Rnd 1: 6 sc in MR (6)
  2. Rnd 2: (2 sc, inc)*2 (8), sl st.
  3. Rnd 3: 8 sc, sl st, cut the thread.

Paws for the fourth and fifth ball:

  1. Rnd 1: 5 sc in MR (5)
  2. Rnd 2: 5 inc (10)
  3. Rnd 3: 10 sc (10)
  4. Rnd 4: (3 sc, dec)*2 (8), sl st.
  5. Cut the thread.

Assembly

Sew the head to the body. We sew horns, paws, and bow. Embroider eyebrows and mouth.

Congratulations, your caterpillar is ready!

Top Ad 728x90